Are you too experiencing Start Menu Search Issues in Windows 10 on your PC? Several users are complaining that the taskbar doesn’t show search box which is eventually confusing them. This problem usually occurs after upgrading the OS to Windows 10 April Update 2018 update. However, today, we will discuss certain workarounds that will get back Cortana search to function normally. The problems may be the Search not working, you cannot, type query in box, missing, and others.
Start Menu Search plays a vital role in Windows allowing you to find any file or folder that exist in the system. By using various tools like running troubleshooter, Disable antivirus program, change in Cortana settings and File Explorer will help you to bypass this issue. So, go through them and resolve Cortana related bugs in Windows 10.
Start Menu Search Issues in Windows 10 Solutions
Here is how to fix Start Menu Search Issues in Windows 10
Restart your computer
Sometimes several errors get corrected automatically by just rebooting the computer. Therefore before proceeding to any troubleshoot; just restart Windows 10 PC for once. This workaround alone may be enough to get rid of Start Menu Search Issues in Windows 10.
Run Windows Troubleshooter
Windows Troubleshooter is the easiest solution which is programmed to find out errors related to the OS. It is designed in such a way that when commanded, it looks for various causes behind any problem and automatically rebuilds the path so that the issue is resolved easily. Furthermore, it helps in looking out for the correct installation of Start Menu and Cortana on your PC.
Step-1: Open Windows Settings app by pressing Win + I hotkeys.
Step-2: Here, make a click on Update & security to open it. Go to the Troubleshoot section on the left sidebar of the following page.
Step-3: On the corresponding right side, locate and select Search and Indexing.
Step-4: It will expand and display a button Run the troubleshooter, click on it.
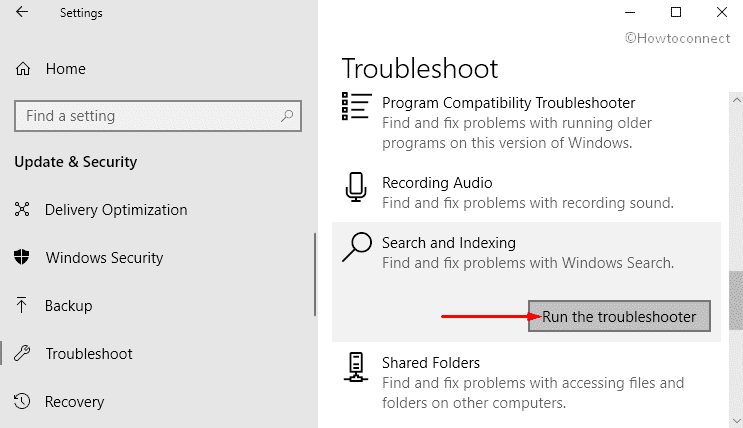
Step-5: It will show a list of checkbox with the options to choose what you doubt to be the cause of this error. The troubleshooter will try to automatically bypass if any issue is found. For example, choose Files don’t appear in search results.
Step-6: After selecting any checkbox, hit Next.
If the problem persists on the computer even after processing the above-mentioned steps, give an attempt to Troubleshoot Start Menu.
Disable Third-Party Antivirus, Enable Windows Firewall
Third –party software could also be the culprit behind Start Menu Search Issues in Windows 10. If that’s the case, you should remove third-party antivirus software like Avast, Kaspersky etc. from your system completely. Sometime Avast might be occurring this issue in the computer so first uninstall it and find its alternative like “Windows Defender Security Center” (built-in protection app).
Although disabling faulty app and enabling Windows Firewall may bypass Start Menu Search Issues in Windows 10 PC. On the other hand, enabling firewall doesn’t take much time to finish and help you in finding the exact reason behind these types of bugs. It is simply a Search and Index option which is very sensitive to your security settings. Hence, tinkering around with them by enabling and disabling things may yield proper results.
See our article to Properly Uninstall Avast in Windows 10.
Restart Windows Explorer
Windows Explorer is one of the vital programs which are responsible for managing all your files and folders on your PC and help in smooth functioning of ‘Start Menu’. The restart of Windows Explorer is a slightly easier solution than randomly looking for different methods which might curb Start Menu Search Issues in Windows 10.
Hence, read out the below-mentioned steps and find out how to restart “Windows Explorer” in your computer using Task Manager.
At first, press “Ctrl+Shift+Esc” using the keyboard to jump into Task Manager.
Under the ‘Processes‘ tab, you will notice many sub-sections. Scroll down the cursor and make a right click on Windows Explorer.
Hit the Restart option on the context menu.
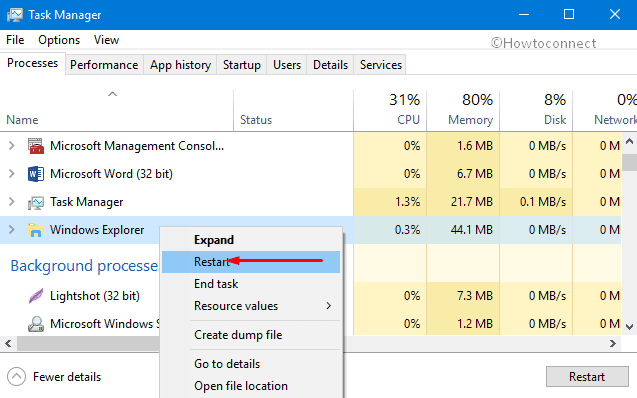
Wait for few seconds and then initiate your search. It might be solved, if not, continue reading further.
Check Windows Search Service
Another attempt is to Check Windows Search Service of your computer. Windows Search Service works as a system service, which automatically runs on the PC’s Start Menu.
Press “Win+R” hotkeys to open Run dialog box. Here type services.msc in the void box and then hit Enter on your keyboard.
Now scroll down the cursor to locate “Function Discovery Resource Publication” service. Once you see it, put the right click on it and then select Properties.
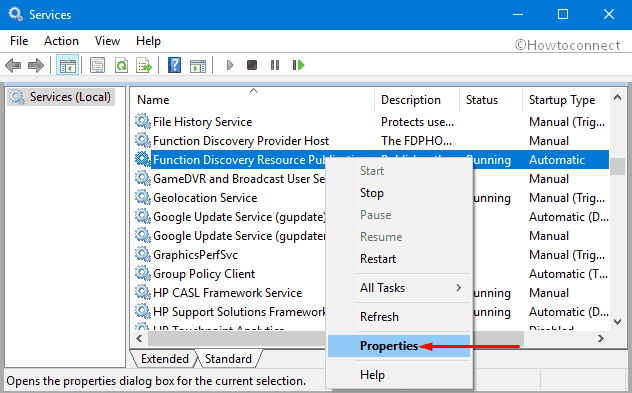
Here in the General tab, make sure that “Startup type” is set to Automatic or Automatic (Delayed Start) depending upon your preference.
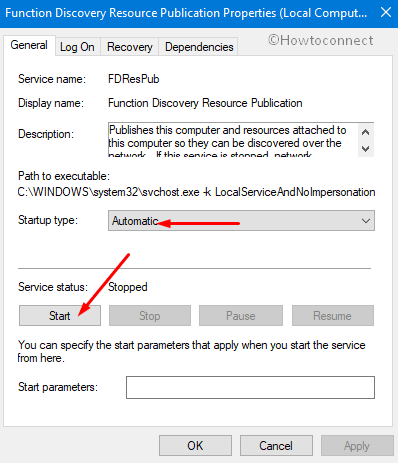
After this go to Service status. Here make a click on Start button and then on OK.
Lastly, do the right click on Windows Search option and hit “Restart“.
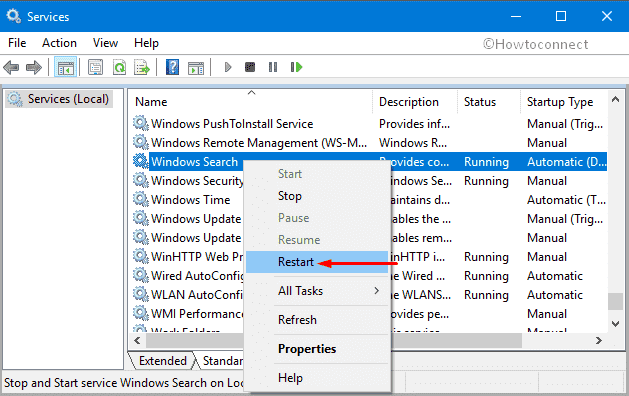
Once the service is started, Start Menu Search Issues in Windows 10 would be resolved.
Change the size of your paging file
According to comments by different users on Windows forum, Start Menu Search Issues in Windows 10 involves an increase in the “paging file size”. Therefore, we recommend you to adjust the paging file size of the search box in the taskbar.
First of all, conduct a right-click on Start Menu and select the Run option.
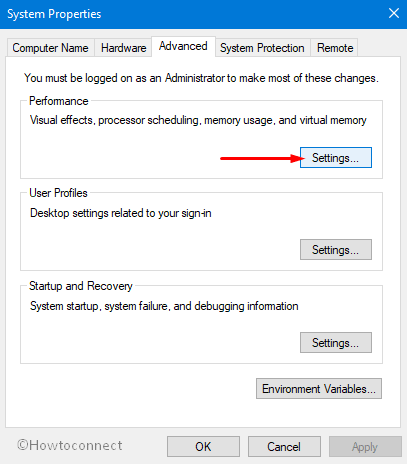
In the void box, type sysdm.cpl and press OK to open System Properties dialog box.
Go to the Advanced tab, make a click on Settings under Performance sub-menu.
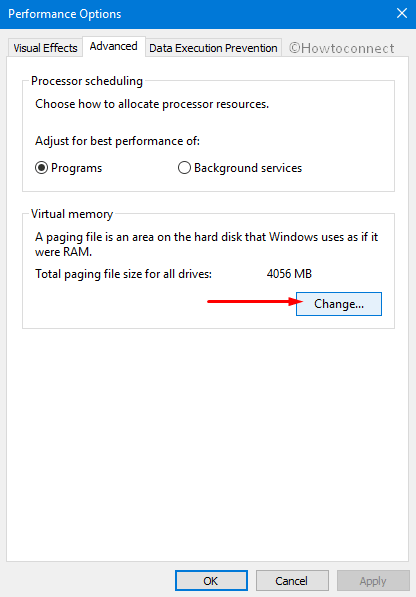
Again do the click on the Advanced tab. Here, below the Virtual memory section, hit Change button (see snapshot).
Uncheck the option namely “Automatically manage paging file size for all drives“.
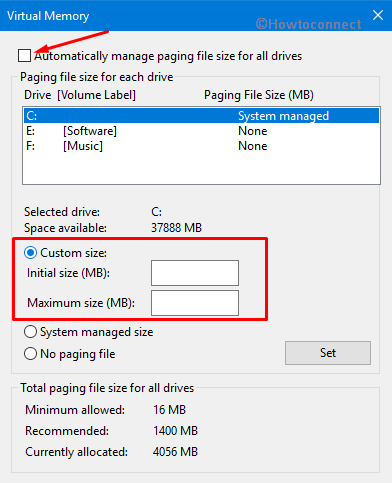
The Custom size option will be active now to set the paging size.
The page size depends upon the size of your hard drive. At first, try to set the initial size of 16MB and a maximum size of at least 2000 MB. If it starts creating problems in your PC’s performance, reset the paging by following the above process.
See Windows 10 – How to Customize Paging File Size for Disk Drives.
Restart Cortana Process
The distracting bugs such as Start Menu Search Issues in Windows 10 might be due to misbehaviors of Cortana itself. It is observed that restarting Cortana alone fix the Start Menu Search Issues in Windows 10. You can restart Cortana by following the steps mentioned below:
Press Win + X hotkeys from the keyboard and then select “Task Manager”.
Under the Processes tab, locate Cortana and click on it (scroll down the cursor to find Cortana).
At last, go to the right corner and hit “End task” button.
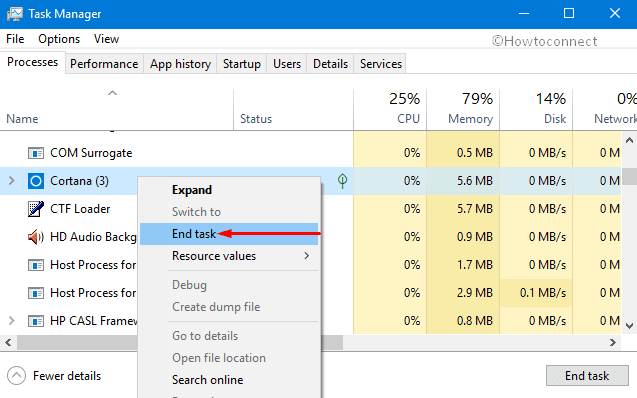
This process will restart Cortana and might bypass the Start Menu Search Issues in Windows 10 PC. If not, follow the next tool.
Re-register Cortana
If the above restart process is not successful in settling the trouble, then you can give an attempt to another tool like “Re-register Cortana”.
Go to the Taskbar and click on File Explorer icon.
Now, navigate to the below-mentioned path –
C:\Windows\System32\WindowsPowerShellv1.0
Here right click on “Powershell.exe”, then select “Run as administrator” option.
In the PowerShell window, copy/paste the given command line and hit Enter to execute it.
Get-AppXPackage -AllUsers | Foreach {Add-AppxPackage -DisableDevelopmentMode -Register "$($_.InstallLocation)AppXManifest.xml"}
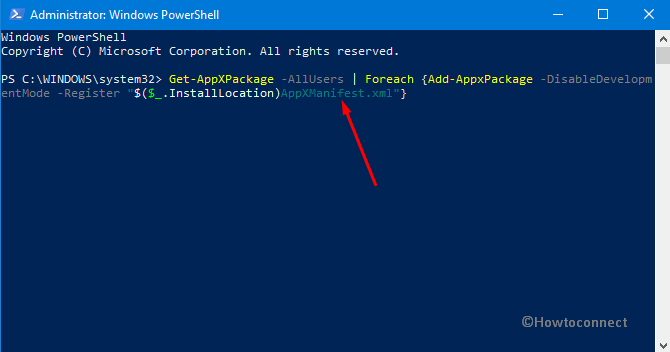
After executing the above command, close PowerShell and reboot the PC. We hope it will restore Start Menu Search in the taskbar.
Hope this article helps you in solving your PC’s Start Menu Search Issues in Windows 10.
