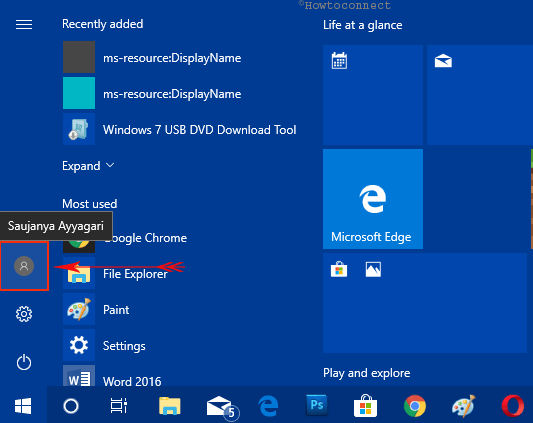
When you add a new account to Windows 11 and 10, you notice its user avatar displays a gray background with a white curved outline. This profile image continues to remain same till the user chooses to change it or until their Microsoft account picture syncs. But if you hold admin authority on your PC, you can effortlessly Set Default Account Picture to All Users in Windows 11 or 10.
Upon standardizing this pic, the other users on your computer will be unable to change their profile photo. The OS provides you with two methods to carry out this task – Registry Editor and Group Policy Editor. So, let’s head into the sequence of steps now.
Table of Contents
Set Default Account Picture to All Users in Windows 11 or 10
User picture is always visible on the startup screen and in the Start Menu in a tiny round-shaped thumbnail. If the user has a Microsoft account, the same picture is uploaded to all the Microsoft servers like Office 365, Onedrive and others. The operating system synchronizes this user photo automatically all over devices that use the same account. So, let us head towards the procedures and see how to use one image as default profile picture for all users.

Method-1: Through Registry Editor
Step-1: Click Search and type regedit. Press the Enter key and it guides you directly to the Registry Editor.
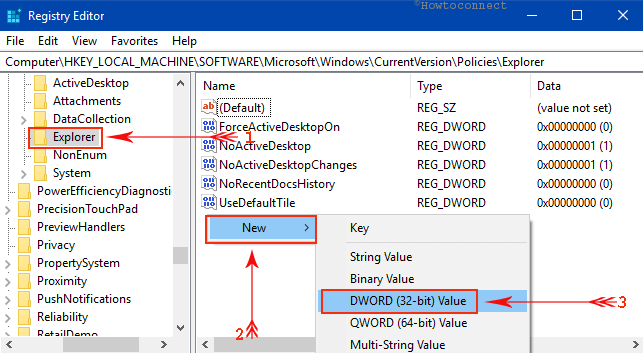
Step-2: In the Registry Editor, browse to the following path from the left pane:
HKEY_LOCAL_MACHINE\SOFTWARE\Microsoft\Windows\CurrentVersion\Policies\Explorer
Step-3: Quickly jump up to the right side and right-click on an empty area. Hover the mouse over New and click DWORD (32-bit) Value as indicated in the given image.

Note – In the case of running 64-bit Windows, creating for 32-bit DWORD serves the same.
Learn How to Create a New DWORD Value in Registry Editor on Windows 10.
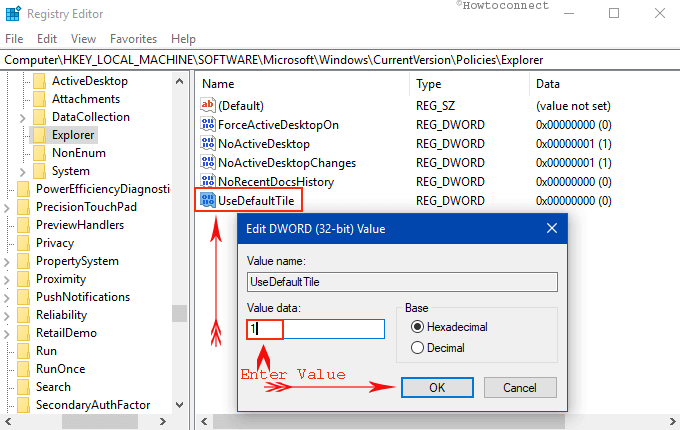
Step-4: Name this DWORD as UseDefaultTile and double-click on it.
Step-5: In the Value data section, type 1 and click OK to Set Default Account Picture to All Users in Windows 11 or 10. Lastly, restart the PC and you can notice the changes being effective.

Note – To revert back the changes, set the value as 0 and then you can change the account picture as per preference.
You have an alternative technique that can pretty easily Set Default Account Picture to All Users in Windows 11 or 10. Using the Group Policy Editor and enabling a specific policy will do the same. Hence, let’s have a look at the next method.
Method-2: Using Group Policy Editor
Step-1: Press Windows logo, type in gpedit, and when you notice Edit group policy at the top, press Enter.
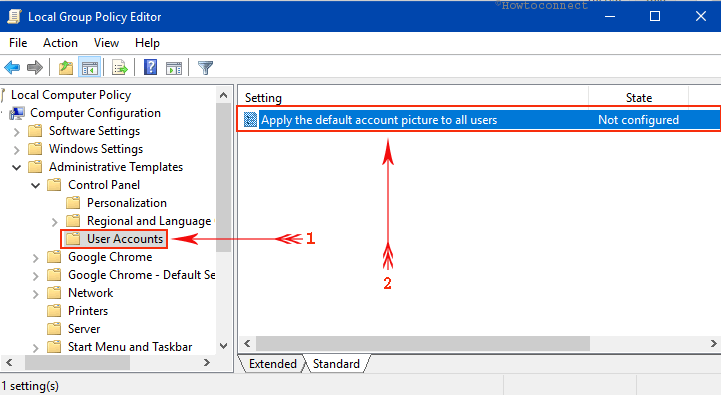
Step-2: Now in this window, navigate to the given-below path from the left pane:
Computer Configuration\Administrative Templates\Control Panel\User Accounts
Step-3: On the adjacent right side, double-click the policy namely Apply the default account picture to all users.

Step-4: In the window that opens up, choose Enabled on the top left portion. Click Apply and Ok buttons to make the group policy modifications effective.
Note – In future, to let users modify their account picture, choose the Not Configured option.
For reference, you may like to read our guide Windows 10 – How to Remove Account Picture.
Therefore, these two ways are equally effective in order to Set default Account Picture to All Users in Windows 11 or 10.
The default account image (gray background and white outline) is used as the user profile picture when you add a new account in Windows 11 or 10. Microsoft authority synchronizes this same photo all with the related accounts and attributes. Using two different procedures you can manage to Set default Account Picture to All Users in Windows 11 or 10 pretty effortlessly. It will also restrict users from changing the picture later on. We have discussed the easiest way to do the same on Windows 10 operating system.