Here you will find How to Check Laptop Specs in Windows 10 using few ways, for example, Settings application, System information, DirectX Diagnostic, Classic control panel, Command prompt and PowerShell.
At times, it becomes necessary for you to check laptop specs in Windows 10 when it comes installing a new game or software. The system should always be capable of playing or running such programs that you prefer to install. Moreover, knowing the details about your laptop configuration is necessary when you need to troubleshoot the problematic elements. So it is always an advantage to be fully aware of the computer’s hardware. There are various interesting methods that can provide you all the technical specifications of the laptop. Recently, we covered a tutorial on How to Check Ram Type in Windows 10 like DDR, DDR2.
Table of Contents
How to Check Laptop Specs in Windows 10
On Windows 10 you can view your computer’s hardware specifications which include BIOS description, processor, the model of the laptop, graphics, hard drive, operating system, moreover, amount of memory and so on.
How to Check Laptop Specs in Windows 10 Through Settings App
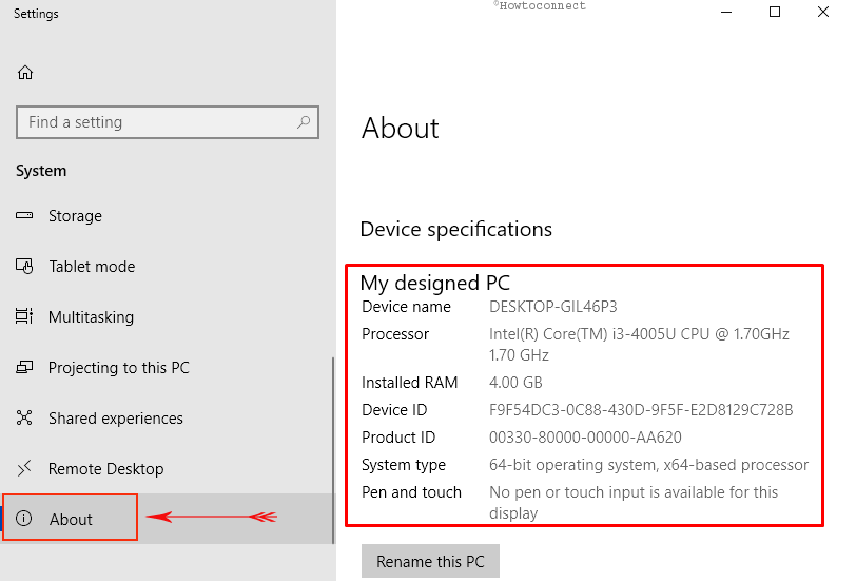
Step 1 – Hit the hotkeys Win and I all together with an intention to launch the built-in Settings program. Moreover, you can also access the application from the Start menu.
Step 2 – Upon the appearance of its home page, click System, the first category.
Step 3 – Scroll the left column of the following page and select About. Switch to its corresponding right side and you can Check Laptop Specs in Windows 10 (see snapshot).
How to Find Hardware Specifications Via System Information
In Windows 10, System Information is an old age program or utility that lets you check laptop specs. It is considered one of the best method because it gives you a comprehensive view of specifications of your system.
1. First of all, go to the Cortana search box and type msinfo32 and then hit the Enter key.
2. A separate window of System Information will immediately show up on the screen. Wait for a moment and you can see the System Summary.
3. The System Summary is further divided into two columns – Item and Value. The Item column displays all the areas of specifications such as model BIOS version, system name, manufacturer, processor, installed physical memory and many more such details.
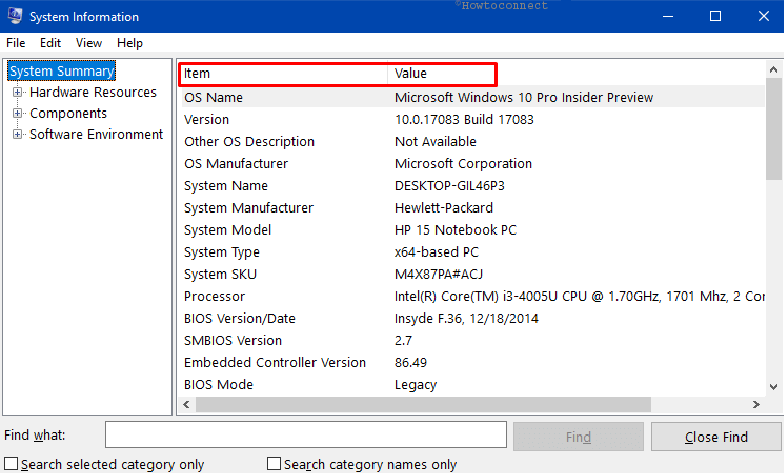
The Value column describes all these areas in details. For example, just next to the Processor it shows all the details including CPU cores and logical processor.
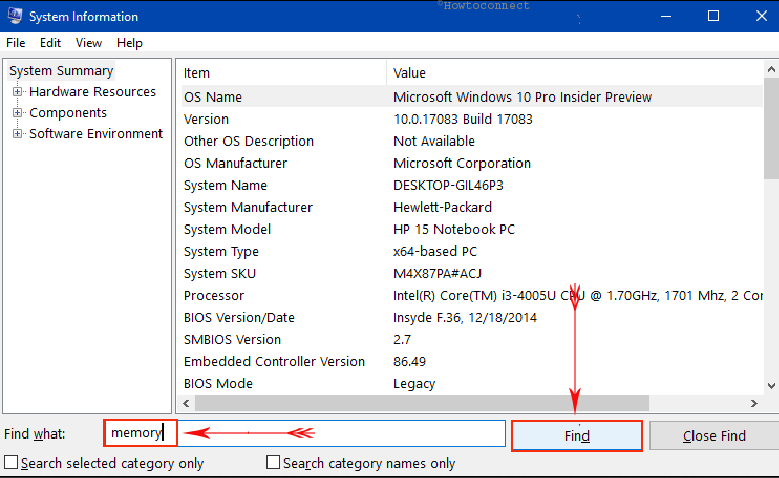
4. If you don’t want to scroll through the list you can also search the particular specification in the window. At the extreme bottom, next to the option Find what, type in the area of specification you wish to retrieve. After typing your query click the Find button and Windows will show you the information.
How to Get System Details by using DirectX Diagnostic Tool
When you need to understand how much video memory a “graphics card” does your laptop have, then, fortunately, Windows provide you this method. Furthermore, if your system contains a dedicated graphics card you may prefer to know its minute details.
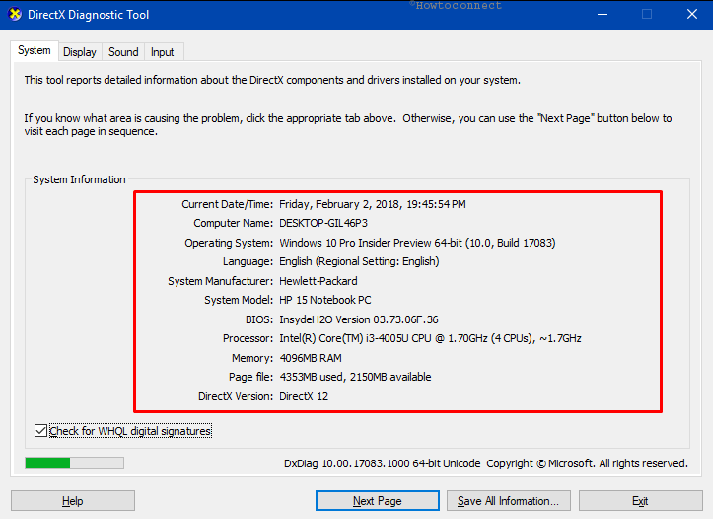
A. Type the command dxdiag on Cortana at the taskbar and press Enter when you see the same as the Best match.
B. DirectX Diagnostic tool will appear on the screen with 4 tabs. By default, the System tab is highlighted and in the System information section, all the specifications regarding the system can be seen. Moreover, it also shows you the DirectX version installed on your system.
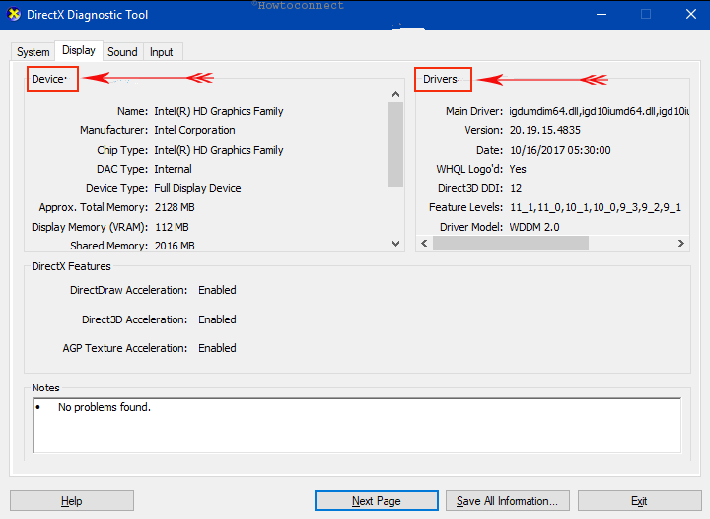
C. If you prefer to know specifically about Display driver and Sound you can switch to these tabs respectively. Go to the Display tab and you notice two sections at the top. The left one is the Device which describes the name of the graphics card, its manufacturer, chip type, display memory, shared memory, the name of the monitor and lastly whether it supports HDR or not. The second section is of Drivers which displays its version, date, model.
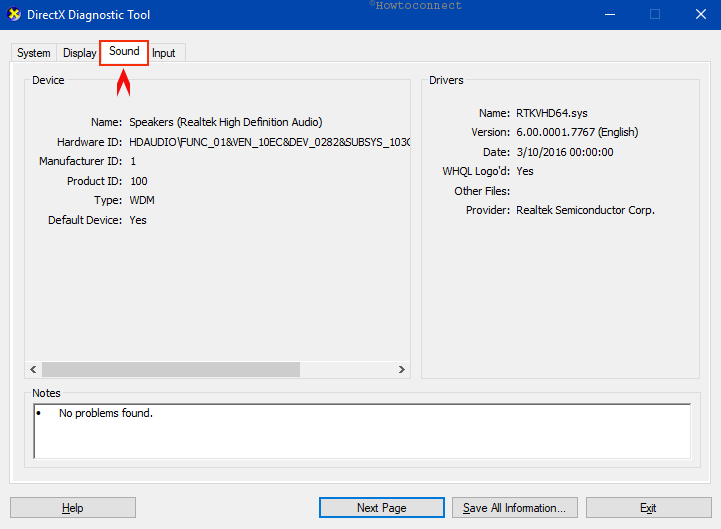
D. Switch to the Sound tab and explore all its information. Underneath Device section, you can view the name, product ID, type, etc. In the Drivers section, the name of the provider, version, date and more such details can be seen.
How to Know Laptop Configuration Details with the help of Classic Control Panel
Windows 10 is slowly shifting all the items from Control Panel to the new built-in Settings program. But you can still check laptop specs through the traditional Control Panel.
- Type cp on the search field at the taskbar and press enter in order to access the Control Panel.
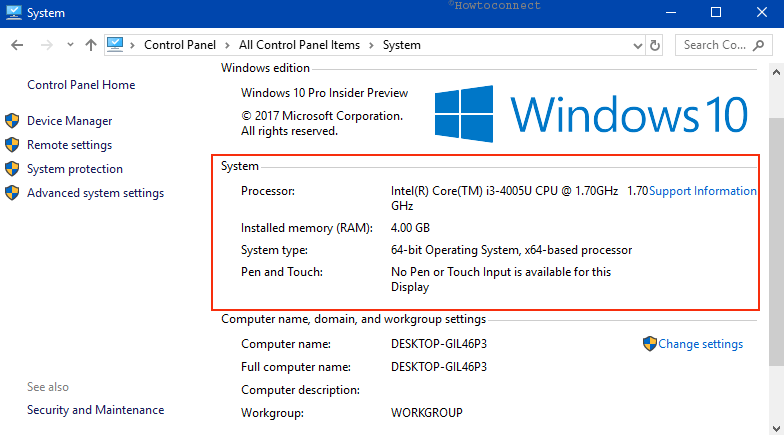
- Ensure to view all the items in small icons and locate System. Click on it and you can immediately and Check Laptop Specs in Windows 10 right away.
How to Find Individual Driver Information by accessing Device Manager
If you want to learn about the individual drivers such as Bluetooth, monitors, display adaptors and so on then you can access Device Manager in this regard. It displays all the hardware attached to your computer. When a certain piece of hardware component fails to work, you can deal with it in Device Manager pretty easily.
Furthermore, the graphics card tends to be the most significant specification you would prefer to be aware of in order to play the latest games. The information or details of it is less visible in other methods we have covered so far. Hence, using Device Manager you can quite comfortably Check Laptop Specs in Windows 10 including graphics card and to make it happen, go through the below series of steps.
i. Hit the hotkeys Win & X and unfold the power user menu. Instead right clicking the start button on the taskbar also launches the same menu. Once it appears on the screen, find out and conduct a click on Device Manager.
ii. Once it comes into view, locate and click the arrow next to the Display adapters.
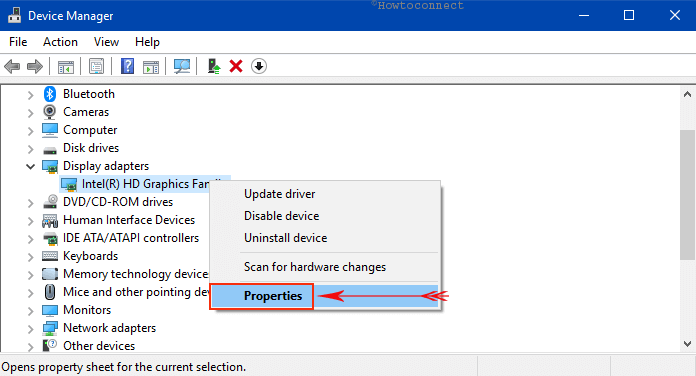
iii. Here your laptops graphics card will be listed. Execute a right click on it and select Properties as depicted in the picture below.
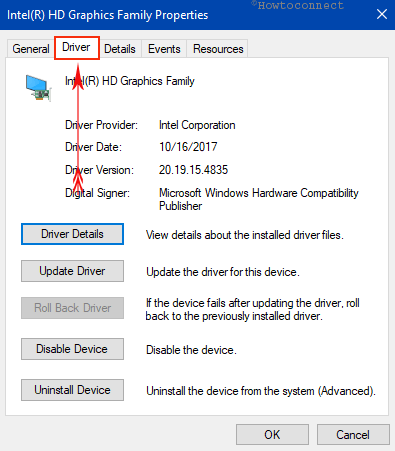
iv. Switch to the Driver tab and you can notice the provider name, driver date, version along with digital signer.
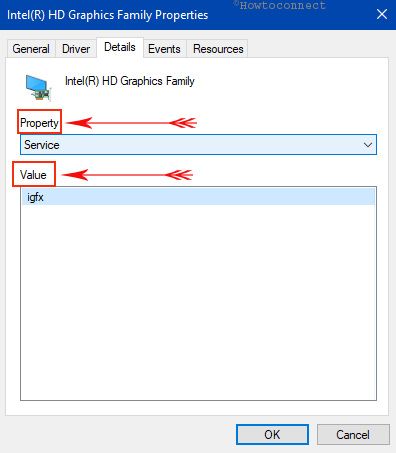
v. If you want to explore the information in depth shift to the Details tab. Click the drop-down underneath Property and choose the option whose details you prefer to learn. For example, to know about its Service choose the same and you get to see its specs in the Value section.
vi. So just go to the Properties of that specific device whose specifications you want to be aware of.
How to Get Computer Hardware Information through Administrative Command Prompt
Another interesting technique to check laptop specs in Windows 10 is with the help of an elevated command prompt. You can access a great deal of information by running a small command line tool and it will also tell you about the operating system you are using. To know the system configuration pursue the below-given sequence of steps accordingly.
I. First and foremost, type CMD in Cortana. When the Best match displays Command Prompt then execute a right click on it. Among the few options make a click on Run as administrator.
II. Upon the prompt of UAC ( user account control), hit the Yes button.
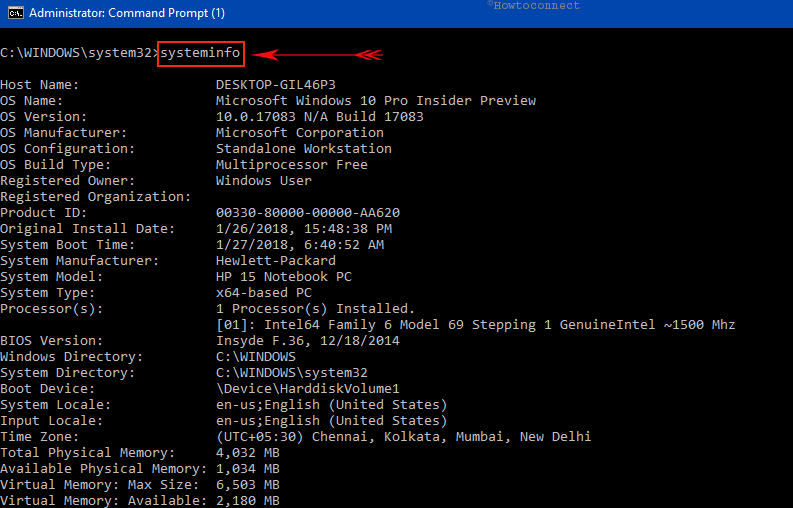
III. In the black window, type or copy paste given the line of command and press Enter to access all the specifications of the system.
Systeminfo
IV. Wait for a moment until the command line utility retrieves all the information for you. You get detailed configuration including the operating system, hardware, update, BIOS, memory, network adaptor, architecture and other important places of the specification.
How to Retrieve Computer Details from PowerShell
Thankfully, few PowerShell commands are out there that tells you about various specifications of the hardware installed on your computer. You need to run different commands for separate specs. Unlike Command Prompt, this method does not let you Check Laptop Specs in Windows 10 in one command line.
a. Conduct a right hit on the Start button at the taskbar and reach out to Windows PowerShell (admin). Upon the prompt of “User Account Control” ( in short UAC), click Yes to agree with it.
b. Now, depending on what information you wish to retrieve use that command line.
To retrieve hard disk information
To learn about the partition style, name, run get- disk and hit Enter key. Take a glimpse at the screenshot below where the name of the hard disk, its health status, is operational status, total size, as well as partition style, is visible.

Partition information
Run the command gdr -PSProvider 'FileSystem' and to execute it hit Enter. Once you do so you can see how much free space is available in each partition and how much space is used.
Memory specification
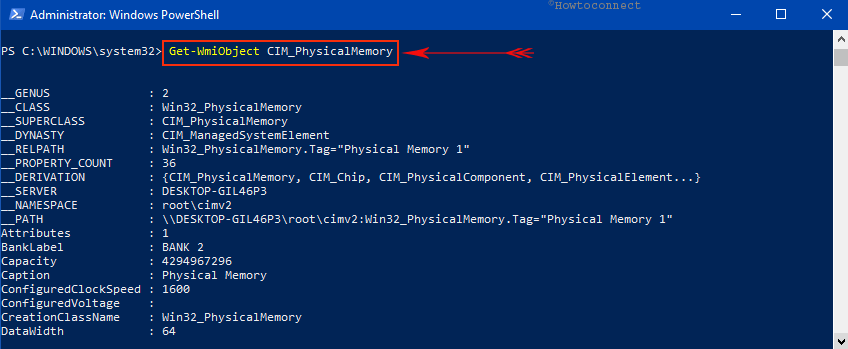
Type in or copy-paste Get-WmiObject CIM_PhysicalMemory in the blue panel. You get all the specifications such as manufacturer, its name, and more related data.
BIOS specification
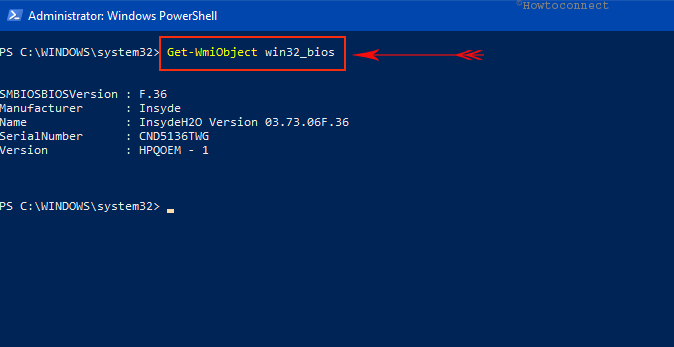
To retrieve BIOS specification use this piece of command Get-WmiObject win32_bios. It immediately shows manufacturer details, serial number, version, SMBIOS version.
Processor details
Copy paste the syntax for the sake of gathering processor details and press Enter to see the results Get-WmiObject –class Win32_processor | ft systemname,Name,DeviceID,NumberOfCores,NumberOfLogicalProcessors, Addresswidth
You can see in the screenshot below the name of the processor, the number of cores along with logical processes.

Ending Words
Most of the time you need to be familiar with these details and have the overview of the system’s specs. This is important because many programs require your system to meet certain criteria of specifications for the sake to use them perfectly and correctly. Windows 10 provides you a decent range of ways so that you can check laptop specs quite easily and comfortably. Hopefully, by this time, you must be completely aware of all the configuration. If you have more tips to Check Laptop Specs in Windows 10, do write them to us.