To manage Hardware Accelerated GPU Scheduling, your GPU should come with a driver that supports it. This new feature will eventually help in reducing latency followed by improving video output system performance. Furthermore, by using your PC’s graphic card, it will perform video and other calculations more accurately in software mode. In addition, graphic card drivers execute hardware acceleration to allow smoother, quicker playback of games and videos. Basically, when it comes to calculations, graphics cards are better in them when compared to CPU.
To enable and disable this new feature, Windows 10 provides you two methods – through Display Settings and via Registry Editor. However, before proceeding ahead ensure that your account has administrative authorities. But to make it possible, make sure that your system driver supports the feature.
Hardware Accelerated GPU Scheduling on Windows 10
Here is how to Disable/Enable Hardware Accelerated GPU Scheduling Windows 10 –
Way-1: Take help of Windows Settings app
- Press Win+I hotkey to bring forth the Settings app.
- Once the interface shows up, click on System.
- Move down on the right pane of next settings page and click the link Graphics settings.
- From the consequent page, hit Change default graphics settings link.
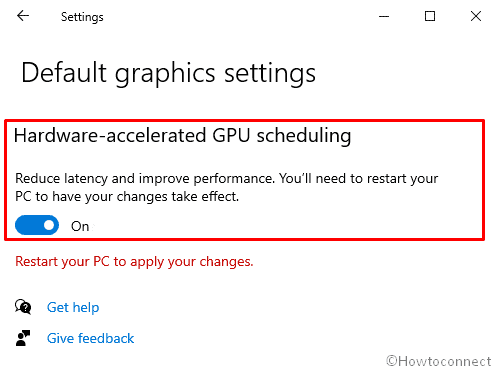
- Next, toggle ON the button of Hardware-accelerated GPU scheduling to the right if you wish to enable the feature.

- To disable Hardware Accelerated GPU Scheduling on Windows 10, simply switch the same toggle button to left.
- Lastly, Restart Windows 10 to make the changes effective.
Note – The settings we described above might be unavailable in your Windows 10 PC if the system driver doesn’t support the feature yet.
Way-2: Disable/Enable Hardware Accelerated GPU Scheduling
using Registry
- Open Run Dialog box by pressing Windows and R keys together.
- Type regedit in the command box and click OK button.
- If a UAC prompts, hit Yes to continue.
- When Registry Editor floats up, navigate the following directory –
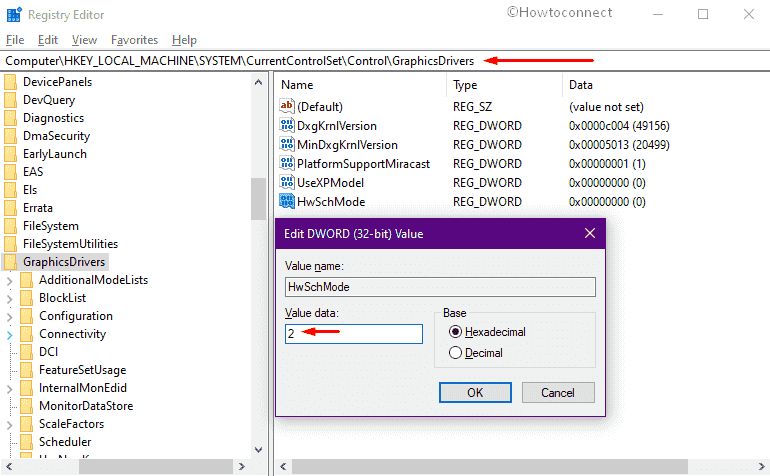
HKEY_LOCAL_MACHINE\SYSTEM\CurrentControlSet\Control\GraphicsDrivers
- Once there, shift to the right pane and double-click on the DWORD key named HwSchMode.
- Put 2 in the Value data box to enable Hardware Accelerated GPU Scheduling on Windows 10.

- In order to disable the feature, you need to insert 1 in the Value data box.
- Click the OK button for the changes to take place.
- In the end, reboot Windows 10.
Note – This change will not have any effect when your graphics card doesn’t support Hardware Accelerated feature. Even if you create HwSchMode manually and set its value accordingly, there will be no effect.
Methods:
1] Take help of Windows Settings app
2] Use Registry Editor
That’s all!!
