VAN9003 is an error code that appears when launching the Valorant game. The error code is accompanied by messages like, “This build of Vanguard requires Secure boot to be enabled to play” and “Initial attestation failed: Secure boot requirement”. All these messages indicate that the computer on which you are playing this game must have Secure Boot and TPM 2.0 enabled.
Windows 11 requires some advanced technologies such as Secure Boot and Trusted Platform Module and when these features are not enabled VAN9003 is likely to occur. This means in order to fix this issue these features must be enabled. See: How to Fix Valorant TPM 2.0 Error in Windows 11 (Bypassed!).
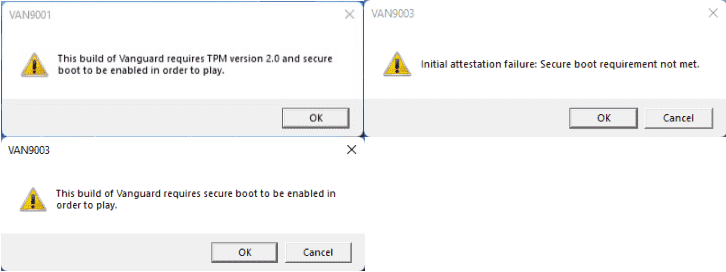
Table of Contents
VAN9003 Error in Windows 11
Check if Secure Boot is enabled
To deal with this problem in Valorant games, you need to confirm that your computer is secure boot supported. For this, follow the steps:
- Click on Start and type msinfo.
- Hit Enter to launch the System Information window.
- From the System summary category go to the right pane.
- Scroll down to reach BIOS mode and ensure that it is UEFI.
- Make sure that Secure Boot State is On.

Ensure the computer is supported with TPM 2.0
To avoid error VAN9003, TPM the device should be supported with TPM 2.0 (Trusted Platform Module 2.0). Certain devices are not compatible with this feature and if you find that this also happens with yours ask the manufacturer. First of all, check if your computer is TPM supported:
- Press Windows and R and type tpm.msc.
- On the Trusted Platform Module (TPM) Management on Local Computer window, go to Status section. Here you should see TPM is ready to use.
- In the TPM Manufacturer Information, Specification Version should be 2.0.

If both TPM and Secure Boot are enabled then you will no longer encounter VAN9003 error. In case, any of them is disabled you should manually enable it to fix the problem.
TPM and Secure boot settings underly in BIOS so they can be enabled from there. Every manufacturer uses its interface for BIOS so you will need to enable Secure Boot or TPM depending on its manufacturer.
We are providing the tips for some outlined manufacturers to follow:
Enable Secure boot
HP consumer laptops
- Shut down the PC and turn it on.
- Press Esc frequently just after powering on.
- After Startup menu screen appears, hold down f10 function key.

- This will take you to BIOS Setup.
- Using the right arrow, highlight System configuration.
- Then, use the down arrow key to highlight Boot Options.

- Hit the Enter key.
- This will show Legacy support.

- Select “Legacy support” by pressing Enter.
- Select Disabled using the arrow and Enter keys.
- Then go to Secure Boot and select Enabled.

- Press f10 to save the changes and exit BIOS.
- Restart your computer.
HP Commercial Notebooks and Workstations
- Power off the system and turn it on.
- Press “Esc” multiple times until Startup menu loads.

- Then press “f10” to access the BIOS setup.
- Navigate to the Security tab.
- Choose “Secure boot configuration”.
- Check the box for Secure Boot.
- Finally, go to the “Main” tab and choose “Save Changes and Exit”.
- Select Yes on Confirmation dialog and restart the computer.
For Desktop Computers
- Shut down the computer and then turn it on.
- Press the function key “f10” frequently and allow “Computer Setup Utility” screen to appear.
- Highlight “Security” using the arrow key.
- Select the option “Secure Boot Configuration”.
- Hit Enter.
- Press f10 on Secure boot configuration screen.
- Go to “Legacy support” and select Disable.
- Then select Enable for Secure boot.
- Press f10 to save the modifications.
Lenovo
- Press the Windows and I keys combination.
- Select System from the left menu.
- Go to the right, scroll down, and click Recovery.
- From the “Advanced Startup” section, select Restart now.
- Click on Yes if a confirmation box prompts.
- Click on Troubleshoot.
- When “Advanced Startup options” loads, select UEFI Firmware Settings.
- Now, the BIOS will open; click on Security from the left menu.
- Go to Secure Boot and make sure that it is enabled.
- Save the change and exit BIOS setup.

Asus
- Turn off the computer and turn it on.
- Press the Delete key immediately and repeatedly.
- Once UEFI BIOS Utility – Advanced Mode application loads go to the Security tab.
- Click on Secure Boot.
- Change the Windows UEFI mode: Secure Boot Control to On.

- Save the change and restart the system.
DELL
- Power on the computer and press f2 frequently when Dell logo is loading.
- When you enter BIOS settings first of all confirm that UEFI is selected. For this,
- In Inspiron, Alienware, and Vostro devices, Navigate to the Boot tab.
- Switch Secure Boot List Option to UEFI.
- Using function key f10, save the change.
- In the case of Wyse, Precision, OptiPlex, and XPS devices, select General.
- Then go to Boot Sequence.
- Select UEFI for Boot list option.
- Click Apply and save the modifications.
- Finally, enable the secure boot and exit the BIOS.

Enable TPM
HP
- Switch on the machine and press f10 to start the BIOS setup menu.
- Highlight the Security tab.
- Turn on the TPM device status to Available.
- Then, change TPM State to Enabled.

- Save the change by pressing f10 and clicking Yes.
Lenovo
- Access BIOS, go to Security, and make sure that Security chip type is TPM and the Security type is Enabled.
Dell
- For Dell devices follow the instructions at https://www.dell.com/support/kbdoc/en-in/000189676/windows-10-how-to-enable-the-tpm-trusted-platform-module.
Asus
- For Asus computers, navigate to https://www.asus.com/in/support/faq/1046215/
- After enabling TPM and Secure Boot VAN9003 Error is solved automatically.
That’s all!!