When you Reinstall Windows 10 or 11 from HDD to SSD, it enhances the booting time and upgrades the overall performance of the system to another level. Many users who are running on old hard disk and are struggling with the startup speed prefer to switch to the solid state drive.
However, the process is a little time consuming but it keeps all your personal data safe. We will cover all the phases one by one with steps and possible screenshots.
How to Reinstall Windows 11 and 10 from HDD to SSD
To successfully reinstall Windows 11 or 10 from HDD to SSD, you need to keep in mind certain requirements. First, let see them –
Requirements to Reinstall Windows 10 or 11 from HDD to SSD
You all know that apart from SSD, you require few other important things. We suggest you a list that you may need in the process.
1. First of all, the desktop users require is to only install the new solid state drive (in short SSD) along with the old HDD to clone it. But in case of laptops, this is not possible. You have to purchase a SATA-to-USB cable. This actually will allow you to connect a 2.5 inches hard drive or SSD to the laptop via USB. Moreover, another way is to install the SSD in an external hard drive enclosure. But this may seem to be a little time-consuming.
2. After connecting the SSD to the system, the next thing you require is “EaseUs Todo Backup”. This is a free cloning tool. It is easy to use and is very famous for cloning data from a huge disk.
3. It is always advisable to have a backup of your data before you start messing the hard drive. So, ensure to keep everything safely so that you don’t lose any of your important personal files.
Phase 1 – Defrag the disk to Reinstall Windows 11 or 10 from HDD to SSD
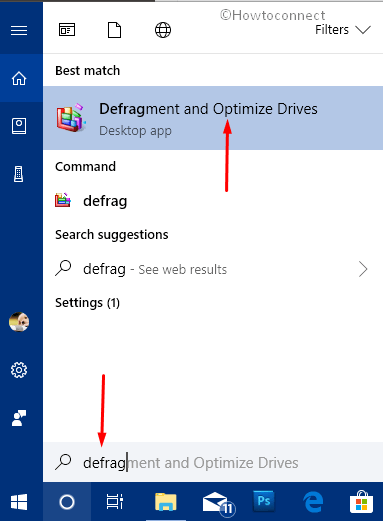
Step 1 – Click the search on the taskbar and type defrag. When you see Defragment and Optimize Drives as the best match, click on it.
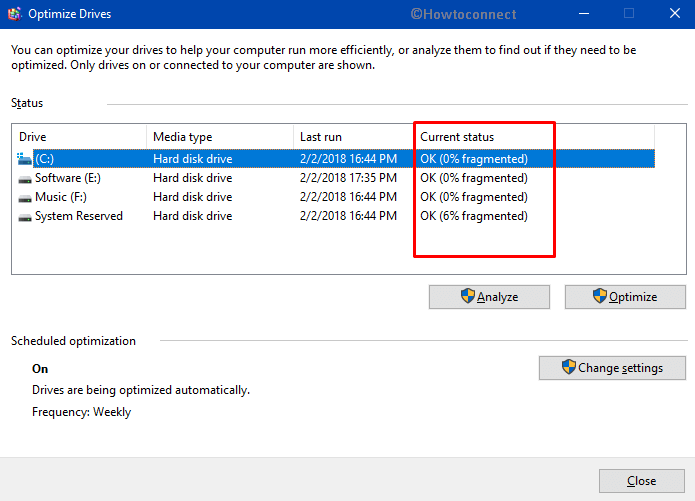
Step 2 – A window with the title Optimize drives will appear on the screen. The tool displays a list of all drives including their Media type and Current status. If you carefully see the Current status column, it shows how much percent each drive is fragmented.
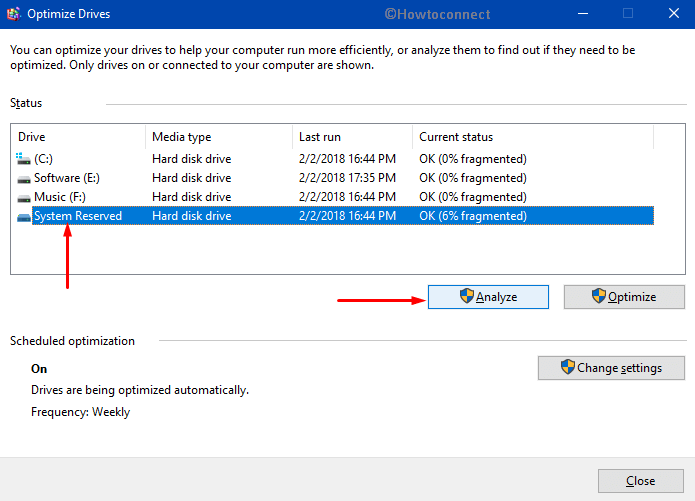
Step 3 – Choose the system drive and click on Analyze button (see snapshot).
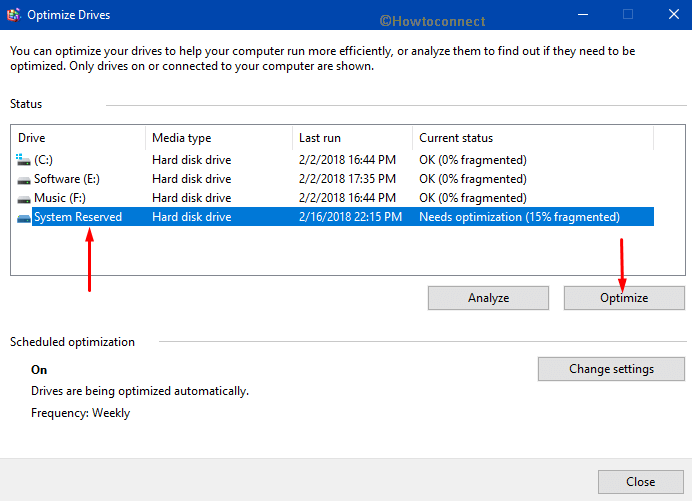
Step 4 – In the next screen, again select the hard drive and this time do a click on Optimize button as depicted in the screenshot below. Wait for the defragmentation to complete successfully.
Phase 2 – To Reinstall Windows 11 or 10 from HDD to SSD, Backup all the data
Once you tidy up the disk, the next thing is to “backup all the data” of your system. An external drive is a great option to store all your precious files over it. If you don’t possess any external HDD, you can move those extra data over any of the cloud-based services such as “OneDrive”.
For reference, read our tutorial to Setup Google Drive Backup and Sync on Windows 10.
Phase 3 – Get rid of additional disk space
Once you successfully backed up your drive, you should get rid of additional disk space. This is necessary to perform because SSDs usually have less space than regular hard disks. Therefore for your system partition to properly fit on the new solid state drive, you have to eradicate the unnecessary files.
A good place to start is by exploring the Videos and Music folders. These are the locations that are piled with a collection of old movies, TV shows, music, or anything that is taking up space. In addition, uninstalling the software that you don’t run anymore will also restore some space.
Furthermore, to clear off the junk from the system, perform “Disk Cleanup“. Moreover, you may even wish to use CCleaner to make sure everything is squeaky clean.
Learn How to Uninstall a Program Using CCleaner on Windows 10.
Phase 4 – Cloning with EaseUs Todo Backup
After slimming down the old disk, start the procedure of migrating the data to the new “solid-state drive” to successfully reinstall Windows 11 or 10 from HDD to SSD.
i. First of all, download the tool from the link below and install it on the system.
https://www.easeus.com/backup-software/tb-free.html
ii. Open up the EaseUs Todo application and on its home screen, click Clone as shown in the below image.
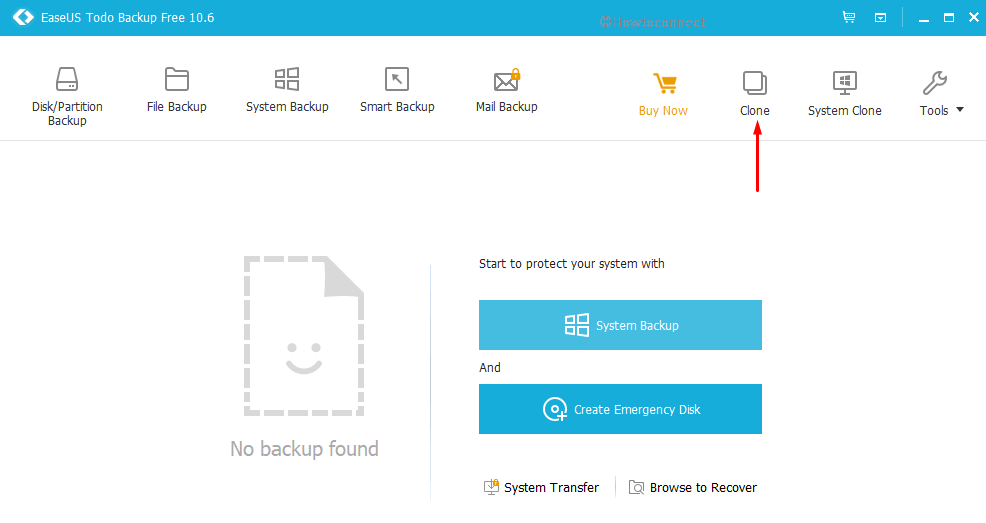
iii. As the clone source picks up the old HDD. Next, for the target location, select the new SSD.
Note – Here, ensure to select the correct drives, otherwise, you may lose data.
iv. Put a tick mark on the box next to the option Optimize for SSD. Doing so will make sure to provide the best performance of the new SSD.
Note – Next to the SSD, click the Edit button. The tool will display what the resulting drive will look like. In some cases, the application wanted to make the recovery partitions and boot quite larger. So, you may also need to resize them before proceeding.
v. The cloning utility will start copying the data. Moving ahead, if you choose to select the option “Shutdown the computer when the operation completed”, the process will instantly close the system once finished.
vi. At this point, if you receive any error message warning that the SSD disk is too big then you have to delete more data from the old HDD. This actually happens when you have not formatted the SSD to detect its original capacity.
Phase 5 – Remove the old drive to Reinstall Windows 10 or 11 from HDD to SSD
In this process to Reinstall Windows 11 or 10 from HDD to SSD, once the cloning phase is completed, File Explorer displays the new system drive. Switch on the system and boot it from SSD. However, you may have to enter the “Boot menu” and pick up the “solid state drive” as the drive that the system will boot from now onwards.
So you noticed that Windows 11 or 10 triggers a lot quicker and faster than before. It hardly takes a few couples of seconds to boot the operating system.
Open the File Explorer and now delete the old drive. But make sure not to remove the backup. Perform a right-click on the drive and from the list of options, choose Format.
Wait for the format to complete and do away with all the items on the old drive.
Phase 6 – Retrieve old data from backup
Finally, it is time to get back all your data on the old disk from the backup.
A. Go to the old drive (which is empty) and create a new folder here. In this folder, you will store all user folders and personal files.
B. Name the folder as per preference.
C. Moving ahead, navigate to C:\users\username (replace the username with the actual one). Here, you should see all your user folders in that location.
D. Make a right-click on the folders one by one and select Properties.
E. Switch to the Location tab, click Move button, and browse to the newly created folder as the target location. Doing so will place all the user folders such as Documents, Desktop, Music, Pictures Downloads, etc on the old HDD.
F. As the last thing that is left is to restore your personal files. So open the backup folder (either “external or cloud service” whatever you choose as the backup location).
G. Drag all your user files to the new user folder that you have generated above. By doing this all your personal data will be accessible.
That’s all about how to reinstall Windows 11 or 10 from HDD to SSD. Everything should absolutely work as before, but only faster and quicker.
