Blue screen error codes are the most nagging issues in Windows 10 that appears at once and lead to system crash. Similarly, Bugcheck Kernel Data Inpage will terminate all running tasks and make the desktop unusable. The Windows may encounter reboot loop or frequent restart making you unable to do anything.
Main reason behind Kernel_Data_Inpage_error is a malfunction in hard disk, bad memory, software conflict with system, or malware infection. Basically, memory finds itself unable to read the kernel data that paging file provides and prompts the blue screen instead when the issue occurs. The error has bug check value 0x0000007A which indicates the same. BSOD carries different kinds of error messages in different situations such as srv.sys, cdrom.sys, ntfs.sys, dxgmms2.sys. Kernel Data Inpage Error is amongst them and indicates that Windows 11 or 10 is unable to read any stuff in memory. Due to this issue, the operating system abruptly prompts Blue screen and suggests to get online help. After a while the PC involuntarily reboots. So, regarding fix Kernel Data Inpage Error or inpageerror in Windows 11/10, the needful job is testing RAM and Hard drive. Contemplate how will you examine both of the memories (RAM and hard disk) in the subsequent portion of this article. See – Fix BGI DETECTED VIOLATION Blue Screen Error BSOD in Windows 10 or 11
Table of Contents
Kernel Data Inpage Error Windows 10 or 11
Here is how to Fix Kernel Data Inpage Error in Windows 11 or 10 –
1] Check Hard Disk for Errors
In most of all circumstances, the bad sectors existing in hard disk carries the aforementioned headache. Here’s how you proceed with the disk check –
Step-1: – Press the Win key and type cmd.
Step-2: Right click on the result and choose the ‘Run as administrator’.
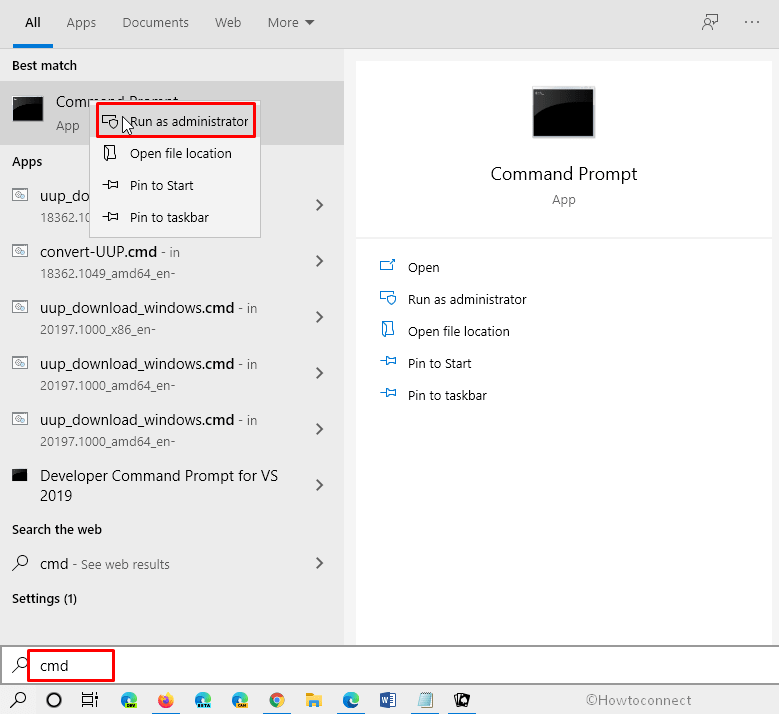
Step-3: – When the UAC prompt will arrive, move ahead by hitting the Yes button.
Step-4: – Copy-paste the underneath text and press Enter.
chkdsk C: /f /r
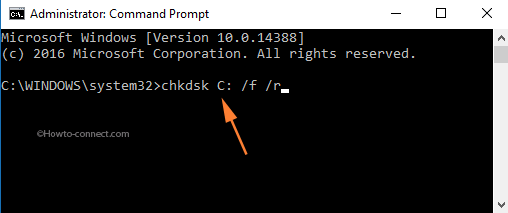
Noteworthy is we suppose that C is the drive where you have stored the OS. While you are positioning it on an alternate partition, replace that drive letter with C into the command.
Step-5: – Allow the command to examine things completely and accurately and when it will trace out the issues, rectify the same instantly.
Step-6: Finally, this will restart your system to identify the prevailing errors on the selected partition.
2] Check RAM using RAM Diagnostic Tool
In order to trace out the messes with your RAM Memory, we advise you to run the RAM Windows Diagnostic Tool. Let us pursue the whole process to run the tool –
Step 1 – First of all, press the Win and S keys in one go.
Step-2: This will expand taskbar search. Write down windows memory in the box.
Step-3: As a Best match, Windows Memory Diagnostic will arrive on the top, click on it.
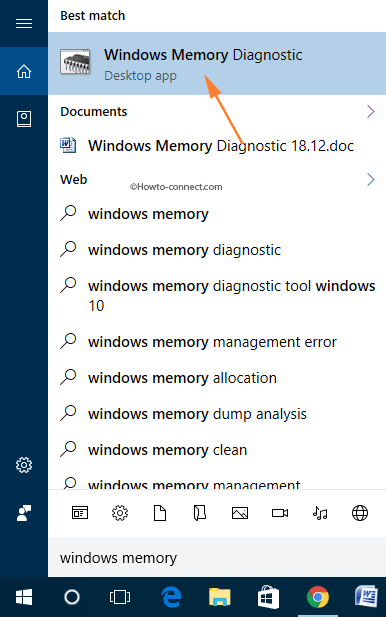
Step-4: – Select the link on the top – Restart now and check for problems.
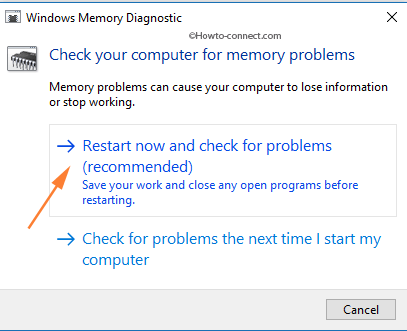
Step-5: Permit the PC to restart and indeed the tool will report you the presence of issues, if any. Thus, on the startup, you will receive further solutions for the issues by the tool.
3] Disconnect all USB Devices and Cables
Finally, disconnect all the external devices, and check if you still encounter Kernel Data Inpage Error in Windows 11/10. If this rectifies the issue, then something is definitely faulty with the external devices.
4] Perform Windows Defender full scan
Kernel_Data_Inpage_Error when playing games or normally running tasks might appear due to malware infections. Threats and attacks corrupt files and resources moreover distort the fundamental structure of Windows finally causing the system to throw Blue screen error.
Fortunately, Windows Defender, a powerful built-in protection tool is sufficiently competent to deal with this kind of infection. Running a full scan deeply will investigate each of the files available in the computer and provide you to delete or quarantine the malicious stuff. So, to fix inpageerror in Windows 11/10 follow the steps –
Step-1: Click the Start, type in security, and then hit the enter.
Step-2: Select the Virus & threat protection.
Step-3: Go with Scan options.
Step-4: Check the option Full scan.
Step-5: Now, select the Scan now.
Step-6: The process will take a long so wait patiently until the end.
Step-7: If any malware is detected, click on Start action.
Step-8: Select the Threat.
Step-9: Click on Filter and choose Remove or Quarantine.
Step-10: Restart the system.
5] Update old drivers to fix Kernel Data Inpage Error
Stop code Kernel Data Inpage Error might be a result of old driver software. Driver is an application establishing communication between hardware and software. Windows 11 or 10 regularly gets updates and patches to add features, improve security whereas OEM companies may not compete with the race. Consequently, the drivers become outdated, cause compatibility issues, generate bugs and finally end up with BSOD. However, after users’ feedback, commonly they release the updates as soon as possible so you need to check the same on regular basis. Furthermore, remember to check for Windows update to keep avoiding such type of errors.
Whenever updating driver Device manager is the best tool moreover it provides an easy built-in solutions. Using this administrative tool you can also rollback and uninstall the same. Therefore, follow the instructions –
Step-1: Press the Win + X.
Step-2: Select the Device Manager.
Step-3: Allow the Device manager to appear and find the devices with old drivers by double-clicking on each one by one. Yellow triangular exclamation marks before anyone will indicate the issue.
Step-4: After located, right click on the same and select the Update driver.
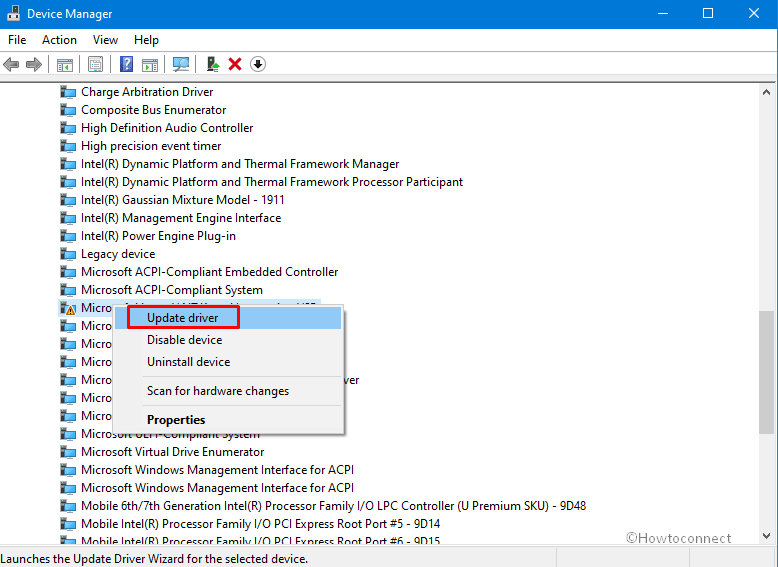
Step-5: Repeat the same for all outdated drivers.
Step-6: Reboot the device and check if inpageerror is fixed.
6] Run System File Checker
Blue Screen errors are however the most annoying problem in Windows 10 or 11 System file checker is a great rescuer. SFC tool will repair all the corrupt and missing Windows components after getting executed via elevated command prompt.
When bugcheck Kernel_Data_Inpage_Error occurs the utility will scan drive for error and fix all the resources automatically. Follow the guidelines –
Step-1: Open Command prompt as administrator.
Step-2: Type the text Sfc /Scannow.
Step-3: Press the Enter.
Step-4: When the detection and repairing touched 100%, reboot the PC.
7] Use DISM Command to solve Kernel Data Inpage Error
In the case of Windows image is not perfect you may also face Kernel Data Inpage Error. DISM or Deployment Image Servicing and Management works as a pain reliever in this situation by fixing the file. Therefore, use the tool to fix the BSOD by following steps –
Step-1: Launch elevated command prompt as already told in the previous methods.
Step-2: Type in the syntax DISM /Online /Cleanup-Image /RestoreHealth.
Step-3: Hit the enter key.
Step-4: Finally, reboot the PC after the deployment is finished.
8] Uninstall the latest update
Although Windows update, cumulative patch, and security package are not less than a bonus for a system sometimes they affect skeptically. Buggy file in any push may generate Kernel Data Inpage Error in Dell, HP, Lenovo, or any other laptops or desktops. Uninstallation is a permanent solution for the issue until Microsoft doesn’t fix the update. Therefore, remove them using below guide –
Step-1: Press “Win+I” and choose the Update & Security.
Step-2: From the next page, click on View update history.
Step-3: Select the Uninstall updates from top.
Step-4: Go to the Microsoft Windows section and locate the most recent update KB.
Step-4: Right-click and select the Uninstall.
9] Check for the latest Update and install
If Microsoft is aware of the issue you are encountering such as Kernel Data Inpage Error the company will push an update with resolution. So check for the same and install as below –
Step-1: Click Start, type update, and press enter.
Step-2: Select the Check for updates in the upcoming window.
Step-3: After scanning and downloading the update, system will ask you to install,
Step-4: Click the Install now.
Reasons that lead to Kernel Data Inpage Error in Windows 11 or 10
1. Hardware or Driver conflicts.
2. RAM problem,
3. Distorted or damaged hard drive,
4. Registry issues,
5. Third-party software.
More posts –
1] Blue Screen Troubleshooter Windows 10 to Fix BSOD
2] How to fix Memory could not be read error on Windows 10, 8
3] Windows 10 – How to Run Program Automatically at Startup
Methods:
1] Check Hard Disk for Errors
2] Check RAM using RAM Diagnostic Tool
3] Disconnect all USB Devices and Cables
4] Perform Windows Defender full scan
5] Update old drivers
6] Run System File Checker
7] Use DISM Command
8] Uninstall the latest update
9] Check for the latest Update and install
That’s all!!

Abigail Vaughan
says:Try running check disk on the hard drive to see if there are any corruptions.
1. Type command prompt in the Search charms. Right click on it and click on Run as administrator.
2. Type chkdsk /f and hit enter.
if doesn’t work you may try this steps here>
Solution 3. Uninstall corrupt driver in safe mode