Multiple users have complaints about the PAGE_FAULT_BEYOND_END_OF_ALLOCATION blue screen error in Windows 10. This BSOD having bug check value 0x000000CD is found to cause serious fatality these days in the computer system. Stop error causes lots of issues but the most annoying one is, it restarts repeatedly and automatically. Furthermore, freezing desktop and abnormal termination of programs with error message are quite common too.
The reasons for PAGE_FAULT_BEYOND_END_OF_ALLOCATION BSOD might be Software or Hardware issues. Leaving the device drivers outdated for a long is considered as suspected. In addition to the Infection from malware intruders, missing DLL files, and system component play a major role. Hardware issues like poor sectors in it, use of external HDD, piling up of huge temp files will also cause PAGE FAULT BEYOND END OF ALLOCATION Blue Screen.
PAGE_FAULT_BEYOND_END_OF_ALLOCATION
Here is how to fix PAGE_FAULT_BEYOND_END_OF_ALLOCATION Error BSOD in Windows 10 –
1] Make Sure to Disable Automatic Restarting of Windows
BSOD error causes serious damage to the system every time. To decrease the impact of this issue, Windows tends to reboot time and again. This gives you lots of troublesome as working simply is beyond any vicinity. To create a perfect environment for deploying other resolutions, we have to first disable this irritating action. Here is how you can move for –
Step-1: Save and then close all ongoing programs.
Step-2: Now, press Win+D and straight away move to your Desktop screen.
Step-3: Perform a right-click on This PC icon.
Step-4: Choose Properties option from the appearing menu.
Step-5: Go to the left pane and hit the Advanced system settings.
Step-6: In the following wizard, you will be moved on the Advanced tab.
Step-7: Under Startup and Recovery heading, click the Settings button.
Step-8: Visit System failure area when another Window appears.
Step-9: At this point, wipe out the tick ahead of Automatically restart.
Step-10: Finally, select the OK button to save these changes.
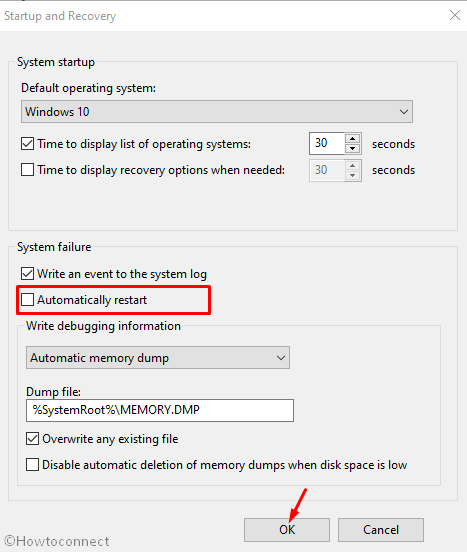
After these tweaks being effective, the system will disable automatic restart without notice. Hence, you can work without any disturbance.
2] Perform Safe Boot to load basic programs only
From the ancient time after Windows made its way out, various issues haunted it. But luckily one resolution can offer you hope in all cases and this is boot in safe mode. In this special Startup process, Windows loads only basic applications. This will heal the most in case of serious issues like PAGE_FAULT_BEYOND_END_OF_ALLOCATION Error in Windows 10. To execute the workaround, here are the guidelines –
- Invoke Taskbar Search by pressing Win+S together.
- Type MSConfig.
- Choose System Configuration when it shows up in the result.
- When a wizard rolls in, shift to the Boot tab.
- Move ahead to the lower half in the window where you will find Boot Options.
- Tick ahead the Safe boot option. It activates the grayed out options.
- On the proceedings, check the radio button of Minimal.
- Now, hit the Apply button and then OK to save the changes.
- Leave this window and perform a reboot in a prevalent method.
- At the moment, when the device is booting at startup, keep pressing F8 key continuously.
- When the Advanced boot menu appears, choose “Safe boot” option from here.
- Enter into the Safe Mode on the consequent move.
3] Detect Malware using Windows Security and fix PAGE_FAULT_BEYOND_END_OF_ALLOCATION
Whenever we surf in web, the security system is no longer the safest one. You can be easily swindled by viruses after clicking any link you are not supposed to. In this way, these bugs manage to enter into the system and deteriorate the system files. In the end, the device suffers from PAGE_FAULT_BEYOND_END_OF_ALLOCATION Error. The best way to safeguard is to clean them in Windows Security. Here is how to move on –
- Press Win+Q hotkeys and let Taskbar search appear.
- Type Security in the appearing text box and hit the Enter key.
- Select Virus & threat protection from the left pane.
- On the corresponding section, click on the Scan options link.
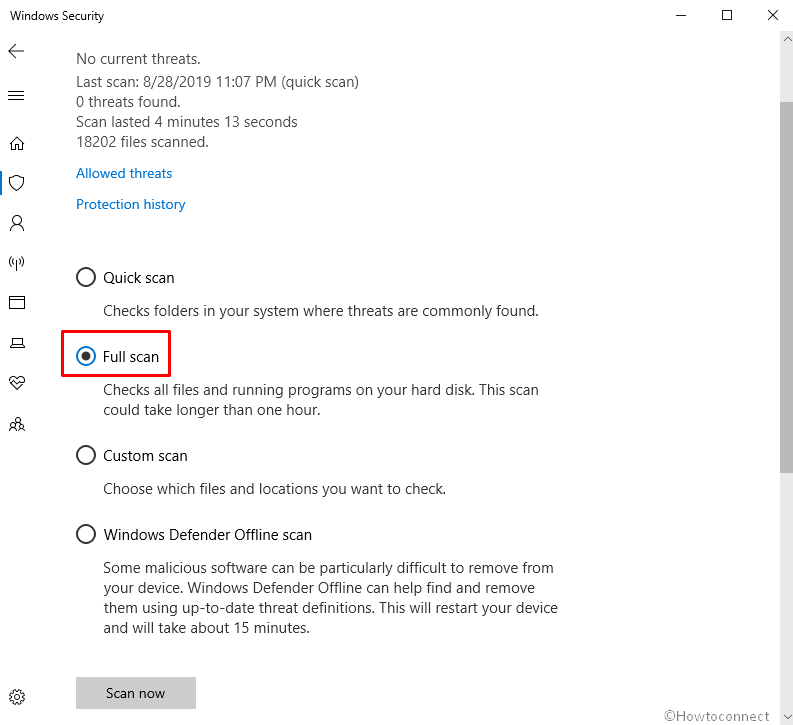
- In the progress, select Full scan.
- Click on the Scan now button and let the detection start.
- After finishing the procedure, if you find out any malware, choose Clean threats option.
- Select Remove and then click on the Start actions.
- In the end, all the malware will be deleted and the system will be safe.
4] Run Windows Blue Screen Troubleshooter – the default tool
BSOD errors like PAGE_FAULT_BEYOND_END_OF_ALLOCATION can be so dangerous that they can even damage the whole system permanently. With the chances too high, Developers team came out with a very convenient tool in the name of Blue Screen Troubleshooter. If you are using any version of Windows 10 Fall Creators Update or above can access the utility to fix blue screen error. This is a built-in tool and available in the Settings app. Here is the way to use the Troubleshooter –
- Press Win+I together and let Windows Settings appear.
- From app UI, move on to Update & security section.
- Choose Troubleshoot tab from the left pane and then jump to the corresponding side.
- On the right, find out Blue Screen option and select it.
- Click on Run the Troubleshooter button.
Thereafter, the tool will initiate the detection process in the system. Any issues trace out in the path will be fixed automatically. In the end, you can get rid of the PAGE_FAULT_BEYOND_END_OF_ALLOCATION issue.
5] Find out bad areas in Hard Disk and resolve using Disk Checking Tool
Disk might also be a reason for PAGE_FAULT_BEYOND_END_OF_ALLOCATION error in Windows 10. We recommend you run the Disk Checking tool if the issue occurs because of the same. The application powers up in an administrative Command Prompt and fix the problem in there. Here is the procedure –
- Right-click on Taskbar and select Task Manager from the visible options.
- When the app opens up, perform a click on File option.
- Select Run a new task from there.
- Once a dialog appears, type cmd in the text box provided.
- Mark the tick ahead of ‘Create this task with administrative privileges’.
- Now, press the Enter key and it will directly take you to the Elevated Command Prompt window.
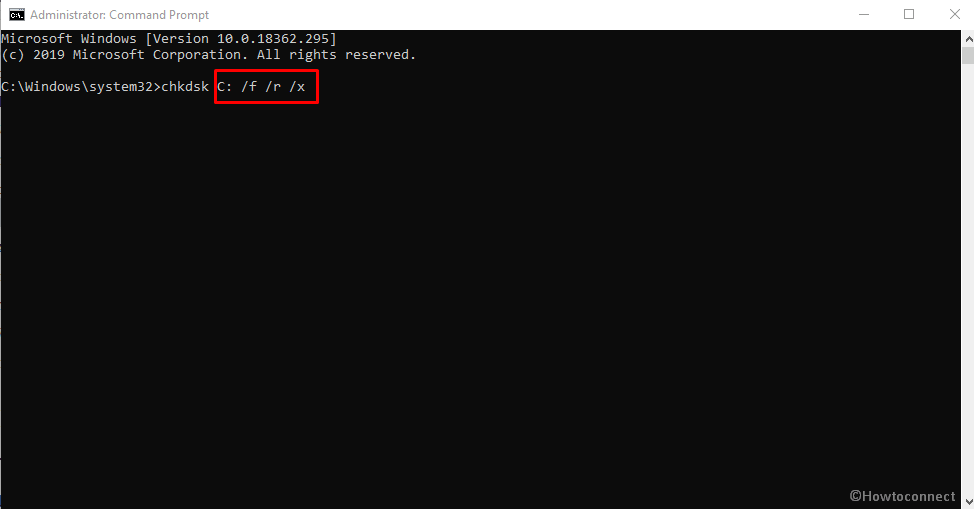
- On the following screen, type the following command line after C:\Windows\system32> –
chkdsk C: /f /r /x - Execute the tool by pressing the Enter key.
- Disk checking utility will investigate and repair bad sectors on the hard disk by itself. This process will take a few minutes of time.
- When the process gets over, perform a restart to the device.
- After completing the cycle of rebooting, check if there is an error in the system.
6] Resolve Memory problems to Fix PAGE_FAULT_BEYOND_END_OF_ALLOCATION
When Windows experience memory issues like critical areas in RAM, BSOD issue show up eventually. To fix this issue, Windows Memory Diagnostic comes handy to fix PAGE_FAULT_BEYOND_END_OF_ALLOCATION.
- Open the Windows Settings app pressing Win+I keys combined.
- In the search box, type memory.
- Choose ‘Diagnose your computer’s memory’ problems from the drop-down list.
- You will be guided to the Windows Memory Diagnostic directly.
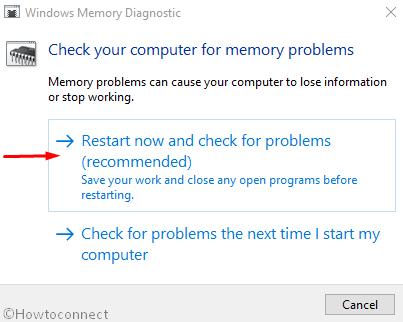
- Select ‘Restart now and check for problems (recommended)’ as shown in the below screenshot.
- After restarting your PC, you will see a blue screen detecting memory issues.
- When the progress hits 100 %, the device will reboot again.
- Once the system powers up, check the result of diagnosis in the System tray- notification area.
7] Install all the newly released patches
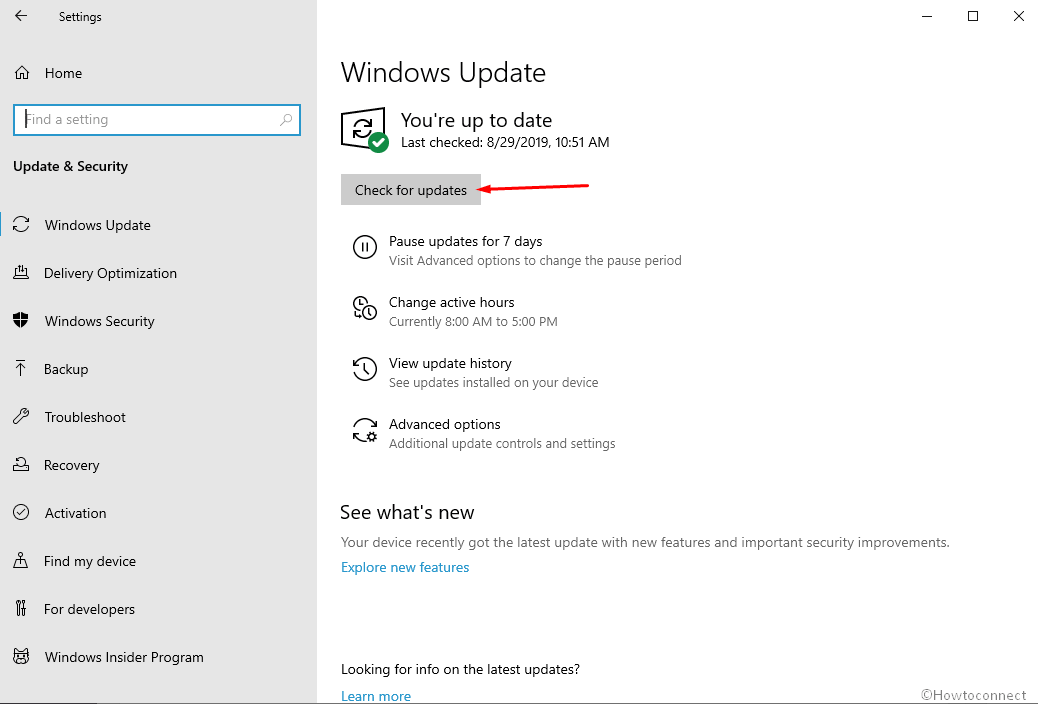
Microsoft at a regular interval releases update patches containing latest features and mostly bug fixes. Users often ignore them but that is actually frightening. An outdated Operating System is usually weaker in strength and caught easily by PAGE_FAULT_BEYOND_END_OF_ALLOCATION Error. We can easily limit this risk by installing all the available cumulative updates. To download these files, you need to manage a speedy internet connection. This will reduce time consumption during the process. On the contrary, while using Mobile Hotspot, ensure Metered Connection is Turned Off. Once all the arrangement is set, proceed with below guidelines –
- Right-click on the Start icon and select Settings.
- From the app Home, go to Update & Security.
- When the following screen loads, you will be on the Windows Update section.
- In the right side, click on Check for updates button. Don’t worry if you see a dialog like ‘You’re up to date’.
- Finally, follow the coming on-screen instructions to get it installed.
8] Uninstall Applications engage in conflict with each other
A similar application in a Windows OS always has a tendency to create conflict with each other. In the end, after the collision, they lose the necessary components from each and also from the PC. The ultimate effect is a PAGE_FAULT_BEYOND_END_OF_ALLOCATION Error. Well, the easier way to stay away from this is to uninstall one of these. To remove a program from the system, you need to follow below instructions –
- Press Win+X hotkey and select Apps and Features option from the menu.
- On the following page, go to the right side and locate the applications colliding in the list.
- Once found, select them and hit Uninstall from the extended pane one after another.
- If UAC prompts, select Yes to proceed.
- Follow the on-screen guidelines available next to remove it completely.
- Now restart the device and upon returning to the desktop, check for BSOD issue in it.
- After getting resolved, you can opt for downloading the program if needed.
9] Run System Restore to Undo recent changes
Changes in Windows often corrupt registry particularly because of installing new programs or uninstalling. Regedit.exe is actually a sophisticated app and any abnormal alteration can cause BSOD issue. In a simple way, you can resolve the error by heading back Windows 10 to an earlier state. Performing System Restore leads undo the recent changes in the presence of a previously created restore point. If you lack that, skip this process. When you have one, proceed with below guidelines –
- Open the Taskbar search using the method explained above.
- Type rstrui in the available field.
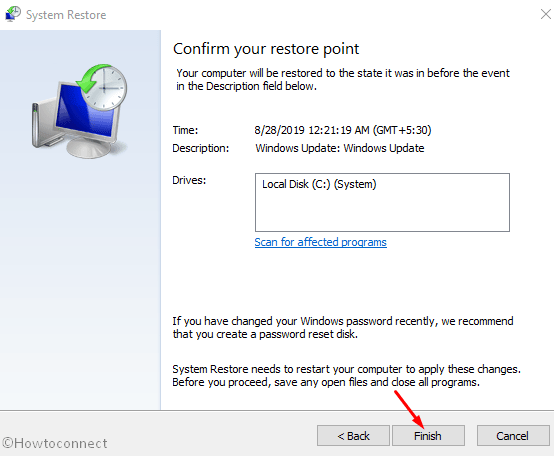
- Hit Enter key and let the System Restore wizard appear. Click Next.
- From the wizard appearing, choose Show more restore points option.
- Upon arriving at all the available points, select the latest one.
- Hit Next option to continue.
- From the following window, choose Finish to start restoring process.
10] Perform Clean Boot to Resolve PAGE_FAULT_BEYOND_END_OF_ALLOCATION
Often some specific programs and services cause the PAGE_FAULT_BEYOND_END_OF_ALLOCATION Error in the system. As a process to fix, we need to disable them. The easiest way to accomplish that task is to perform a Clean Boot. Here is how to proceed –
- Click on Windows Search icon to open it.
- Type system configuration in the text area and select it from the result.
- When the app loads, you will see the General tab is opened directly.
- In the current tab, choose Selective startup.
- Remove the checkmark before Load startup items.
- Switch to the Services tab and tick ahead of Hide all Microsoft services.
- Click on Disable all and then hit the OK button.
- Now, visit the Startup tab and perform a click on Open Task Manager.
- On the following screen, you will be guided to its Startup tab.
- Do right-click on each item here and make Disable them all.
- Once you have disabled all the startup applications, return back to the System Configuration window.
- Select the Apply button first and then OK to save these changes.
- Finally, restart the device and when power up next, check if there is any PAGE_FAULT_BEYOND_END_OF_ALLOCATION Error.
11] Update all the drivers using Device Manager
Every time when there is a BSOD or relevant issues occur, outdated and malfunctioning drivers play a major role. Sometimes, they may stay out of touch and end up in causing vulnerabilities. To update them, it would be better to use Windows Device Manager as outdated ones are indicated with yellow exclamation here. For rest of the instructions, go through below part –
- Press of Win+R hotkey and further let Run dialog box appear.
- In the text zone, write devmgmt.msc.
- Now, hit the Ok button located beneath the box.
- Once the Device Manager comes in, look closely in the console.
- If you see any yellow exclamation mark in device manager, expand the same by double clicking.
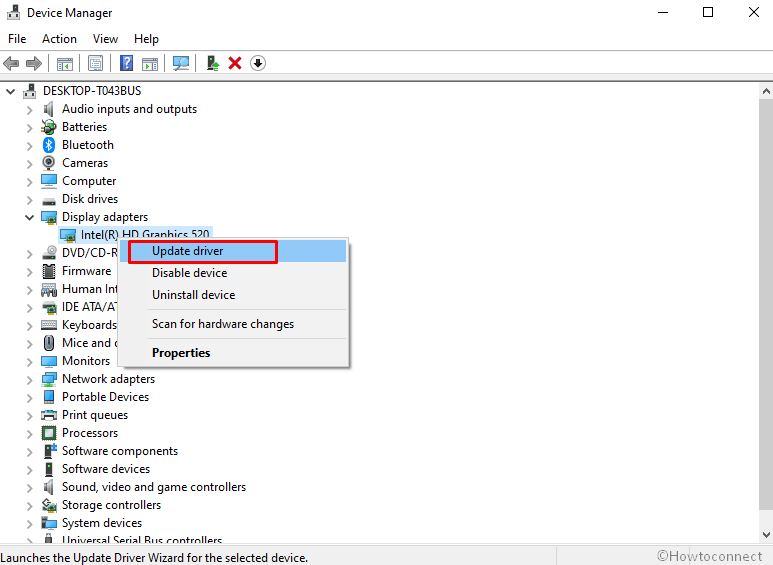
- Upon proliferation, perform a right-click on the drivers one by one.
- Select Update driver option and let the process begin.
12] Recover DLL files and fix corrupted system resources
With the effect of malicious invaders or similar issues, there might be corruption in the system resources. Often due to a collision of similar programs, DLL files also go missing. All these things can together call up PAGE_FAULT_BEYOND_END_OF_ALLOCATION Error. To fix these things, System File Checker will be a great option. Here is how to proceed –
- Click on the Taskbar Search icon and allow opening it.
- Type cmd.exe in empty space.
- When the results appear, do a right-click on Command Prompt.
- Select Run as Administrator option from the menu.
- Hit Yes on UAC prompt for giving permission.
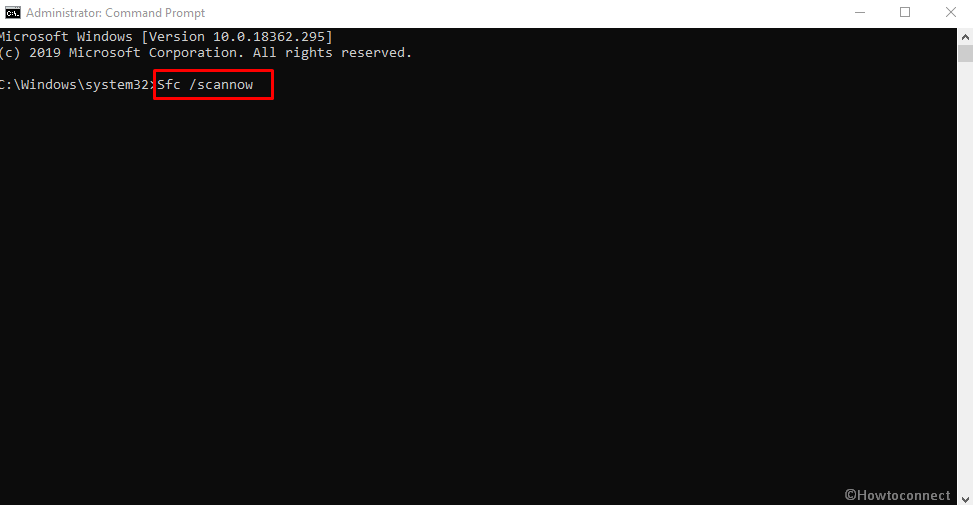
- On the subsequent page, insert following command –
Sfc /scannow - Now, press the Enter key to activate the System File Checker tool here. The utility will detect and fix all the missing DLL files and corrupted Windows components.
- The process may seem a long one so hold the nerve until it finishes up completely.
- After it ends, restart the device using any convenient way.
- Now, check if there is any BSOD related issue occurs in Windows 10.
13] Delete all Third-Party antimalware programs
You may have used third-party antivirus solutions to prevent viruses before. But with the introduction of Windows Security, they are unnecessary indeed. Since there is a chance of having BSOD error while using them also, you need to delete them immediately. Here is how to uninstall them –
- Invoke Run dialog by using the method discussed above.
- Type appwiz.cpl in the search box given here.
- Hit Enter key to launch Programs and Features window.
- On the following screen, look for third-party antimalware programs listed.
- Do a right-click on it and eventually select Uninstall.
- If UAC prompts, click on the Yes button.
- Follow the guidelines available on display next to remove the tool completely.
14] Repair Defective Image files using the DISM tool
Defective Windows image files found to cause PAGE_FAULT_BEYOND_END_OF_ALLOCATION Error BSOD in Windows 10. To fix these files, the Deployment Image tool will be useful thoroughly. The guidelines are as follows –
- Right-click on the Start button located on the far left of Taskbar and select Run from there.
- Type cmd in the empty text box.
- Consequently, press “Ctrl+ Shift+ Enter” keys to open Command Prompt administrator quickly.
- Type the following command –
DISM.exe /Online /Cleanup-image /Restorehealth
- Hit Enter to execute the DISM tool.
- This will finally settle all the problematic Windows image files.
- Wait for a while until the process ends normally.
- Reboot the system and prior to signing back in, check if the error has resolved.
15] Delete Terminated Windows Update files
Sometimes, Windows Updating gets terminated abnormally while installing patches. This is quite an exceptional case but can cause PAGE_FAULT_BEYOND_END_OF_ALLOCATION error. You can easily remove this pitfall by uninstalling those files –
- Open Settings by using any method as per your convenience.
- Click on the Update & Security.
- On the right pane of the current page, click on the View update history link.
- Hit the Uninstall updates.
- At this time, a new Installed Updates page opens.
- Look for the last received patch in the appearing list.
- Select it and then click on the Uninstall option displaying in the top ribbon.
- Follow the further tasks as shown in desktop until they get deleted completely.
16] Make some more space by cleaning unnecessary junks
Junk files are temporary and they are created for execution objective only on Windows OS. However, they engage an equal amount of space in the storage. When the files coalesce in a big amount, makes the operation of the device slower. This also a reason of PAGE_FAULT_BEYOND_END_OF_ALLOCATION Error in Windows 10. Disk Cleanup Utility undraws those files and creates more space.
- Press “Win+S”, type cleanmgr and then hit the Enter key.
- It will prompt to choose the drive where you want to carry out deleting. Click on the dropdown menu and select C: and click OK.
- On the subsequent page, move down and select the Clean up system files button.
- The previous small popup dialog will appear again.
- Select C: in the same way as before and also click on the OK button.
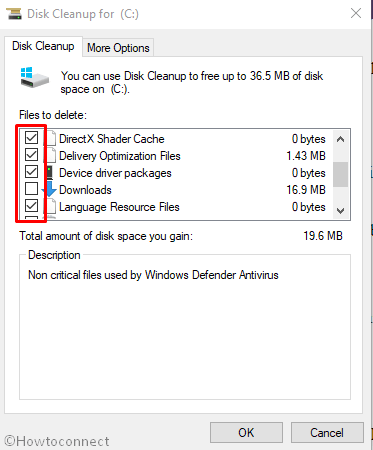
- Once Disk Cleanup for C: wizard comes into view, check all the boxes available there leaving Downloads.
- Next is to hit the OK button to start the removal.
17] Offer little break to External Hardware components
Users have been experiencing BSOD issues after attaching external Hardware accessories with their machine. So only disconnect them to temporarily heals the issue. If you are okay then reinsert, download a fresh driver from the official website of the device and install.
- Remove the external hardware devices from PC.
- Restart Windows 10 device.
- After Windows completes the rebooting, check if there is any PAGE_FAULT_BEYOND_END_OF_ALLOCATION Error present.
- If it resolved successfully, connect the devices you had removed moment before.
- Open the web browser to visit the manufacturer’s website for respective hardware accessories.
- Download and Install the latest drivers for each and use them smoothly.
Hereby, we have discussed all the probable resolutions to fix PAGE_FAULT_BEYOND_END_OF_ALLOCATION Error BSOD in Windows 10. Hope you have already resolved the issue. If having the issue existing still, try reinstalling Windows 10. This will be the ultimate solution for all the existing issues.
Before doing so, back up important files to avoid losing them. You can also ask help from skilled people in case of incompetency.
Methods:
1] Make Sure to Disable Automatic Restarting of Windows
2] Perform Safe Boot to load basic programs only
3] Detect Malware using Windows Security and fix
4] Run Windows Blue Screen Troubleshooter
5] Find out bad areas in Hard Disk and resolve
6] Resolve Memory problems
7] Install all the newly released patches
8] Uninstall Applications engage in conflict
9] Run System Restore to Undo recent changes
10] Perform Clean Boot
11] Update all the drivers using Device Manager
12] Recover DLL files and fix corrupted system resources
13] Delete all Third-Party antimalware programs
14] Repair Defective Image files
15] Delete Terminated Windows Update files
16] Make some more space by cleaning unnecessary junks
17] Offer little break to External Hardware components
That’s all!!
