Way to Pause Deleting on Windows 10 with steps. – Once decided that certain data are further needless, you may delete them. But in a few instances, you may delete a needful document file or folder accidentally. Then a few options as Restore and Undo Delete still remain using which you can recover the deleted items. But when you clear Recycle Bin it may damage you by losing them. However, you can use a 3rd party tool to Get Mistakenly Deleted Files Back.
In that case, you may use the tool Pause Deleting in Windows 10 and stop the deletion of stuff. This is a very helpful option for the users who delete the files by mistake. Once you select Pause delete, it saves files from removing forever from recycle bin. In addition, it allows you to cancel the tool to complete the deletion process. If you too want to know the unique method of Pause Deleting in Windows 10 to save your files then follow this guide.
Way to Pause Deleting in Windows 10
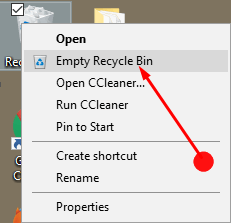
Step 1 – Make a right click on the Recycle Bin icon on the desktop of your device. From the options that appear, select Empty Recycle Bin.

Step 2 – Here click on the Yes button in the next appearing dialog box to confirm the process.

Sometimes you might find permission pop up, in this case, choose on the Continue.
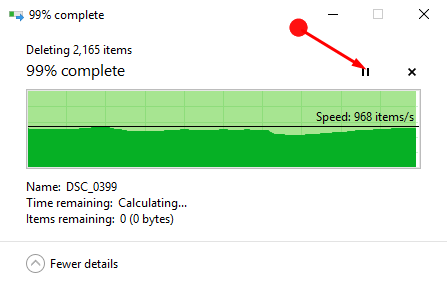
Step 3 – Now the Recycle Bin will start removing all the items to empty itself. Here, if you see a particular folder or a file that you do not want to delete then press the two vertical line Pause icon.

This will help you stop the folder from getting deleted.
Step 4 – Now go back to the Recycle Bin and then restore the document back from there to any of the places that you desire.
Final note
So here you can see how simple is Pause Deleting in Windows 10. It is very useful when you want to bring back a document after pressing the delete option. So if you delete any important stuff accidentally then simply use this icon and get relieved.
