For those who need a quick day planner and clearly set goals to get through the day smoothly, Microsoft To-Do app is certainly one of the most convenient options available. Seriously, for many of us, the schedule could be so tight that it would be a chaos without some sort of schedule or check-lists to refer to. The application became even more convenient after it got a new feature added to it a few months ago: you can now pin a specific Microsoft To-do list to the start for easier access. I mean, isn’t it much cooler? With this feature, we do not need to even bother to launch the application to checkout our preset goals for the day. You can have it all with a click on the Start button.
The best thing is, pinning the To-do list to Start menu isn’t even that tricky. No settings need to be changed. Even so, many of you could have remained ignorant of this until now. Well, here you are! In this article, we explain, the simple steps involved in doing the same.
Pin a Specific Microsoft To-do list to Start in Windows 11 and 10
Here is How to Pin a Specific Microsoft To-do list to Start in Windows 11 or 10 –
- First of all, simply open the Microsoft To-Do app on your Windows 10 or 11.
- You’ll be seeing all the lists created so far. If you have not created any list so far, create one.
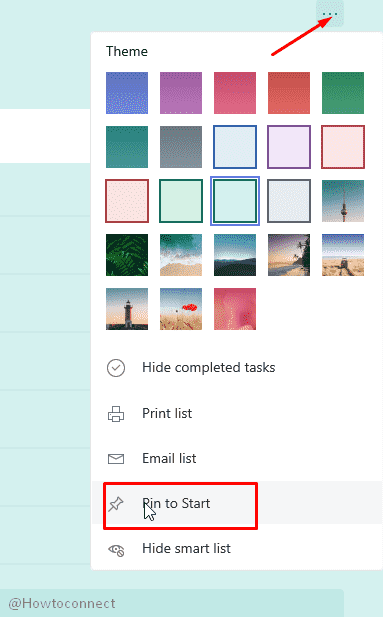
- Now, click on the 3 dots icon from the top right of the app.
- Select Pin to Start.

- You will come across a pop up that says ‘Do you want to pin this tile to Start?’ Click on Yes.

- That is all that you need to do.
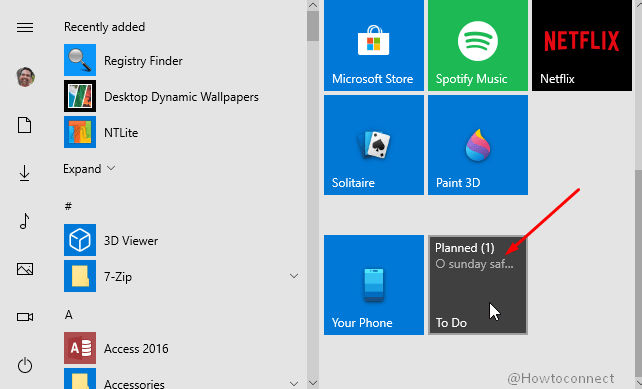
You can check out your Start menu now to see your To-Do list.
To unpin a Specific Microsoft To-do list to Start in Windows 11 or 10, you can right click on the pinned item and select Unpin from Start.
These steps are applicable to all Windows versions. So, go ahead and try out this new feature right away if you haven’t already!!
That’s all!!
