Methods and steps to Remove Run with Graphic Processor From Context Menu Windows 10. – Are you a perfectionist regarding File Explorer? Then this article is pointing to you. Implementing a right-click on either a .exe file or application shortcut displays Run with Graphic Processor command on Context menu. This command comes due to NVIDIA Graphics card existing on Windows PC. The users who love to play high resolution games often use this choice. But the choice is useless for rest users. So they might want to delete this option in order to declutter the context menu.
A simple way is available to Run with Graphic Processor’ From Context Menu Windows 10 unlike with the other commands. Other commands couldn’t be deleted without experimenting with the registry editor.
Remove Run with Graphic Processor From Context Menu Windows 10
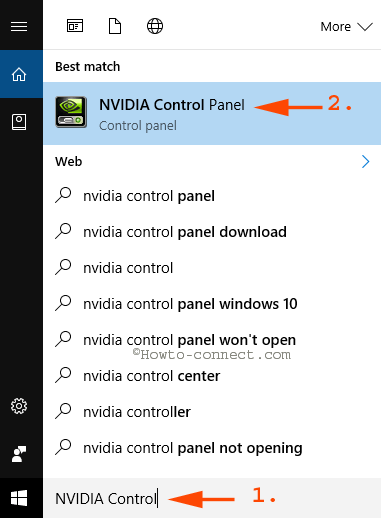
Step 1 – First of all, click on the Start icon on the extreme left of the taskbar to expand the start menu. Then Write NVIDIA Control into the search field of start menu and once the result appears at the top, hit on it.

Step 2 – Once NVIDIA Control Panel becomes available, click on the menu Desktop thereafter on Add “Run with graphic processor” to Context menu.

When you become eager to dislodge NVIDIA symbol from variant locations such as context menu, System tray, furthermore Notification area, the Desktop menu will assist.
If you untick the choice “Add Desktop context menu” eliminates NVIDIA Control Panel from the context menu on the desktop.
In a similar fashion, unchecking Show Notification tray icon eradicates Open NVIDIA GeForce Experience from System tray.
If you dislike GPU Activity simply uncheck the menu saying Display GPU Activity icon.
Conclusion
Therefore, NVIDIA Control panel helps to a great extent to keep context menu clean. Secondly, you can remove other commands only by tweaking registry editor which is not possible for an average techy guy. Whereas from this interface, they can remove unnecessary stuff quite easily and keep File Explorer clean.
