Many users are aware of the Command Prompt whereas a very small number of people know about Windows PowerShell. Instead of Command Prompt, you can work with Windows PowerShell which provides your more power and authority over your Windows 10 computer. Hence, in this article, we are here with tips for different ways to Run PowerShell as administrator in Windows 10 operating system as administrator.
Microsoft has originated shell called Windows PowerShell in order to handle configuration and carry out task automation. Windows PowerShell comes to your rescue when you have a bunch of administrative works to solve. For instance, you ask PowerShell to recognize the programs that are not performing accurately and kill them. Also in a network, you can ask PowerShell to exhibit you all the installed USB gadgets on one or many computers. Well, Windows PowerShell can really do lots of things. If you prefer to give a shot to it, read out different ways to run it in Windows 10 as administrator.
Table of Contents
How to Run PowerShell as administrator in Windows 10
1. Through File Explorer
With this method, you can access Windows PowerShell to the location or place of any particular selected drive or folder.
- Launch File Explorer, travel to the section where your preferred drive or folder is lying.
- Tap on the folder to pick which you want to start in an elevated PowerShell and keypunch (press) File on the extreme left portion of the menu bar.
- From the arrived options, hit Open Windows PowerShell succeeding with Open Windows PowerShell as administrator.
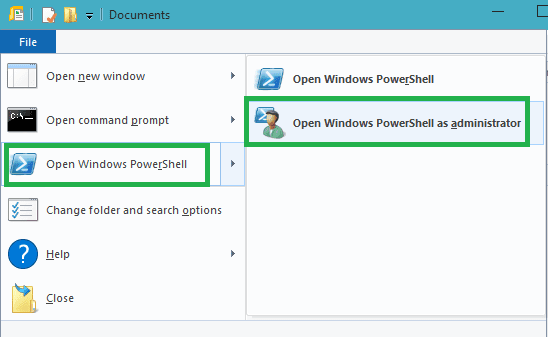
- Done!
2. Through Task Manager
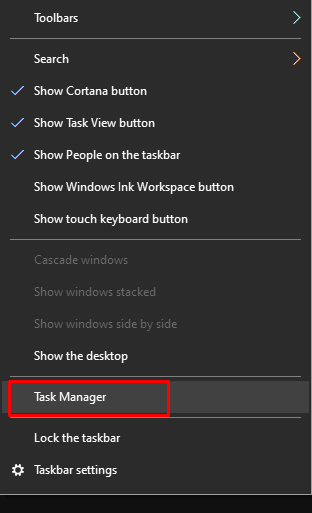
- Right-click on the deserted field of Taskbar and press the 3rd option from the bottom Task Manager.
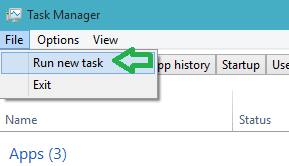
- Task manager Window emerges. On the left uppermost corner of menubar, you find File. Tap on this option. A drop-down comes fourth. choose the first choice from upward which says Run new task.
- Create new task window will arrive now. In the text field, type powershell and select the option Create this task with administrative privileges.
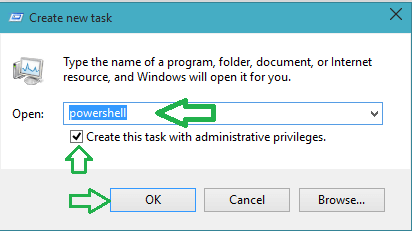
- Click Ok to continue.
- PowerShell with administrator rights will be seen on your screen.
3. Through Taskbar Search
- Click Taskbar search icon, type PowerShell in the text field and hit Enter key.
- You will see Windows PowerShell option with its icon. Select Run as administrator from the right flyout.
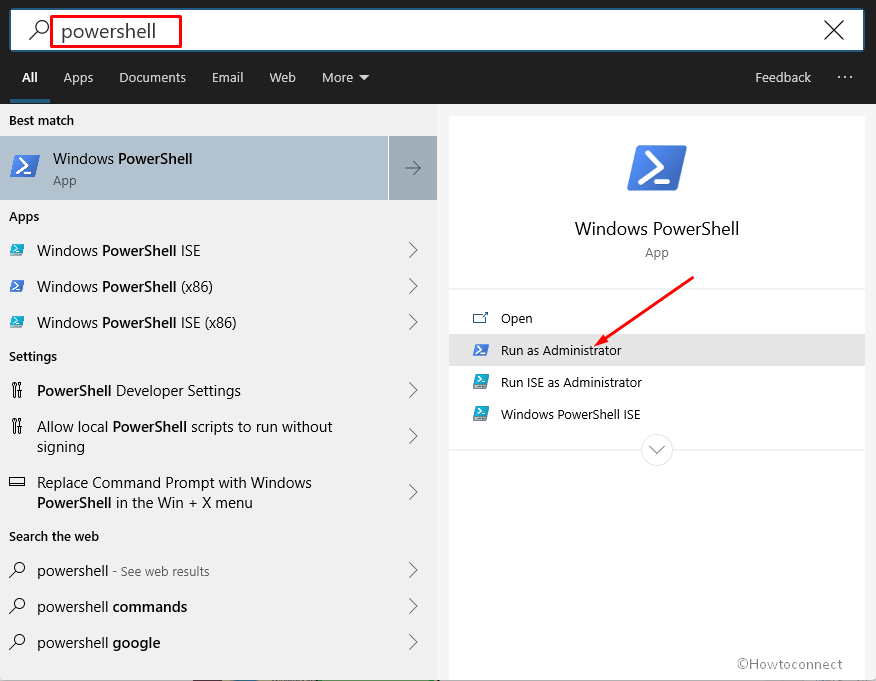
- PowerShell will be launched with administrator privileges.
4. Through from File Explorer again, but this time by Right Click Context menu.
- Access File Explorer on your screen and take yourself to the underneath path –
C:\Windows\System32\WindowsPowerShell\v1.0
- Look for powershell.exe lying in the middle part of the file explorer. Right-click on it and go with the option on the second place from the top which says Run as administrator.
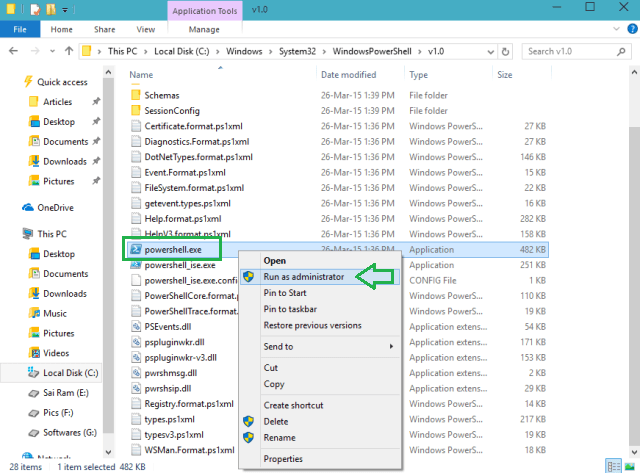
- These are the 4 different ways you can Run PowerShell as administrator in Windows 10.
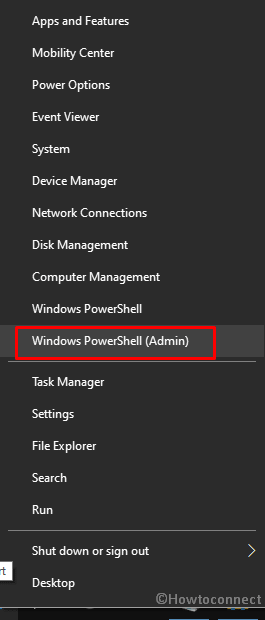
Via Power user menu
- Right click on Start lying at the bottom left corner of the screen. Select Windows PowerShell (admin).
jefferson
says:I would like to delete the administrator account since PowerShell is the admin. Will that cause any problems?
That is because I wanted to swap administrator account with another user (local) and don’t know how to do it.
I discovered, however, that PowerShell is the admin.
Could help me to change the administrator to the desired user account, despite PowerShell being the admin and at present another user name is the administrator?
Thanks
J