The Tsunami X ROM has been released by AOKP (Android Open Kang Project) developer team with a number of latest features. It has removed all previous needless features as well as offers several customizing options so that you can make up your GT-I9000 phone in desired Android interface. The Tsunami X ROM is un-official release version through Samsung. In this tips, we will explain you how to install Tsunami X Android 4.2.2 Jelly Bean Custom ROM on Galaxy S I9000 using CWM recovery method.
Caution
This Tsunami X ROM is only for Galaxy S GT-I9000 Android phone. We advise you to don’t try it on any other Galaxy phones or tablets. In addition, the installation process mentioned in this page is measured as unsafe, because, it may be dead or damage your Android phone. We or the AOKP developers of Tsunami X ROM will not be answerable for any issues. It is recommended that you should start the ROM update process at your personal risk.
Before you begin
- Download and Install Samsung USB driver to your computer in order to connect your Android device with the computer.
- Next, you have to backup all data of Galaxy S GT-I9000 phone. The backup process can be done either using Samsung KIES software on your computer or to memory card manually.
- You must enable USB debugging mode on your Galaxy I9000 Android phone.
- Confirm that battery of I9000 phone is remaining at least 80-85 % battery level.
- Your Galaxy GT-I9000 phone should be rooted and have ClockworkMod recovery installed from before.

How to Install Tsunami X Android 4.2.2 Custom ROM on Samsung Galaxy S I9000
Step 1
At first, you need to download both zip files to your computer from below given link.
Download Tsunami X Custom ROM
Google Apps
Step 2
Now connect both devices (computer and Galaxy S I9000 phone) with the USB cable and browse the Phone’s USB mass storage directory on the desktop screen.
Step 3
At this span of time copy the downloaded both zip files (Android 4.2.2 ROM and Google Apps) and paste it to your memory card. Confirm that you have moved both zip files only in root folder of memory card.
Step 4
After that, switch off your Android phone and remove from the USB cable.
Step 5
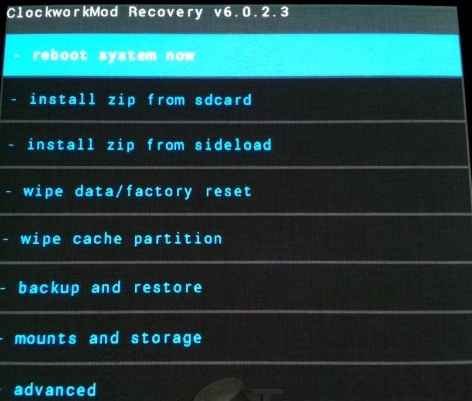
Now you have to boot in the recovery mode. To do so, power on the Galaxy S phone for this purpose you must press and hold volume up + Home + power buttons jointly.
Step 6
As soon as you reach in CWM recovery mode, select wipe data/factory reset option. Then press the power button on the screen in order to do data cleaning action.
Step 7
Next, you have to select wipe cache partition option to clean all stored previous cache in existing ROM.

Step 8
Now the process one should do is dalvik cache clean action. To do so, in CWM recovery main screen, select advanced option. After that choose wipe dalvik cache option on the next screen.
Step 9
At this juncture return to the recovery mode main screen and select install zip from SD card option. Nowadays, select choose zip from sdcard option from next screen and locate to Android 4.2.2 ROM zip file from your memory card and select it with the Power button. At this time, you have to authenticate the installation process on the next screen. After few minutes, it will finish.
Note – Repeat the above step 9 processes another time for selecting the Gapps zip file from the memory card.
Step 10
Once the ROM installation procedure is ended, return to the recovery mode main screen and select reboot system now option to reboot the Galaxy S I9000 Phone.
Now Galaxy S I9000 phone will load first time approximately 5 minutes into installed Android Tsunami X Android 4.2.2 ROM.
