Do you want to Set Custom Startup Sound in Windows 10 so that you may begin your work with fresh mood? Personalization lovers always prefer to be greeted with a melodious audio clip by their PC. So, if you wish to hear a pleasant note at boot, you are at the right location. Read How to Set Custom Notification Sound in Windows 10.
Windows plays a sound on the completion of a boot to inform you that the operating system is ready to use. The workaround to use your preferred media after Windows loads were possible in the previous editions with built-in settings. But here, you need to take help of a third party tool. Startup Sound Changer is a very famous utility with a clean interface that lets you do this very smoothly. So, hook to this tutorial and explore the sections one by one.
Table of Contents
How to Set Custom Startup Sound in Windows 10
For your convenience, we have divided the tutorial into four different sections so that you can easily follow it.
1. Disable the Fast Boot
You all know that this Fast Startup has a great significance when it is about enhancing the booting time. However, not all features of Fast Startup are interesting. When it is on, there are chances that Windows prevents from greeting you with a sound. So, the best workaround is to switch off the fast boot and to do follow the below-given steps.
Step 1 – Open WinX menu and select Power Options to Set Custom Startup Sound in Windows 10 PC. Instead of pressing Win + X keys, you can also right-click Start.
Step 2 – Here, locate and click Additional power settings.
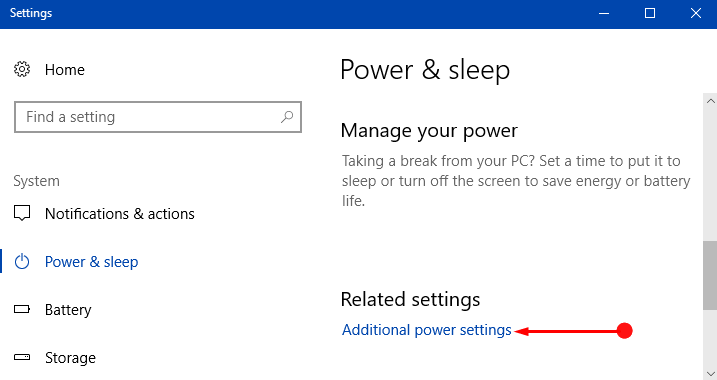
Step 3 – This launches Control Panel, displaying all the settings associated with power. Moving on, click Choose what the power button does on the top left side.
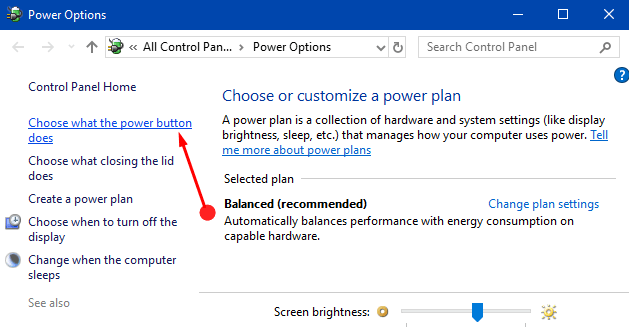
Step 4 – You may find some options grayed out, so to manage them, click Change settings that are currently unavailable.
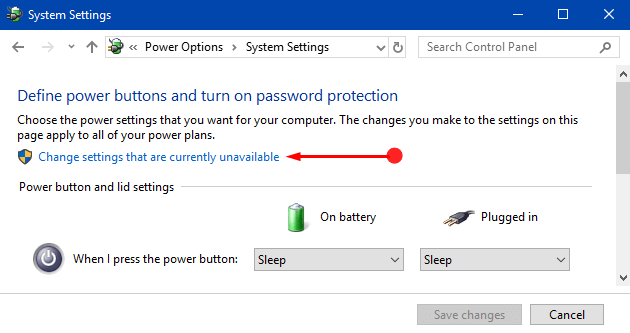
Step 5 – Out of various option, untick the first one namely Turn on fast startup. Lastly, click Save changes to make the Fast Startup modifications effective.
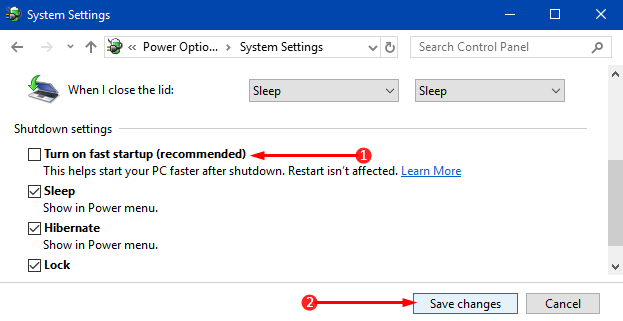
You can also follow our detailed tutorial on How to Turn On or Off Fast Startup in Windows 10.
2. Turn On Windows Startup Sound
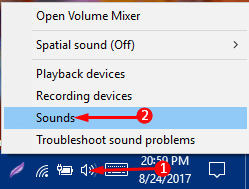
Step 1 – To Set Custom Startup Sound, execute a right-click on speaker icon on the taskbar. When few options come up, select Sounds.
Step 2 – Stay on the Sounds tab and ensure to tick mark the last box “Play Windows Startup sound“.
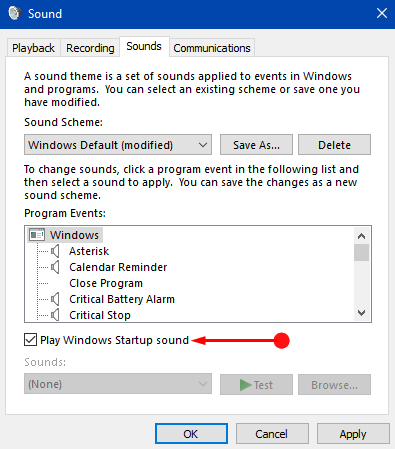
Step 3 – Click Ok on the dialog to enable this feature.
For reference, see How to Disable / Enable Startup Sound on Windows 10 to learn more.
3. Download and Install Startup Sound Changer
Step 1 – Now, visit this web page and download Startup Sound Changer, a small freeware.
Step 2 – After downloading it, extract the contents. When you see its executable file, double-click on it to install the tool.
4. Set Custom Startup Sound
To Set Custom Startup Sound, the audio clip should be in .wav file format. You can either download the jingle in .wav format or can convert it online also.
Step 1 – Once your preferred jingle is ready in .wav file format, you can set up a set up a custom Startup sound. So, first, open Startup Sound Changer by clicking its icon on the desktop.
Step 2 – Here, you can see four options, click Replace.
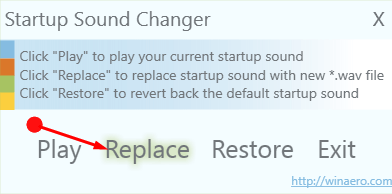
Step 3 – Just navigate to your preferred sound and select it. Finally, enjoy the sound when the OS Startup.
You may like to pursue Windows 10 – How to Turn Off System Beep Sounds.
Conclusion
Microsoft does not provide any direct option or another workaround to Set Custom Startup Sound in Windows 10. So, you have to take help of other tools to make it happen. However, this Startup Sound Changer is the simplest one in this regard. If you are aware of some other easy method to change this sound, do write them to us.