Start Menu is the most crucial part of Windows but imagine how frustrating it can be when it won’t work on Windows 10 Version 1803! Since when Microsoft released their latest version, a huge number of users are reporting about it. Some complain that it completely disappears, or just does not respond to multiple clicks. Thankfully, there are some solutions to Start Menu Not Working in Windows 10 Version 1803 April 2018 Update and we will discuss them in the following section.
Windows 10 April 2018 Update came to the system with a great zeal but a large number of users complains about bugs and problems. However, they are fixing them gradually by sending cumulative updates but Start menu still requires attention.
Table of Contents
Start Menu Not Working in Windows 10 Version 1803 April 2018 update Solutions
Here is how to fix Start Menu Not Working in Windows 10 Version 1803 –
Solution 1 – Start Menu Troubleshooter
After the launch of “Creators Update“, a substantial number of users started reporting about Start Menu issues. At that time, Microsoft rolled out Start Menu troubleshooter. It will scan and verify the correct installation of Start Menu and Cortana on your PC. Moreover, it will also try to ensure that registry key permissions, as well as database corruptions, are in place.
Step-1: Make a click on the following link and the troubleshooter will initiate downloading.
Step-2: Once it is over, go to the Downloads folder, locate and double-click the file namely startmenu.diagcab.
Step-3: The troubleshooter wizard will appear, click Advanced. Here, ensure to checkmark the box Apply repairs automatically.
Step-4: Click Next and follow the guidelines of the wizard to complete the troubleshooting process.
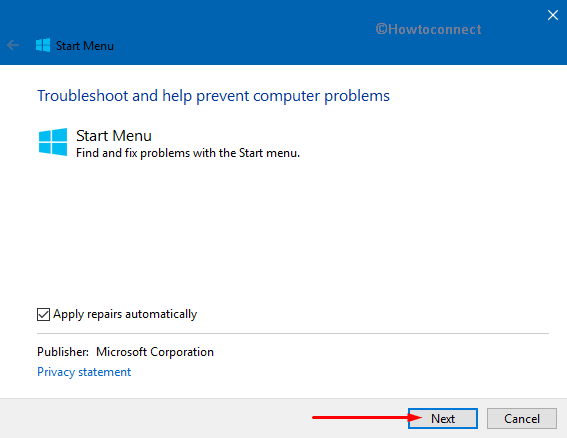
If it detects any issue, the troubleshooter will try to resolve it by itself. After you Troubleshoot Start Menu if the problem continues to occur, see the next fix.
Solution-2: Reinstall all Windows apps
Windows apps are those that come with built-in Windows 10 and also obtainable from Microsoft Store. Previously these were addressed as Metro apps but now Microsoft changed it to Modern.
Though reinstalling Windows app apparently bypass the Start Menu Not Working in Windows 10 Version 1803 issue but it’s not that much easy to carry out. The re-installation is automatic and doesn’t take much time to finish. But before you head towards the steps, ensure that this procedure will wipe out certain data that is saved in these apps. So, it’s better to keep a backup.
– Perform a combined hit on Win+R keys to open Run dialog box on the PC screen.
– Type PowerShell in the text field and press Ctrl + Shift + Enter keys altogether. If UAC prompts up, click Yes to proceed further.
– This will launch an elevated PowerShell on the PC screen.
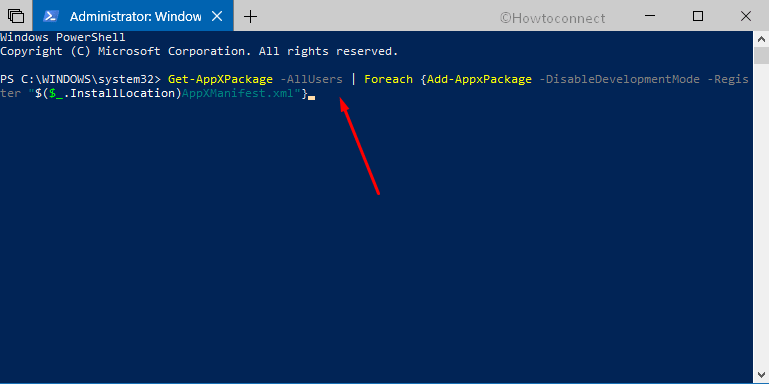
– Once you are in, copy-paste the below-given command and hit Enter.
Get-AppXPackage -AllUsers | Foreach {Add-AppxPackage -DisableDevelopmentMode -Register "$($_.InstallLocation)AppXManifest.xml"}
Now, lots of processes will begin and in the end, you will notice quite a few red texts. Just ignore those lines and restart Windows 10 PC.
Solution-3: Change Privacy Settings
When Start Menu Not Working in Windows 10 Version 1803 occurs after restarting the computer or post-Windows Update, then tweaking “Sign in Privacy setting” may provide some relief.
Hit Win+I hotkeys to open Windows Settings quickly.
Click Accounts category.
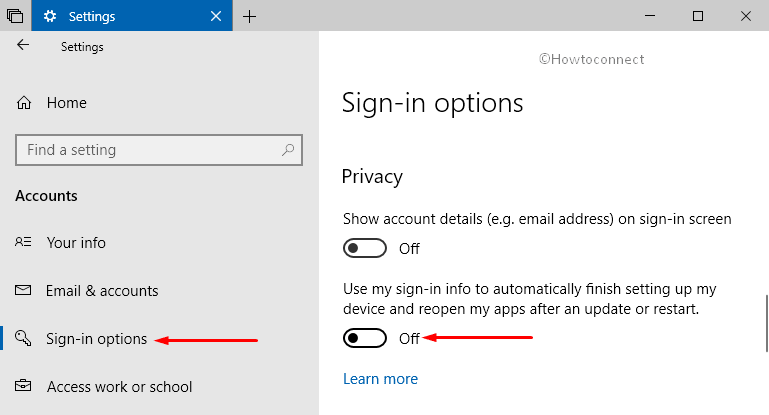
Select Sign-in options on the left pane of the following page. On the right pane, scroll to Privacy section and toggle OFF the option “Use my sign-in info to automatically finish setting up my device and reopen my apps after an update or restart“.
Solution-4: Create a New Account
After following the above method, in case Start Menu Not Working in Windows 10 Version 1803 continues, then you should give a shot to “create a new user account”. If you are currently using a “Microsoft account”, your settings will be transferred to the new account when you upgrade it from the local account. You just need to transfer all your files from one account to another. Let’s see how you can create a new user account –
• Go to the Cortana search box and type powershell on it. When it displays the result, make a right click on PowerShell and select “Run as administrator“.
• Once the PowerShell Window shows on the display, type the following after the blinking prompt.
net user NewUsername NewPassword /add
Note – In the place of ‘NewUsername’ and ‘NewPassword’, you need to put your new username and password.
• Now press Enter in order to create a new account.
At last, Reboot your computer and this time login with your new user account.
Hopefully, it will resolve Start Menu Not Working in Windows 10 Version 1803. And if it is perfectly operating, you need to transfer your settings to the new account by following the given series of steps.
Open Start Menu, type cp, and open Control Panel by clicking the same result on top.
Click System applet.
Select “Advanced system settings” from the top left corner of the following window.
Switch to the Advanced tab and hit Settings button under “User Profiles”.
Now, select the new account and henceforth click Copy To button.
Solution-5: Find and repair Windows files
Sometimes corrupted files may cause various issues in the Start Menu. Luckily Windows 10 has built-in feature to fix it.
Conduct a right-click on Start icon on the taskbar and let power user menu show up. Alternatively, pressing Windows+X keys will also access the same menu.
From the list, locate and click Windows PowerShell (Admin). If UAC prompts up, click Yes.
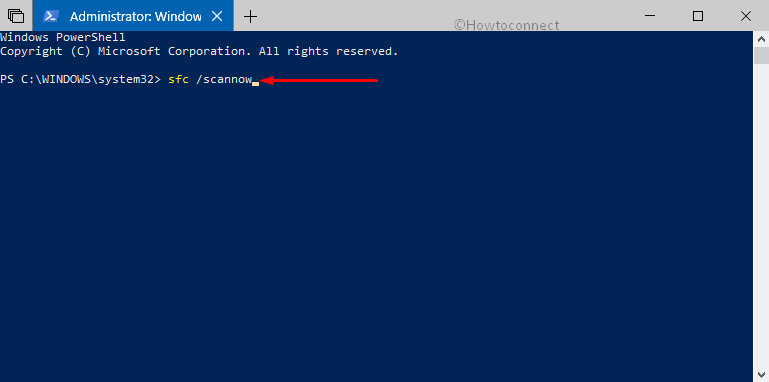
Now, in the blue window type or copy/paste the following and press Enter.
sfc /scannow
The scanning of your files will take up in a moment but be patient as it may take some time to complete.
Upon finishing the process, you may see three likely results –
A. “Windows did not find any integrity violations”,
B. “Windows Resource Protection found corrupt files and repaired them”,
C. “Windows Resource Protection found corrupt files but was unable to fix some (or all) of them”.
If you see the last result, then again insert the below command and press Enter.
DISM /Online /Cleanup-Image /RestoreHealth
This process may take time but in the end, your system will start downloading files from Windows Update which will eventually replace the corrupted one.
Solution-6: Restart Windows Explorer
For many users, restarting Windows Explorer also resolves various troubles that often occurs in Start Menu.
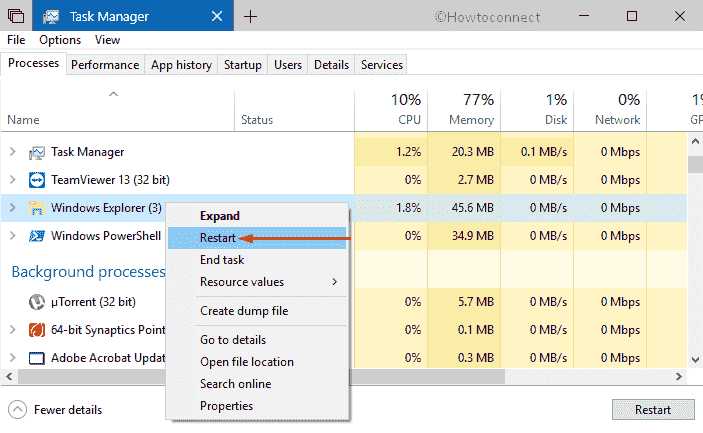
Perform a right-click on an empty area on the taskbar and henceforth choose Task Manager from the menu.
Stay in the Processes tab and find out Windows Explorer entry. Once you see it, again perform a right-click on it and choose Restart.
Solution-7: Check for Updates
If above solution didn’t work for you, then this is another option to fix Start Menu Not Working in Windows 10 Version 1803. The ultimate attempt that you can make is to check for updates. If Microsoft rolls out another small Cumulative update, then it can also provide some relief to your non-functioning Start Menu.
Make a joint press of Win+I to open Settings app. When it rolls out on the display, do a click on Update & Security once highlighted.
Stay in Windows Update section and shift to the right side. Moving ahead, perform a click on “Check for updates” button.
It will check if an update is available for you or not. Once it finds the update, it will automatically download the files and install it as well.
Solution-8: Uninstall Third-party Antivirus
If there is any presence of 3rd party antivirus solution on your computer, then there are possible chances of the causing problems to your Start Menu. If removing these antivirus programs from the system resolves the Start Menu issue then you should contact the vendor to seek some help.
However, the built-in Windows Defender Security Center also protects your PC from basic threats.
For reference, go through our article on How to Uninstall Unnecessary Apps from Windows 10.
Solution-9: Run Application Identity Service
The Application Identity is a service in Windows 10 that decides which applications are allowed or not allowed to function on your computer. Usually, you don’t need to touch this service as it works correctly on your PC. However, forcing it to run especially when you encounter Start Menu Not Working in Windows 10 Version 1803 will definitely provide some assistance.
Access Run dialog box by hitting Win+R hotkeys altogether.
Type “services.msc” on its text field and click OK to continue.
Once Services window opens up, find out Application Identity service. Once you locate it, do a right-click on it and select Start.
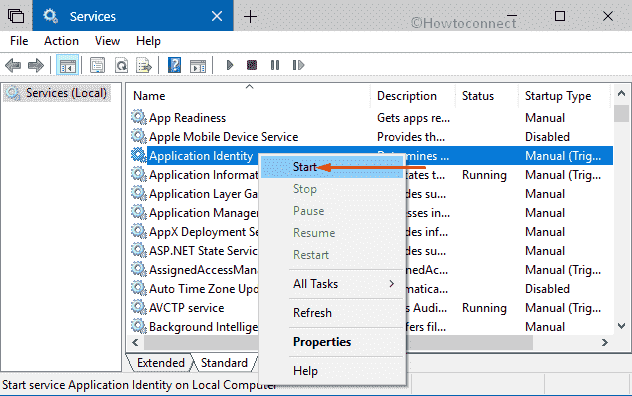
Finally, restart the PC and the Start Menu should be running up flawlessly.
Solution-10: Reset your PC
Reset is similar to reinstalling your Windows 10 but in this case, your document will not be affected. However, after resetting, you will have to reinstall the apps that are not part of Windows 10. Here’s how you can reset your PC –
• Open Start Menu and click the cog icon that shows up at the bottom left corner.
• When Windows Settings interface appears, select Update & Security tab.
• Moving ahead, choose Recovery tab on the left sidebar.
• Shift to the corresponding right-hand side, click Get started button underneath the section namely Reset this PC.
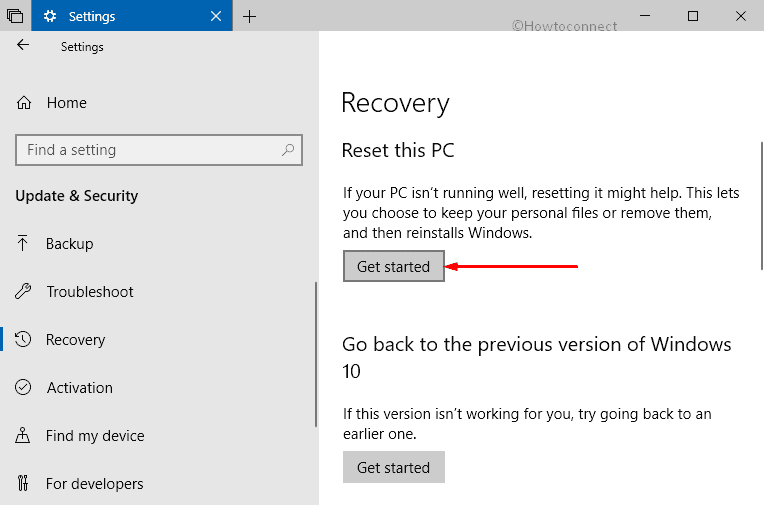
• A box will appear with two options – “Keep my files” and “Remove everything”. You can choose to Reset Windows 10 by Removing Everything or by Keeping Files as per preference.
• Choose your option accordingly and it will process automatically.
So, That’s it. As Microsoft didn’t give any official fix for this issue, you may try some method to solve Start Menu Not Working in Windows 10 Version 1803.