Many users of Windows 10 are apt to watch the videos of high distinctive quality across scenes in Microsoft Edge and hence a video format is essentially needed to improve the resolution without spending more on the bandwidth usage. After the fresh Windows update Edge will comprise VP9 to code for the videos. At present this is regarded as the most powerful and capable video compression codec at the half bandwidth in comparison to the same used by the variant codecs. So, in this article we will pen down the steps, going through which you can Turn on VP9 Codec in Edge on Windows 10.
However, the users of Windows 10 Build 10547 can procure this facility. This tool was not aided by Edge in the former days but later on, Microsoft decided to provide it to the users. If you wish to watch videos of high resolution, ensure to install this latest build and then follow the below steps for how to Turn on VP9 Codec in Edge on Windows 10 written further.
How to Turn on VP9 Codec in Edge on Windows 10
- Spread out Edge on your screen and on the address bar write the following words: about:flags

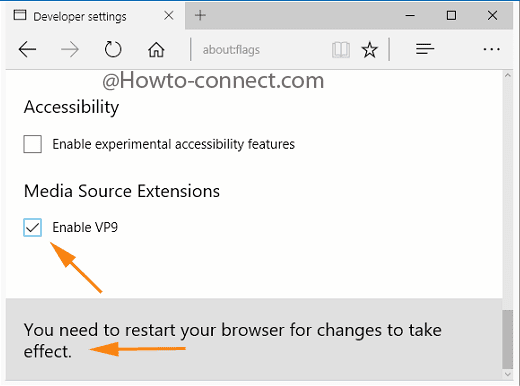
- Underneath the Experimental Features, get yourself down to the Media Source Extensions.
- It holds a cell that says to Enable VP9. Put a tick mark on it.

- When done, restart the browser.
- Again launch the browser to see that it supports the web pages that consist of VP9 videos.
After you turn on VP9 into edge you would be able to run the videos having 4K resolution on this browser. This will not affect the data as the video will be compressed to half of its original size. This means you can see the extra high-resolution videos without spending on data.