The basic recommendation given to every user to develop his Windows 10 computer blazingly fast is to optimize the paging file. In this article, we will help you with a few formularizations which you need when trying to tweak paging file. Also, we will share a light on the paging file settings.
In this post, we have illustrated How to Tweak Paging File for better Windows 11 or 10 Performance, its basic concepts furthermore customization methods.
Table of Contents
Basics of Paging File in Windows 11 or 10
Another name of the paging file is Virtual memory. When the real storage aka the physical RAM of your PC gets repleted, Windows consumes space of your hard drive which is known as virtual memory. Let us explain this in a more simple way. Suppose you have a computer whose RAM is 2 GB and you have installed various applications that result in needing more than 2.0GB of memory. In this state what Windows does is that it consumes the computer’s 2 GB memory and then utilizes free space of hard drive. This is known as virtual memory or in other term paging file. Thus, depending on your active applications, Windows enlarges and contracts the paging file as needed. Hence, when your computer uses paging file the performance of your computer slows down. Never miss this article – How to Customize Paging File Size for Disk Drives in Windows 10.
Therefore, it is always advised to use a good quantity of real storage (RAM) because more storage means better performance of your computer. But, there is nothing to worry about if you have less RAM because you can tweak paging file in Windows 11 and 10. By tweaking the settings of the paging file, you can prevent Windows from being fragmented and thus keep Windows trouble free. Read the below steps to tweak paging file in Windows 10 or 11.
How to Tweak Paging File in Windows 11 or 10
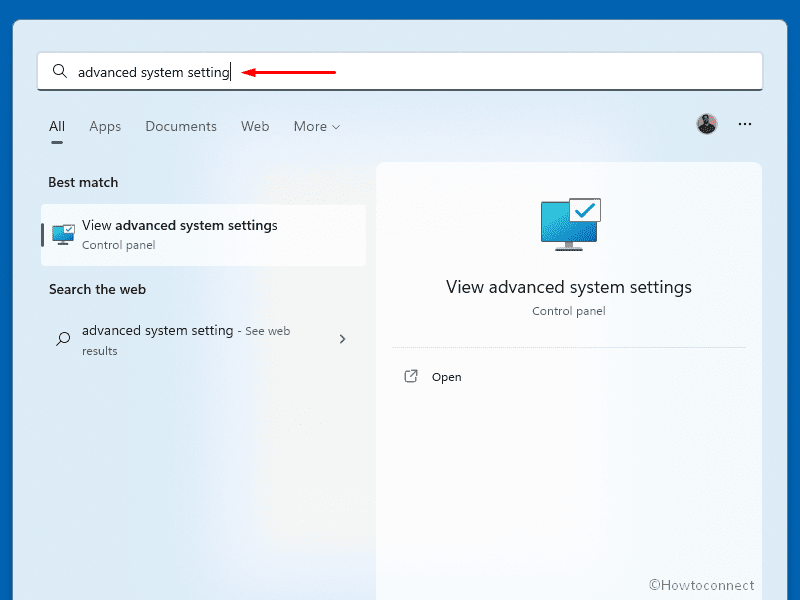
- Click on Search.
- .Type advanced system settings.
- Press Enter.
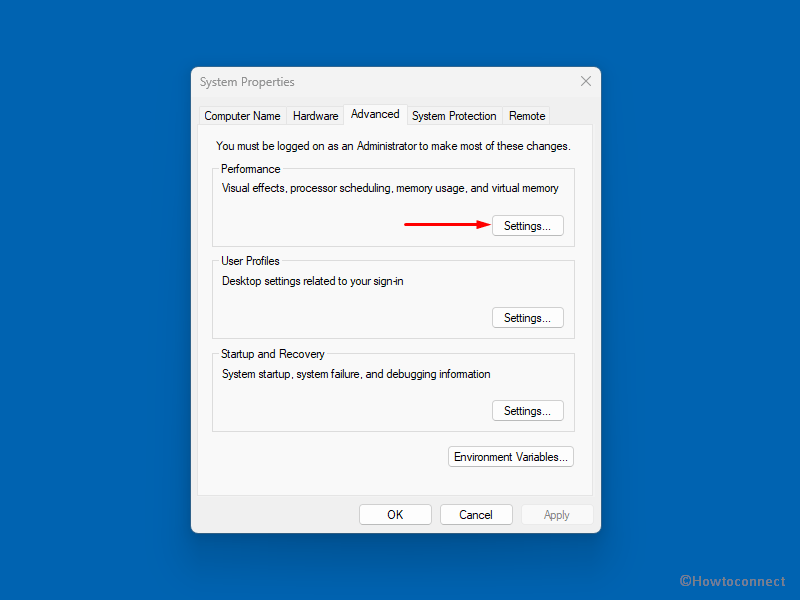
- On the System Properties wizard, go to the Performance section and click on Settings,
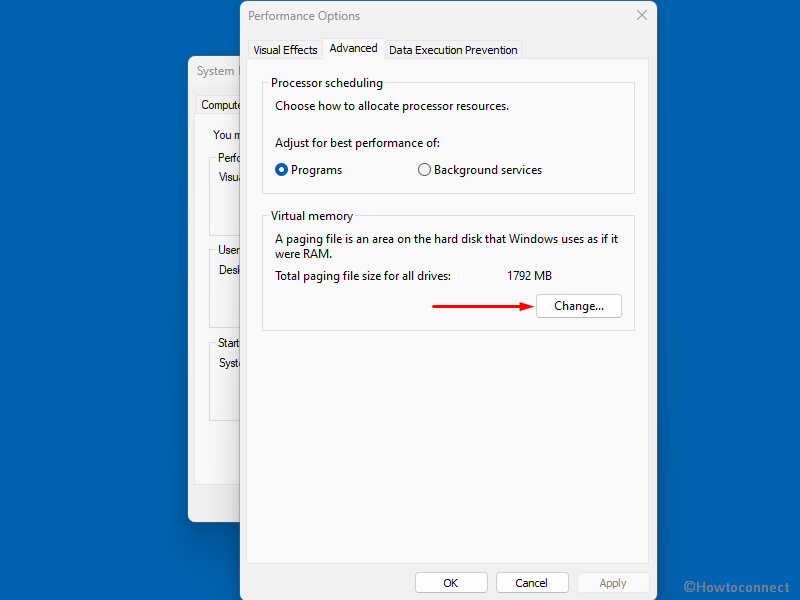
- On ‘Performance Options’ window, click on Advanced tab.
- From the ‘Virtual memory’ section, click on Change.
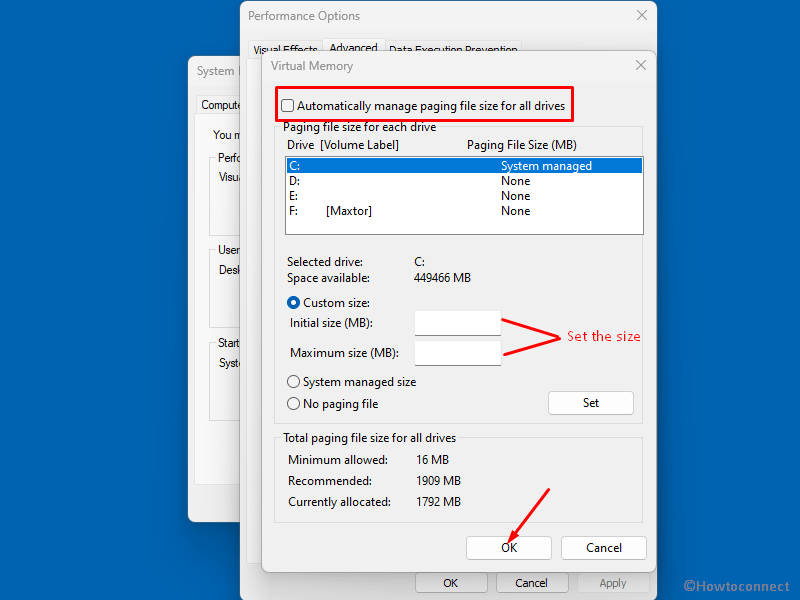
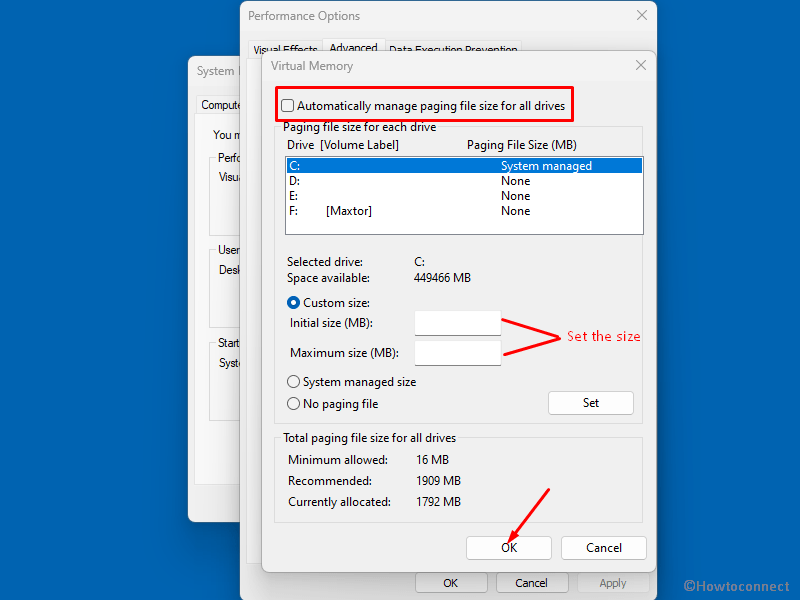
- Now, you can view a dialog box of the Virtual Memory containing drive names and sizes. Generally, the Automatically manage paging file size for all drives is set by default. Uncheck this option.
You need to keep certain points in your mind before you proceed to tweak paging file in Windows 11 or 10. In order to correctly set your paging file, you have to follow basic norms –
- It is best suggested to create a paging file on variant partition rather than your boot partition. Boot partition is generally the drive containing the operating system, in most of the cases, it is the C drive. It is advised because Windows can then manage several I/O requests (Input/Output) more easily. To make it clearer, when the paging file is created in the boot partition, Windows have to execute disk reading and writing plea on both the paging file and system folder. So, when you move the paging file to a different partition, the competition between reading and writing petitions gets decreased.
- But, when you take out the paging file from the boot partition, Windows becomes unable to create a dump file.
- So, the perfect way is to set one paging file on the boot partition so that it will manage the wreck situations and another paging file on a different partition of a totally different hard drive. Now, in case you have one hard drive present on your computer, simply establish a paging file on another partition. In this way, Windows will use the paging file which is not accessed much.
- Another interesting way is to set the paging file without any extra data on its own partition. It makes sure that Windows performance will improve and the paging file will not be shattered.
- In order to lower the rupture of the paging file, set the same number to the initial size and maximum size. See the below screenshot. This makes it sure that the file can not either expand or shrink and hence will avoid fragmentation.
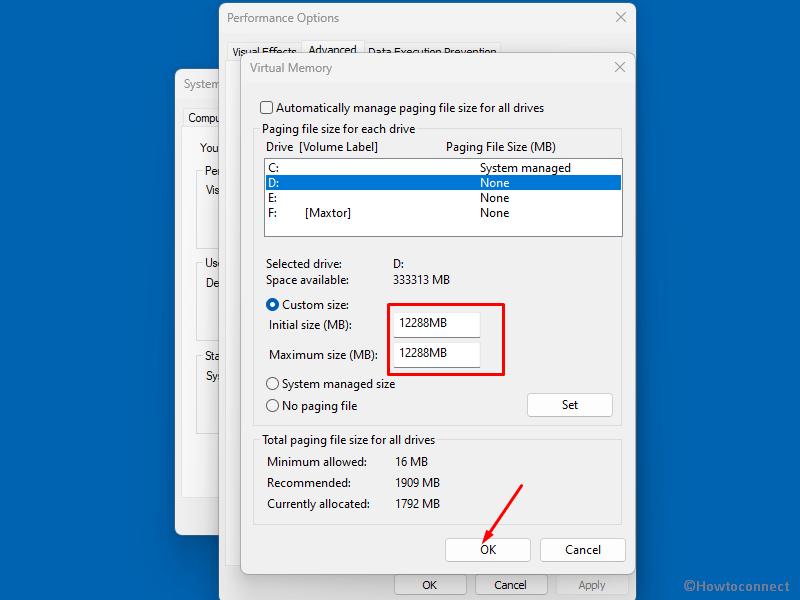
Windows Paging File size recommendation / Virtual Memory Recommended Size Windows 11 or 10
Paging File size depends on the size of Physical memory of a computer. It can be lowest 1.5 times and highest 4 times of RAM. Suppose your PC has 1GB of Memory then Paging file size should start from initial 1.5 GB and finish up to Maximum 4GB. If you believe in precise calculation then see the following table
| Physical Memory | Paging File size / Virtual Memory | |
| Minimum | Maximum | |
| 1GB | 1536MB | 4096MB |
| 2GB | 3072MB | 8192MB |
| 3GB | 4608MB | 12288MB |
| 4GB | 6144MB | 16384MB |
| 5GB | 7680MB | 20480MB |
| 6GB | 9216MB | 24576MB |
| 7GB | 10752MB | 28672MB |
| 8GB | 12288MB | 32768MB |
| 9GB | 13824MB | 36864MB |
| 10GB | 15360MB | 40960MB |
We hope the information provided about Tweak Paging File in Windows 11 or 10 in this article will be quite helpful to you.
sunita
says:Hey wilderbee, Thanks for your precious complement.
You can reduce the volume of files through this article: How to Reduce Windows 10 Disk Footprint on your PC
wilderbee
says:thank you, Thank You, THANK YOU
— Desperately needed your info to control Windows 10.
— Win-10 ate all my metered bandwidth for the month in just a few days!!!
— Plus it would get slow even though I bought max speed, max disk, max memory!!! So then corrupted my work.
–Your articles are the best and most extensive I have found for a thorough list of fixes.