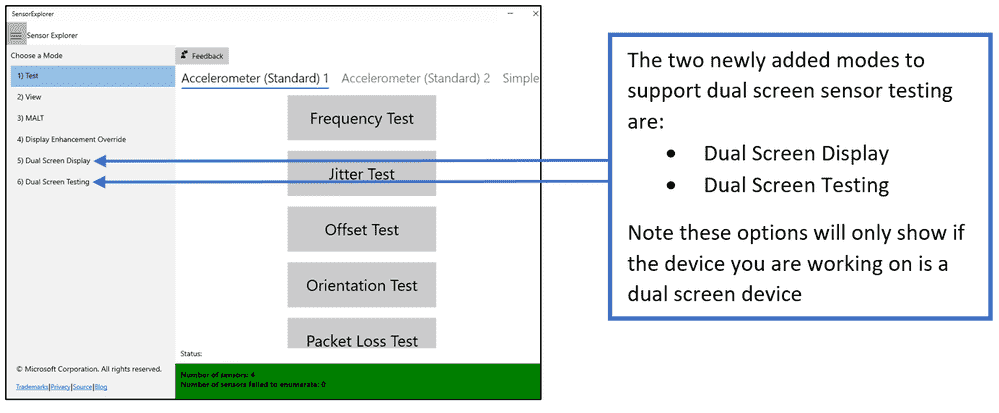
Microsoft has launched a very exclusive application named SensorExplorer way back in 2017. The app is now available easily on the Microsoft Store and you can also access the entire package from GitHub. Comprising a small size of 22.04 MB, it provides you the ability to verify the installation of compatible sensors such as orientation sensors which otherwise would not have been possible manually.
Moreover, the application will also produce you comprehensive tables and plots that enable you to monitor different other sensors as well which may be useful for you in the long run. So in this article, we will walk through the procedure of How to Use Sensor Explorer 2.0 to Check Dual Screen in Windows 11 or 10.
Table of Contents
SensorExplorer 2.0 in Windows 11 and 10
Here is How to Use SensorExplorer 2.0 to Check Dual Screen in Windows 11 or 10 –
Download SensorExplorer 2.0
Before moving on to the testing of the dual-screen with the SensorExplorer, let us first explore the ways from where you can grab the app.
1] Through Microsoft Store
- Get access to any web browser and navigate to the official download webpage of SensorExplorer.
- Click Get and upon popup, select Open Microsoft Store.
- When Microsoft Store displays the overview of the app, click Get again on its interface.
- Let the application get downloaded and installed on the system.
2] From GitHub
- First of all, click on this link and visit the GitHub website. You will get the app package inside the SensorExplorer folder for sideloading.
- Download and install the package manually.
Check Dual Screen in Windows 11 or 10
Well, now we know the different new components of the SensorExplorer 2.0 and before even getting started with the testing, make sure you work on the below-given instructions.
1] Check if the two Accelerometers and Sensors are present
So to begin with, it is important that all the components are intact and ready to be used.
- Once into the app, click on View mode, the hamburger menu on the upper left corner.
- Scroll the cursor horizontally to check all the four components on the screen. You should see Accelerometer 1, Accelerometer 2, Simple Orientation Sensor 1, and Simple Orientation Sensor 2.
- If you see all of them, you are good to proceed further.
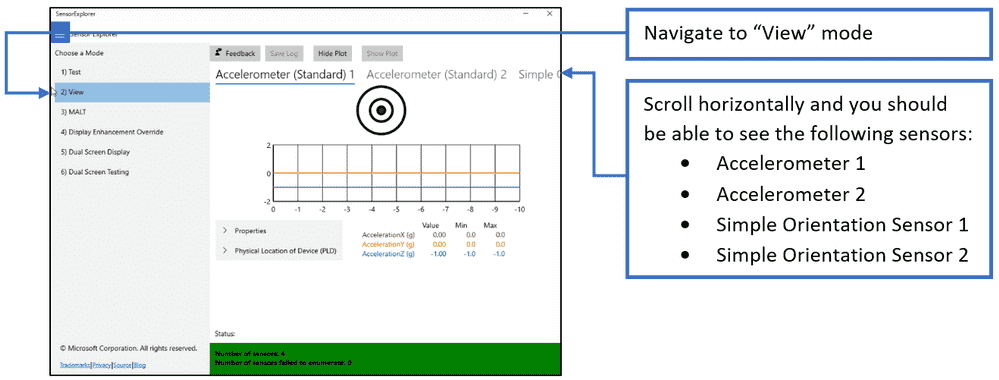
If you do not see the name of any of the above components on SensorExplorer, it means that sensors have not been enumerated to your OS. Make sure all the four sensors are on the screen.
2] Unique Panel ID for accelerometer and Sensor
Now, for the next step, you need to check whether the accelerometer and orientation sensor has a unique Panel ID.
- Click on the View Mode button that appears at the top left.
- Scroll your mouse horizontally and select Hide Plot.
- Finally, expand the “Physical Location of Device” (PLD) section to check the Unique Panel ID.
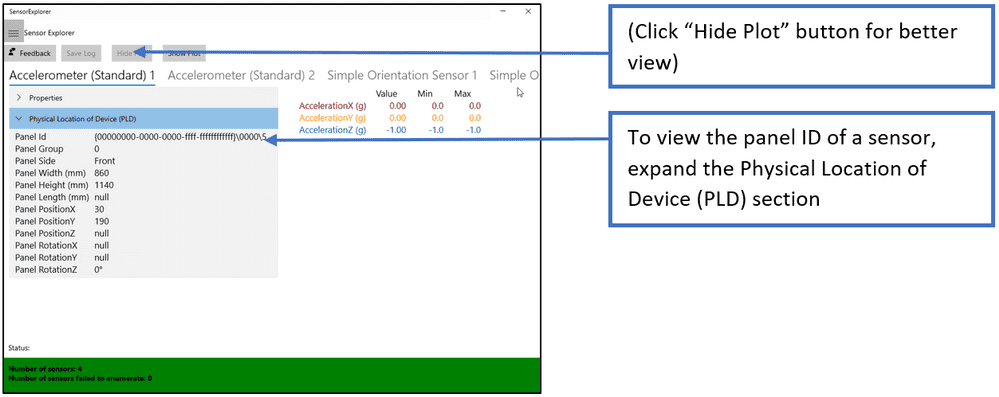
Sometimes, there are might occur certain chances where the ID goes missing from the panel. Well, the reason could be that PLD values have not been properly submitted. Therefore, make sure everything is up to date and wait for the Panel ID to appear.
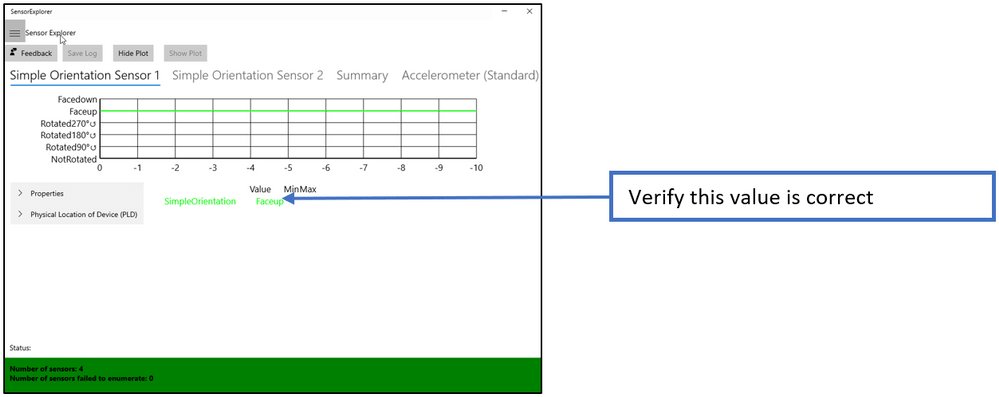
3] Simply move the device around and verify the data
Last but not least, all you need to do is move the device and check its status appearing on the screen. The data needs to be correct that is coming out from each simple orientation sensor.
Test Dual Screen Mode
Now, we have finally come to the sole purpose of this article, all the below information will allow you to test the devices.
1] Hinge Angle Test
You need to arrange two panels of the device to achieve a particular Hinge Angle to a certain degree. After this, check the sensor readings accordingly.
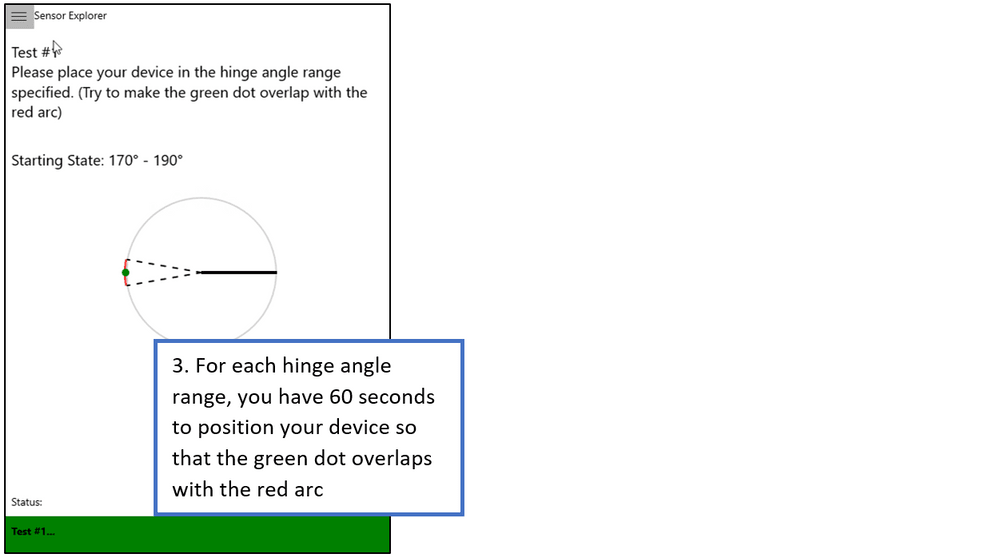
In total, the test consists of performing 5 rounds. By taking angles range of 170° – 190°, you have to change the angles similarly.
- First of all, go to Dual Screen Testing Mode.
- Now, click on the Hinge Angle Test to begin the process.
- Select the Hinge Angle sensor that you prefer to test from the drop-down menu.
- On the screen, you may see a circle with data. As a part of the process, you have over 60 seconds to change the hinge angle and such that the green dot overlaps the red one.
2] Posture Test
In this test, you will be asked to position the device in a certain posture and check the sensors further.
Unlike the previous test, this will be around for 20 rounds. However, you will be made to move your device with starting posture and then to a final posture.
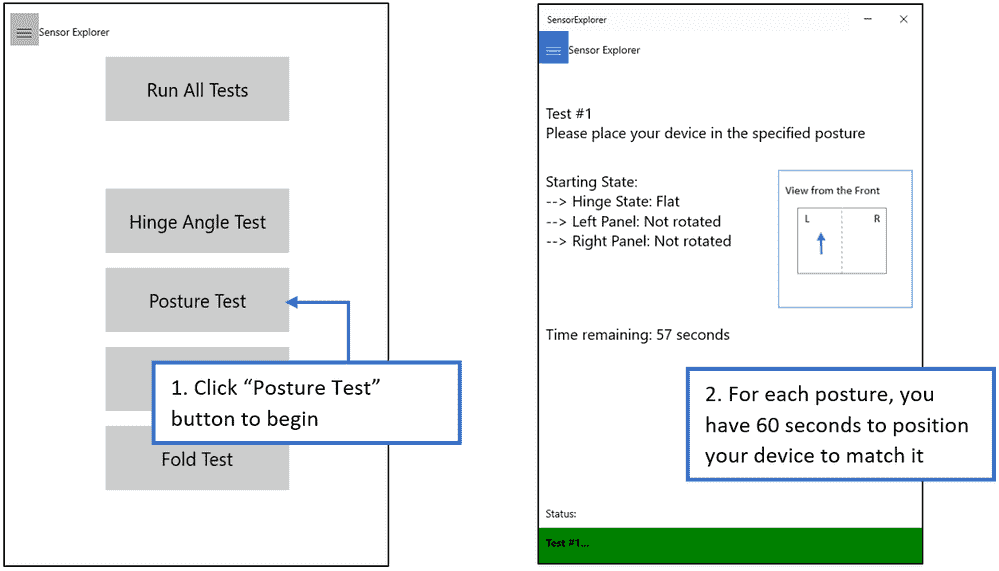
- Choose Posture Testing under the Dual Screen Testing Mode.
- Each round has different postures to be tested and make sure you have a different posture every time.
- Only 60 seconds are allowed to position the device as displayed on the screen.
3] Flip Test
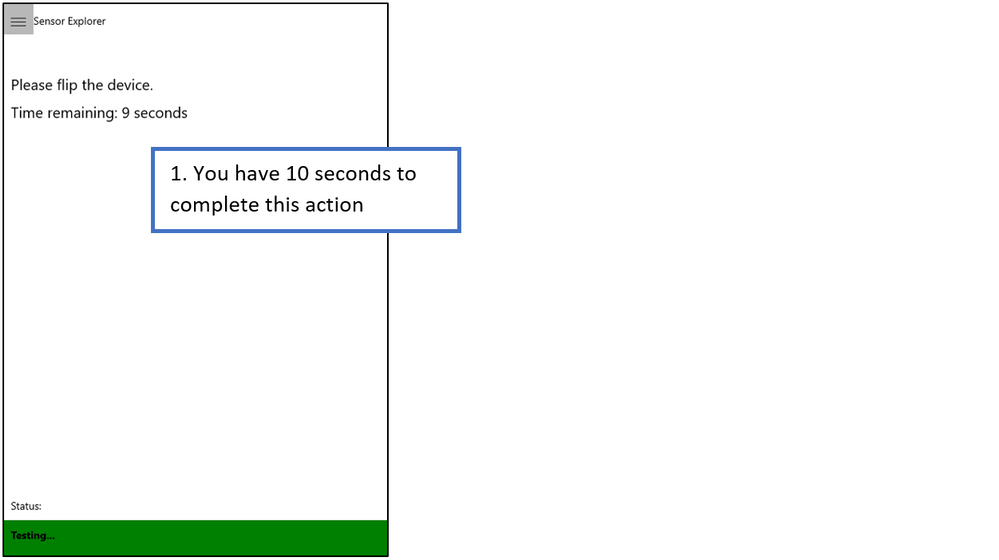
Once you are over with the Posture test accurately, move on to the Flip Test. As simple as it sounds, all you need to do is flip the device open or shut and the sensor will test the flip.
You will be only given 10 seconds to perform the Flip action. As soon as you Flip it the sensor will test the action.
4] Fold Test
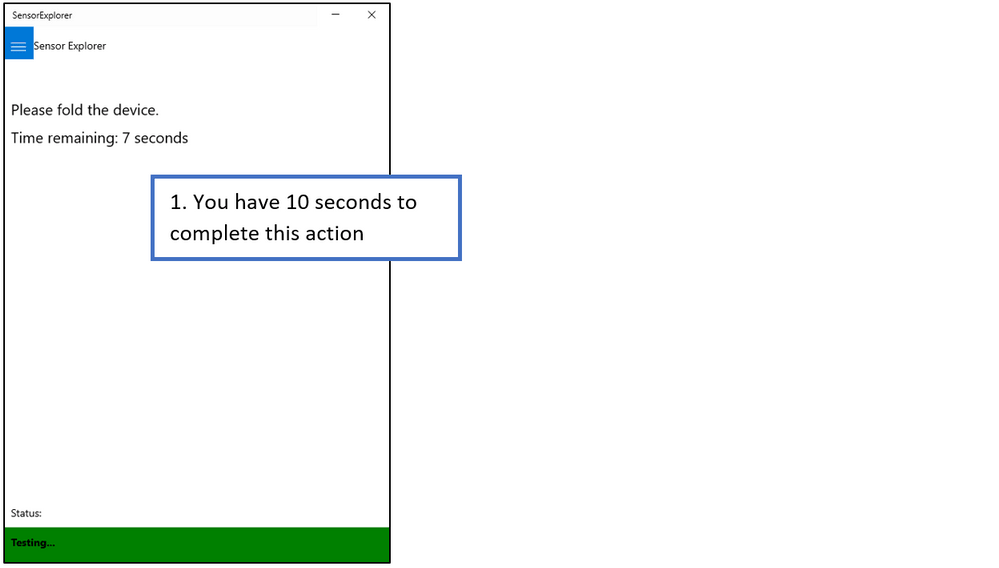
Similarly, the Fold Test will ask you to fold the device and the SensorExplorer 2.0 will try to detect it.
This too will be allowed 10 seconds to perform the Fold action on the device. And likewise, the sensor will try to detect it.
5] After Test
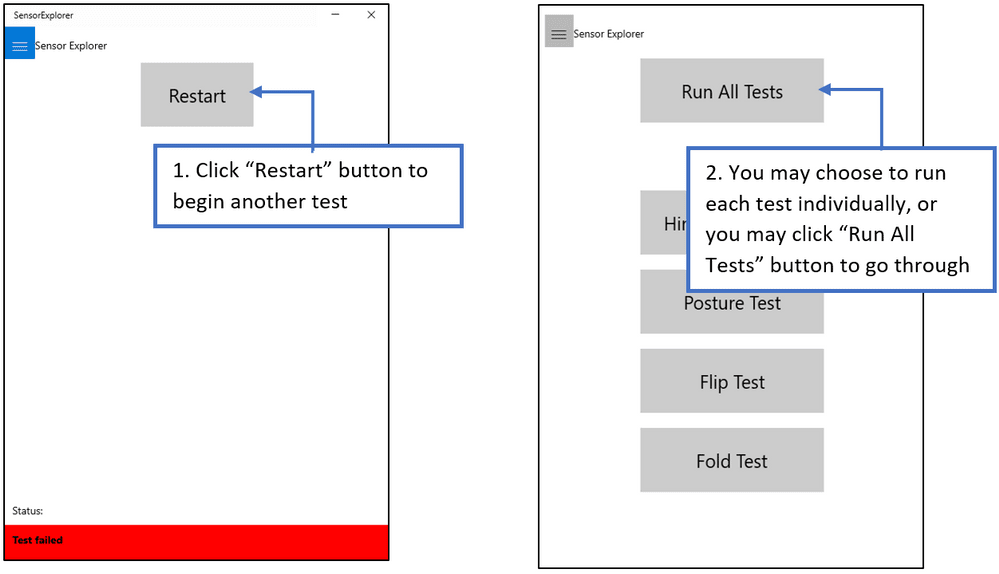
If by any means the test does not go as planned since there are way too many steps and this is something new to you. Simply click on the Restart button.
You will be redirected to the Dual Screen Testing Mode main menu. Either choose Run All Tests option and perform all of them back to back or take one at a time.
SensorExplorer Posture Summary
Since this could be a new application to test the dual-screen device and certain actions on the screen could be confusing. For example, you may have to read the posture description to perform it on the device.
For example “hingeState-panel1Orientation-panel2Orientation” posture description will be displayed on the screen. You will have to perform it within 60 seconds. Here is how you can understand it by using the table given below.
| Hinge State | Panel Orientation |
| Concave | Faceup |
| Convex | Not Rotated |
| Closed | Facedown |
| Flat | Rotated 90 degrees counterclockwise |
| Full | Rotated 180 degrees counterclockwise/Rotated 270 degrees counterclockwise |
New Features in SensorExplorer 2.0
Some exclusive and amazing new features were introduced to SensorExplorer 2.0. There is an inclusion of two dual-screen mode to the application that will carry out sensor testing. However, these options will only appear on the app while using the dual-screen device. Try using the application with any other device, you can see the above two options are not present. The two modes are –
1. Dual Screen Display – Here, two major sensors come into the picture namely the hinge angle sensor and the posture sensor. You can select the mode to view and visualize data with the help of these sensors and moreover, you can easily monitor the behavior of the sensors also. These are the things you can do when into this mode –
- If you have multiple Hinge Sensors present on the dual-screen device, you can select one of them from the available drop-down menu.
- Set the reporting threshold of the Hinge angle sensor on the available space on the application.
- While testing as you tend to fold or unfold the device multiple times, you can easily check both the sensors acting upon it and analyze the data accordingly.
2. Dual Screen Testing – You can execute four types of manual testing using this mode or can choose to run all tests as well. There are basically 4 major options on the screen to choose from –
- Hinge Angle Test
- Posture Test
- Flip Test
- Fold Test
That’s all!!!
