VIDEO_TDR_FAILURE is one of the notorious BSOD errors that users are confronting after updating the graphics driver. The prime reason behind this issue is a file called igdkmd64.sys or nvlddmkm.sys. This is actually attributed to Intel integrated graphics which clearly indicates incompatible device drivers playing an important role in causing the issue. This error affects the regular functionality of a Graphics Card Driver having a bug check value of 0x00000116. This also indicates an intention to reset the display driver and recover from a timeout failed one.
This Blue Screen of Death is an outcome of defective, incompatible, and outdated device drivers. Sometimes, it can be a result of missing system resources or corrupted OS components. Other reasons such as bad areas on Hard drive, Storage running short, problems in Memory, and Windows image files can take part in causing this issue. With the error, Windows restarts automatically which interrupts the normal functionality of the device and also in deploying resolutions to fix it. For your hustle free navigation, we are offering quick links for those resolutions below –
VIDEO_TDR_FAILURE BSOD Error in Windows 10 and 11 Solutions
Here is how to fix VIDEO_TDR_FAILURE BSOD Error in Windows 10 or 11 –
Way-1: Modify Default Settings to disable Automatic Restarting of Windows
Once VIDEO_TDR_FAILURE BSOD shows up in Windows 11 or 10, the system will have a tendency to reboot automatically. Surprisingly, no warning will be there and things will be difficult to handle. A simple tweaking to the default setting leading to hold up this action will be a great help. Here are the steps to proceed –
Step-1: Press Win+D hotkeys at once and head to the desktop area immediately.
Step-2: On the desktop, make a right-click on This PC icon and choose Properties option.
Step-3: When a new window comes into the view, select Advanced system settings from the left pane.
Step-4: On the following wizard, straightway reach its Startup and Recovery region.
Step-5: Once you see the Settings here, perform a click on it.
Step-6: Upon opening a new wizard, head to its System failure part and uncheck the box located beside “Automatically restart“.
Step-7: Lastly, select the OK button to save these changes you made.
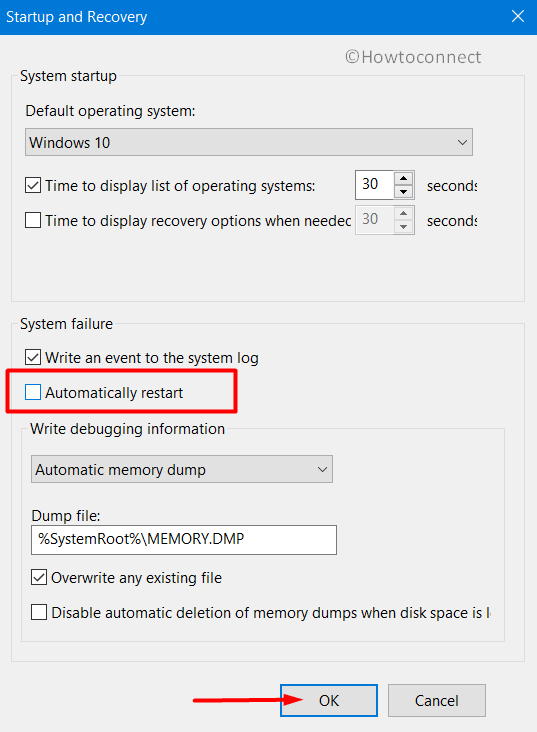
That’s it; Windows will not go for rebooting automatically from now on.
Way-2: Disable Intel HD Graphics driver to Fix VIDEO_TDR_FAILURE
Sometimes, problems in the Intel HD Graphics driver might call up VIDEO_TDR_FAILURE BSOD Error. If that happens, we need to disable it from the Windows Device Manager. Here are the ways to proceed –
- Open the Taskbar Search by pressing “Win+Q” hotkeys together.
- When the Search box shows up, type in or copy-paste devmgmt.msc in the provided text area.
- Press Enter key and Windows Device Manager will be upfront.
- Move to the Display adapters section and click on it to expand.
- Right-click on Intel HD Graphics driver and select Disable device from the appearing menu list.
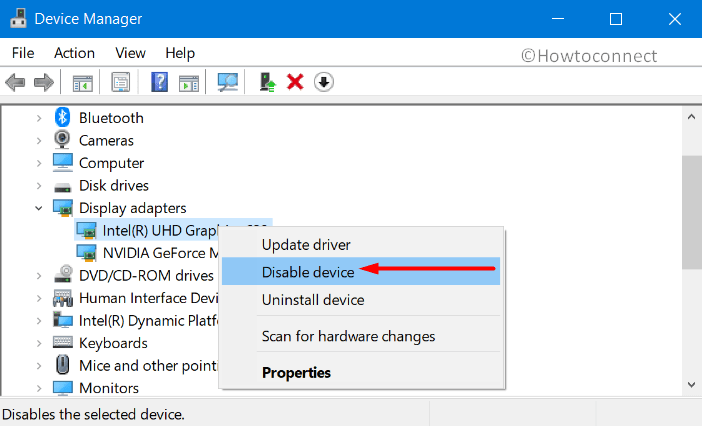
- Once the procedure ends, restart Windows and make these changes effective.
Hopefully, the BSOD error will take leave by now.
Way-3: Deploy Windows Blue Screen Troubleshooter
BSOD errors are found to cause serious damage to the system and the problem reaches a far extent. To reduce the rapid spreading, Microsoft technicians came up with a built-in Fixit tool for resolving this issue effectively. The tool is named Windows Blue Screen Troubleshooter and it is accessible through a page on Microsoft’s official website. Proceed with the below instructions to deploy the utility –
- Go to the official Walkthrough troubleshooter.
- You will be asked – Step 1: When did you get the error? and given 2 options 1. After an update was installed 2. While using my device. Check the correct one.
- Follow the instructions under Step 2 on the page carefully to resolve the issue.
The utility will now detect and fix all the Stop errors from your device. This process might be a little longer and in the end, you can get rid of VIDEO_TDR_FAILURE BSOD Error.
Way-4: Update all the Drivers to Resolve VIDEO_TDR_FAILURE
There is no doubt that VIDEO_TDR_FAILURE BSOD Error might be an outcome of outdated and defective device drivers. Not only this one but also every time we come across a critical issue, these drivers play a great role. All the drivers in Windows 10 or 11 get updated automatically after some period when the OEM or Microsoft itself prepares the release. Yet some might be left alone and cause issues eventually. To update them, Windows Device Manager is a top-notch utility. It shows the problematic drivers with yellow indications. To accomplish the workaround, move with the below method –
- Right-click on Start and choose Run.
- Once the dialog comes into the view, type devmgmt.msc text in its empty box.
- Hit Enter.
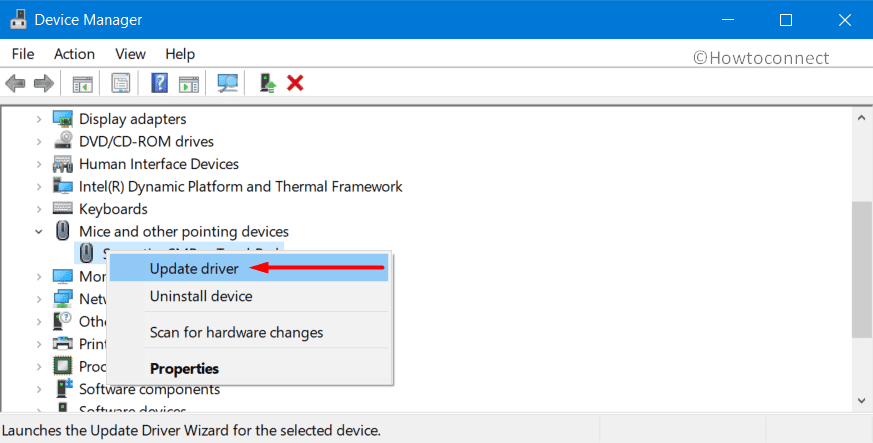
- When the Device Manager console comes in, look for any exclamation mark beside any category.
- If found, select the same to expand the driver list.
- Right-click on the drivers and eventually select Update driver. Follow the upcoming guidelines on display until these all get updated.
Way-5: Dismiss viruses present in the system using Windows Security
Nowadays, malware is the worst enemy for the computer system. Most of these bugs appear on the web in disguise. Whenever a user visits a malicious site or follows links in spam mail, they get entrance. In the continuation, System files go missing along with DLL ones. Hence, VIDEO_TDR_FAILURE BSOD Error becomes eminent. To avoid this, regular full system scanning is necessary and for that, Windows security will be the best platform. Follow the below guidelines to detect and dismiss the malware –
- Press Windows+S.
- Type – windows security.
- Hit Enter.
- When in the app area, do a click on Virus & threat protection staying in the left side pane.
- On the corresponding right, click Scan options link to unveil all detection methods.
- Select the radio button of Full scan and thereafter click Scan now button.
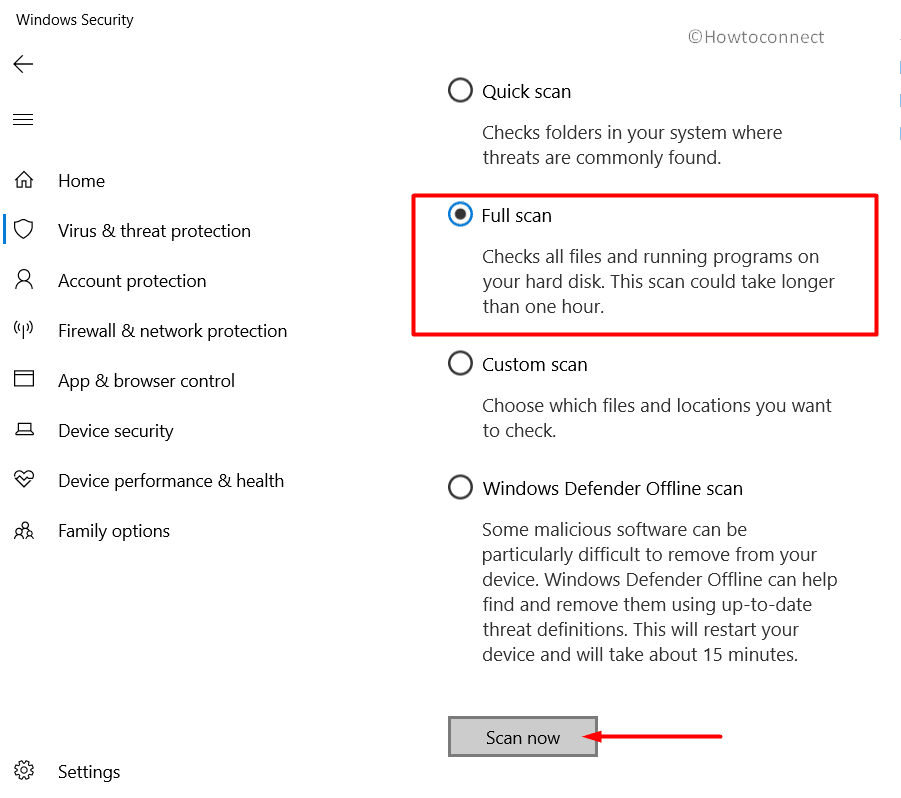
- Now the system will start searching for threats and results will be shown upon ending.
- In case the utility trace out any bug, choose Clean threats from there.
- When the following page appears, select Remove first and then Start actions to dismiss all these viruses.
Way-6: Roll back default Display driver
By default, drivers in Windows 11 and 10 get updated automatically when available. The same thing is applicable to the Display driver too. Sometimes the latest version of it may go either way and eventually cause VIDEO_TDR_FAILURE BSOD Error. In that case, we need to roll back this Display driver to its default edition. In the process, BSOD error will be fixed. Here is how to proceed with a workaround –
- Press Windows and R to invoke Run dialog.
- When the utility comes in, enter the text “devmgmt.msc” into its typing box.
- Choose OK located there and let Device Manager open.
- Reach out to Display adapters section and eventually select it to expand drivers.
- Look for the display driver and right-click on it. Click Properties.
- In the Properties wizard, switch to the Driver tab. Click on Roll back driver.
- When the process ends, Restart the device to make changes effective.
Once the device restarts, check for the BSOD error again. If the same thing persists, you have no way to uninstall the Display driver.
Way-7: Downgrade your Nvidia driver
Sometimes, only uninstalling the display driver doesn’t work either. In that case, after uninstalling it using the same guidelines as the previous one, you need to downgrade it. Therefore, launch a web browser and visit Nvidia’s website to download a new set of drivers. There, search to download version 353.54 of drivers. This is usually an older version. But unlike the latest ones, it doesn’t have issues with Intel’s drivers.
Way-8: Disconnect external Hard Drive temporarily
Recently, some people have reported having VIDEO_TDR_FAILURE BSOD Error after connecting an additional Hard Drive with the device. The issue created mass havoc as we really need these devices now. Users also reported that the BSOD error disappears after disconnecting the device only. So, we can give it a try.
After disconnecting the external Hard Drive, Restart Windows 10 PC and later on check for error here. If it resolves truly, do visit its manufacturer’s website to download the latest Driver. Install it to Windows to have no issues evolving afterward.
Way-9: Fix up the Bad areas in Hard Disk
Your Hard Disk may get affected by bad areas formed inside after using it for a long time. The issue usually ends up causing VIDEO_TDR_FAILURE BSOD Error. Well, we can fix these segments using the Disk Checking tool. To access the tool, move with the following instructions –
- Right-click anywhere on Taskbar and select Task Manager.
- When in the app UI, select File from the top left end.
- Choose Run a new task.
- When the dialog appears, type cmd in its blank text area.
- On the further move, check the box before “Create this task with administrative privileges”.
- Now, pressing the Enter key will open up “Elevated Command Prompt” directly.
- When the black display loads, enter the following command line there –
chkdsk C: /f /r /x
- Execute the action of the Disk Checking tool by pressing Enter key.
- This process will take a few minutes time, and wait patiently till it is over.
- When the process ends, perform a restart of the device.
- After completing the cycle of rebooting, check if there is any BSOD in Windows 11 and 10.
Way-10: Fix VIDEO_TDR_FAILURE by Freeing Junk Files
Junk files are temporary and Windows produce them for the execution of various tasks. Since, these files as stored in the Hard Disk, when piling up a lot will occupy a huge space in it. Ultimately, the storage runs in low space, and operation speed gets affected. In the process, VIDEO_TDR_FAILURE BSOD Error can hitch up as well. Using Disk Cleanup tool can be thoroughly beneficial to deleting the junk using one platform. Here is how to proceed –
- First of all, invoke the Taskbar Search by pressing Win+Q keys.
- In the search box provided, type cleanmgr and press Enter key.
- Immediately, a small popup window will float up asking where to run the cleanup. Select C: clicking the dropdown menu and press ‘Enter’.
- The tool will open up shortly, come down its lower end and do a click on “Clean up system files“.
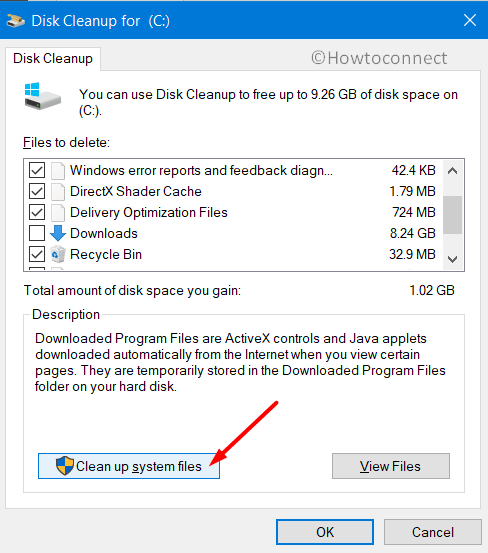
- Once again, that small popup window will reappear asking for the desired drive. Choose C: like before and select OK from there.
- When Disk Cleanup for C: comes up, reach to its Files to delete area.
- Check all the boxes.
- Click the OK button to initiate the cleanup process immediately.
- Wait until this process ends automatically.
Note- Before the utility starts to take action, check Recycle Bin, and if you have anything important, restore it immediately.
Way-11: Perform System Restore
Installing a program or removing another one causes Windows Registry to tweak. This is a sensitive part of the system and often any wrong modification can be risky. If you come across VIDEO_TDR_FAILURE BSOD Error after such changes, you can perform System Restore to stay away from this issue. You must need a previously created restore point to accomplish this workaround. In case you don’t have any, can ignore this process. If you have one already, follow the below process –
- Open the Run dialog initially by pressing “Win+R” together.
- Type rstrui in the blank text box.
- Press Enter key and System Restore wizard will come up immediately.
- From the wizard appearing, click Next.
- Click on Show more restore points.
- When all the points are available, select only the latest one.
- Click the Next button to continue.
- When the following page loads fully, choose Finish to start restoring process.
Way-12: Resolve VIDEO_TDR_FAILURE by Installing Available Patches
Every single update patch contains solutions for bugs and problems. These files are available on the Windows Update settings page. We need to keep the Operating System always updated by installing them as an outdated one is very much prone to get affected by VIDEO_TDR_FAILURE BSOD Error. Before you proceed with installing the update files, ensure getting connected with a speedy internet connection. And obviously, disable Metered connection while using Mobile Hotspot. Once ready, move with the below steps –
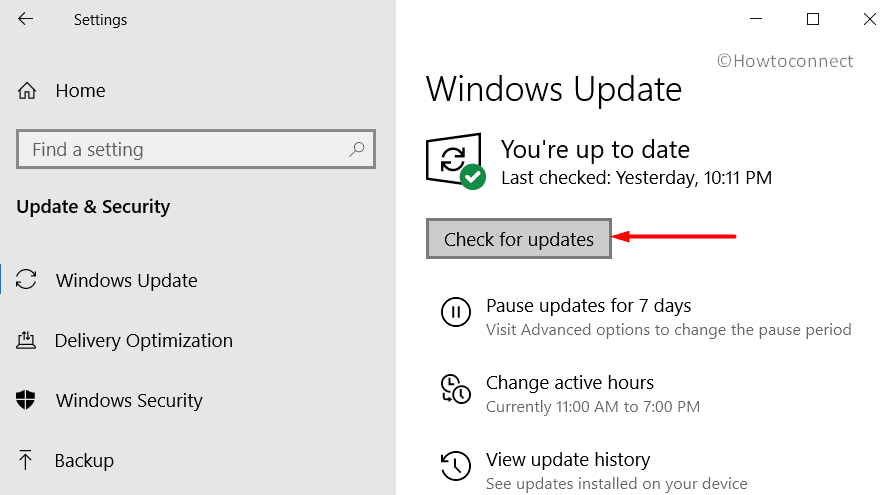
- Get access to the Settings app and navigate to Update & Security.
- Once the next page loads fully, choose Windows Update located on the left pane.
- Click on Check for updates button. Seeing “You’re up to date” dialog is quite normal here, ignore that.
- After all the patches are available here, hit the Download button.
- Once downloading finishes, the installation will start automatically.
- Follow the instructions further until the process completes. You might have to reboot the system quite a few times to finish the procedure.
Way-13: Settle down Memory problems in Windows Memory Diagnostic
There might be the wrong allocation of memory or existing poor segments in the RAM for which you are suffering from VIDEO_TDR_FAILURE BSOD Error. We can put an end to all these problems using a single tool called Windows Memory Diagnostic. Let’s proceed to the utility in the below process –
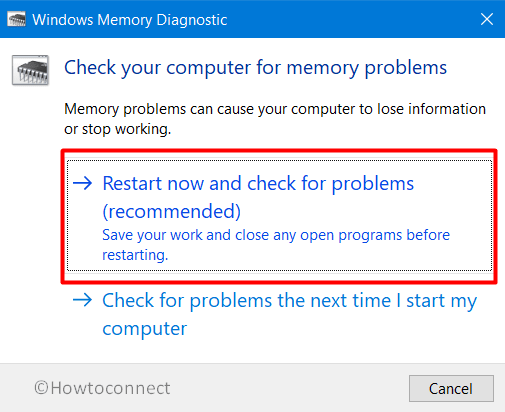
- On the Taskbar Search box, type “mdsched.exe” and press “Enter”.
- “Windows Memory Diagnostic” tool will immediately show up. Choose “Restart now and check for problems (recommended)” option.
- After a moment, Windows will reboot automatically.
- When it signs back in, a blue screen will appear to detect memory issues. When it hits 100%, Windows will restart for the second time.
- Upon restarting, you can check the result of the diagnosis in the Notification area of System Tray.
Way-14: Fix VIDEO_TDR_FAILURE Using DISM Tool
If the device has defective Windows image files, it is at a greater risk of being affected by VIDEO_TDR_FAILURE BSOD Error. To eliminate the probability, we can fix them using Deployment Image Servicing and Management (viz DISM) tool. The utility powers up an Elevated Command Prompt hence, we need to enter there first. Here is the process to follow –
- Right-click on the Start icon and choose Run.
- On opening the dialog, type cmd in the text space provided there.
- Press Ctrl+ Shift+ Enter keys together in order to access the Elevated Command Prompt directly.
- In the dark window appearing next, type the following command –
DISM.exe /Online /Cleanup-image /Restorehealth
- Activate the Deployment Image Servicing and Management (DISM) tool by pressing Enter.
- When the process ends after some time, restart Windows in the prevalent method.
- When it signs back in, check if there is any BSOD error in the system.
Way-15: Remove similar applications colliding with each other
Whenever a system has similar kinds of applications, they often come in contact with each other. As a result, a collision might take place in between. In the end, many important files get deleted which are really necessary for Operating System. This action results in occurring VIDEO_TDR_FAILURE BSOD Error finally. As to resolve, we need to uninstall one from them. Follow the below instructions to uninstall a program –
- Open the Settings app by pressing Win+I keys together.
- Select Apps in this layout.
- On the corresponding right, you will see a list of installed apps. Reach to the programs causing VIDEO_TDR_FAILURE BSOD Error.
- Select one by one and also hit the Uninstall button from the expanded pane.
- When UAC prompts for permission, choose Yes to provide the consent.
- Once the process finishes, Restart the device using a convenient way.
- After the device turns back to operation, check for the BSOD error in the system.
- If nothing comes up, install those programs if required.
Way-16: Uninstall Windows Update patches terminated abnormally
Usually, the Windows updating procedure is an autonomous one and doesn’t really end in disruption. Unfortunately, if that happens, VIDEO_TDR_FAILURE BSOD Error will show up in the system. In this respect, we need to uninstall these dreadful files immediately. You can use the below guidelines to delete those files –
- Launch the built-in Settings app and navigate to the Update & Security category.
- When shifted to the next page, choose Windows Update located in the left pane.
- On the later attempt, shift to the adjacent right and click the “View update history” link.
- Once the succeeding window comes in, click the link saying Uninstall updates.
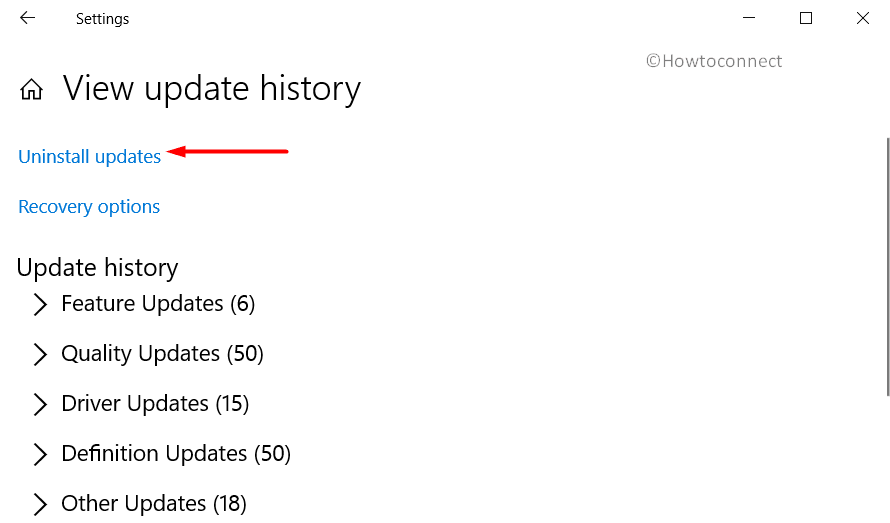
- In a moment, the Installed Updates window will show up.
- Reach out to the last cumulative patch on the list and do a right-click on it.
- Hit Uninstall option once visible there.
- Follow on-screen instructions appearing to delete those files completely.
Way-17: Recover corrupted Windows components and missing DLL files
Corrupted system resources and missing DLL files are very much likely to cause VIDEO_TDR_FAILURE BSOD Error. To fix these resources, we can take help from the System File Checker tool. Here is how to deploy the workaround –
- Open the Taskbar Search by tapping Windows and S keys together.
- Now, write “cmd.exe”.
- Once Command Prompt appears in the result, do a right-click on it.
- Choose “Run as Administrator” from the menu.
- When UAC prompts for permission, select Yes to provide consent.
- After moving to Elevated Command Prompt window, enter the following line –
Sfc /scannow
- Hitting the Enter key to execute the System File Checker tool.
- The tool will thereby fix all the corrupted components in the system after execution.
- After this task ends, Do restart the windows.
- Once Desktop is back in operation, check if the error has been resolved already.
Way-18: Uninstall Third-party antivirus programs to Fix VIDEO_TDR_FAILURE
In the past, people might have used a free anti-virus solution for staying apart from malware. But nowadays, Windows Security is much more effective and the best tool. Hence, there is no need of using a third-party program in this regard. Moreover, most of these programs can also cause VIDEO_TDR_FAILURE BSOD Error. Therefore, if you have such applications, uninstall them right away using the following guidelines –
- Invoke Run dialog using any prevalent method.
- Type appwiz.cpl in the search box provided to the wizard.
- Choose Ok located there allowing Programs and Features to open.
- Locate the Third-Party Antivirus app in the list and select it eventually.
- Hit Uninstall option visible at the top ribbon.
- Next steps will be as shown in the display until it gets uninstalled completely.
Way-19: Boot the Windows in Safe Mode
Right from the time, Microsoft developed Windows as an Operating System, so many issues came up haunting it. Luckily in all critical times, Booting in the Safe Mode came out as a savior. This is actually a special startup procedure where the device starts loading only the basic processes. Let’s give this renowned utility an attempt following the below instruction –
- Open up Taskbar Search by pressing Win+S hotkeys together.
- Type “System Configuration” text in the typing area and press Enter.
- When the app launches, jump into the Boot tab.
- Reach to its second half standing as Boot options.
- Here, check the box before Safe Boot and activate all the grayed-out options.
- Now, hit the radio button before Minimal and proceed forward.
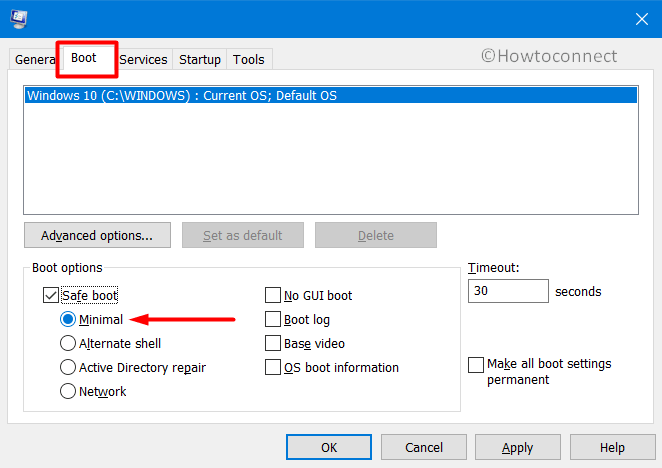
- Choose the Apply button first and then OK to save these changes.
- Reboot the device and when Computer is booting after finishing the process, keep on pressing F8 continuously until guided to the next page.
- Opt for the Safe Boot option located under Advanced boot options.
- Boot into the Safe Mode on the further move.
Way-20: Change the Intel graphics settings
Sometimes, default Intel graphics settings can also be a cause of VIDEO_TDR_FAILURE BSOD Error. In that case, you need to modify the setup following the below guidelines –
- Right-click somewhere on the desktop and from the context menu, choose Intel Graphics settings.
- Make the below changes as directed –
Changes under 3D settings:
- Application Optimal Mode – Enable.
- Use Application Settings for Multi-Sample Anti-Aliasing.
- Turn Off the Conservative Morphological Anti-Aliasing.
- General Settings – Balanced Mode.
Changes under Video settings – Basic changes:
- Change the Standard Color Correction to Application Settings.
- Change the Input Range to Application Settings.
These are the collection of workarounds to fix VIDEO_TDR_FAILURE BSOD Error in Windows 10 and 11. Hopefully, you have resolved the error already and using the device smoothly. Unfortunately, if you cannot succeed even after following these processes, try performing a Clean installation of Windows 10 or 11 again. This will be the last resort and there will be no problems evolving if done accurately.
Before any proceeding, manage to get the device connected with a speedy internet network. Don’t forget to create a Backup folder and save all the necessary items in it. If you feel a little tough accomplishing the task, seek help from professionals.
Methods:
Way-1: Disable Automatic Restarting of Windows
Way-2: Disable Intel HD Graphics driver
Way-3: Deploy Windows Blue Screen Troubleshooter
Way-4: Update all the Drivers
Way-5: Dismiss viruses
Way-6: Roll back default Display driver
Way-7: Downgrade your Nvidia driver
Way-8: Disconnect external Hard Drive temporarily
Way-9: Fix up the Bad areas on Hard Disk
Way-10: Free Junk Files
Way-11: Perform System Restore
Way-12: Install Available Patches
Way-13: Settle down Memory problems
Way-14: Use DISM Tool
Way-15: Remove similar applications
Way-16: Uninstall Windows Update patches
Way-17: Recover corrupted Windows components
Way-18: Uninstall Third-party antivirus
Way-19: Boot the Windows in Safe Mode
Way-20: Change the Intel graphics settings
That’s all!!
