When coming to install Windows 11 the most trouble-free and handy method is through bootable USB and other external drives. Once you got an ISO image on this portable device, you can carry it anywhere and keep it for a long time. So here you will see How to create Windows 11 bootable USB.
You have some more choices to power your computer with Windows 11 such as upgrading, installation using media creation tool, etc. Anyhow, it would also be a better method for you to have bootable USB media, just if something goes wrong. It can also be useful if you are not able to upgrade your OS normally through the updates.
Create Windows 11 bootable USB
Here is How to create Windows 11 bootable USB –
Before advancing with the steps to create the installation media, it is advised that you properly back up your PC. This is because just in case your PC faces any compatibility issues or doesn’t work fine with Windows 11, any important files or data you have on your computer could still be safe. Once you do the backup, below are the steps to create bootable Windows 11 USB media.
1] Preparing the USB
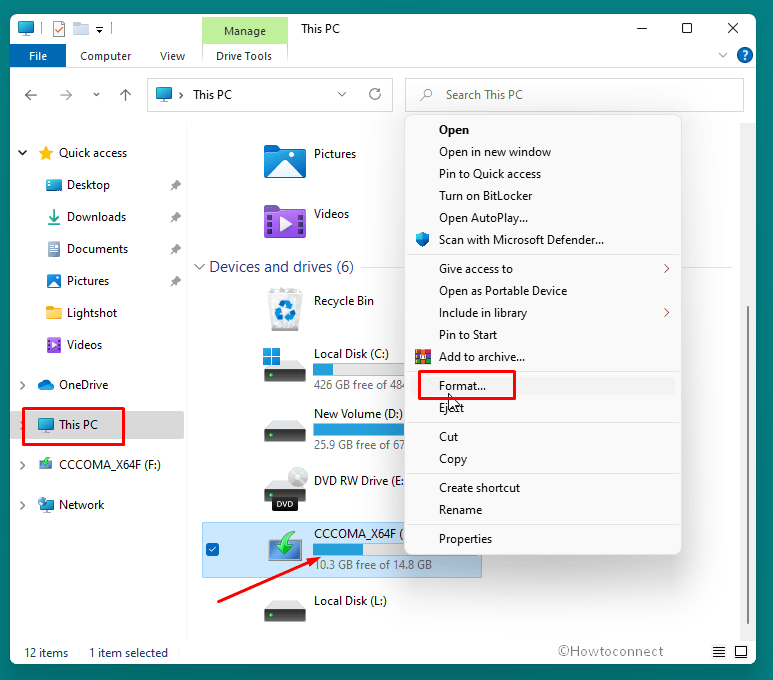
Start by making sure you don’t have anything important on your USB and if you do, transfer it to a safe location. The reason is that, when you create Windows 11 installation media bootable on the USB, the process will remove anything and everything on it. Here is how you can format USB after you secure your files:
- Plug-in the USB into your PC.
- Open – File Explorer.
- Go to – This PC.
- Right-click on the USB drive you’d like to format.
- Click on Format when the fly-out menu appears.
- Confirm if prompted.
2] Download the ISO file
There are different ways of getting the Windows 11 ISO file. You may download Windows from Microsoft’s official website as and when made available by following the below instructions:
- Go to Microsoft’s website to download the Media creation tool by clicking on this link.
- Click on Download Tool Now.
- From downloads, open the Media creation tool.
- This will open Windows 11 Setup screen.
- Accept the terms & conditions.
- Select “Create installation media for another PC”.
- In the next screen, select language and architecture and click on Next.
- Select “ISO file”
- Hit – Next.
- Choose the location where you’d like to save the file.
- Wait for the file to download to complete.
- Note that by selecting “USB” instead of ISO in step 8, you can directly create the USB media and avoid the next steps that involve burning the ISO file.
Furthermore, there are multiple websites offering the free ISO file for Windows 11. Just be aware that there are a lot of malicious sites as well. Make sure you get the file from a reliable link. If you already got your hands on a reliable Windows 11 file, you can skip to the next step!
3] Using Rufus
You need a tool to burn the Windows 11 ISO to the external device. This is where Rufus comes in. For those of you who are not too familiar with it, here are the steps to burn an ISO to USB using Rufus –
- From the link below go to the official website of Rufus.
- In Download section click on the link to get the tool. This is a small file and would barely take any time.
- Double click rufus.exe (with version) from the download location.
- Once a User account control comes, click – Yes.
- In the simple interface that opens up, click the dropdown under – Device.
- Select your USB.
- Under “Boot selection”, click on – Select.
- Browse & locate the ISO file you downloaded earlier. Select it and click – Open.
- Click on the drop-down under – Partition Scheme. You will find 2 options – GPT and MBR.
- Right-click the start button and select – Disk management.
- Once the tool appears, right-click the – Basic.
- Choose – Properties.
- On the appearing window, click the – Volumes tab.
- See the Partition style whether it is GPT or MBR.
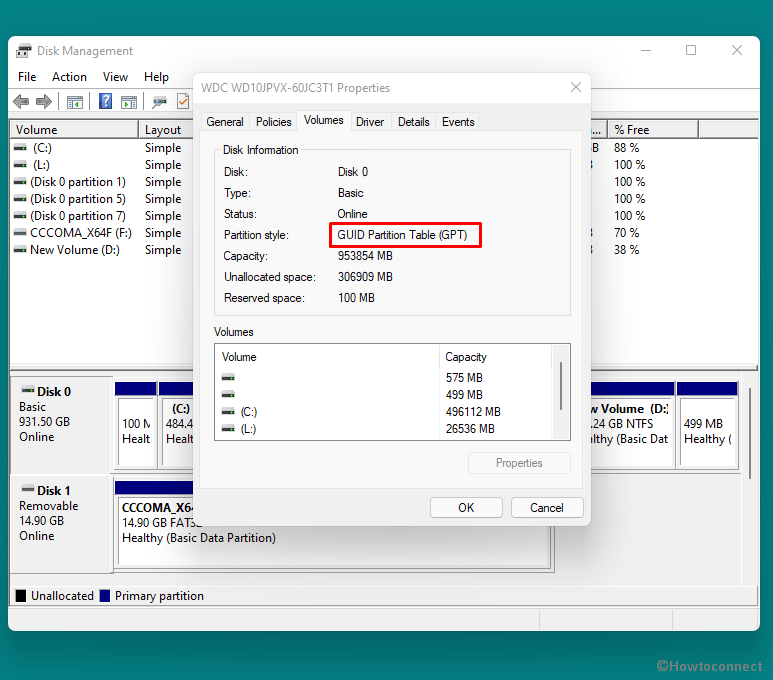
- Select the same under “Partition Scheme” on Rufus.
- The remaining options would automatically be selected once you choose the ISO file.
- Click on – Start.
- A warning pop-up will show up for erasing data; select – OK.
- After a while, the USB will become bootable and you will see a message about this.
You can see – How to Use Rufus to Install Windows 10.
4] Via Etcher
Etcher is yet another great tool you can use to create an installation media using an ISO, .zip, or image file. The main advantage of using this tool is that its flashing speed is quite impressive. Moreover, it is a pretty straightforward process with the simple. Here is what you need to do.
- Plug in an empty USB.
- Download Etcher from the link.
- Run the file.
- Once installation is completed and the interface opens up, click on – Select Image.
- Browse and find the ISO or Windows 11 file you downloaded.
- Next, you need to choose your USB drive and hit “Continue”. If you just have one USB connected, same would be selected automatically.
- Finally, click on Flash!

- Wait for the process to complete.
5] Through Unetbootin
This is yet another alternative for creating bootable USB media. It is primarily used with Linux, but you can use it for Windows ISO as well. Here is how you can create the bootable media using UNetBootin:
- Plug in the USB flash drive.
- Download and Run UnetBooting.
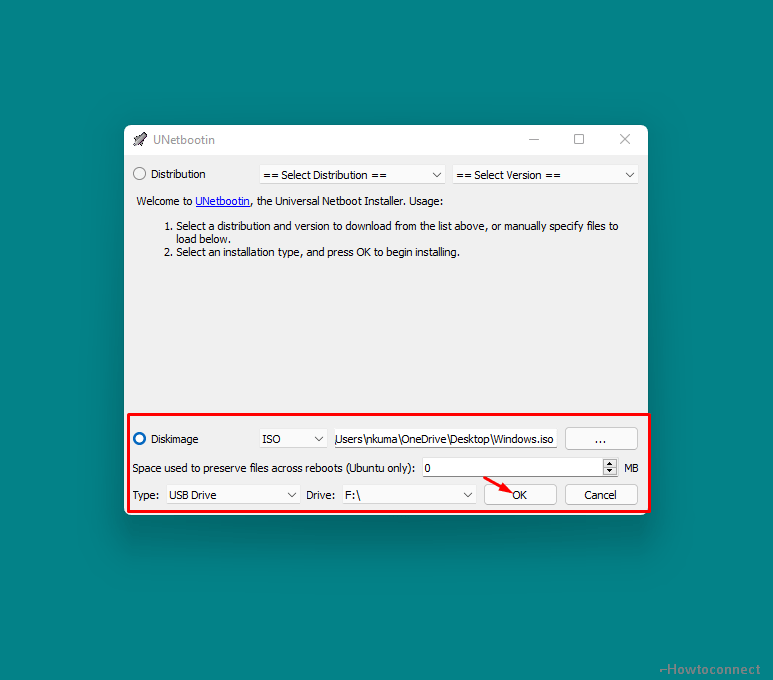
- Click on the tiny circle next to Diskimage.
- Hit on the button with three dots.
- Browse to the location where you have saved the ISO and select it.
- Click on Open. This will load the location of the file into the previously blank space.
- In the Type drop-down menu, select USB.
- Then click on the Drive drop-down and choose the drive name of your device. (Double-check and make sure you are selecting the right one).
- Hit – OK.
- Click on Yes in the pop-up dialog box.
It will quickly start writing the media file onto your USB drive, making it installation-ready
6] With Universal USB Installer tools
Last, but not the least, we have Universal USB Installer. This one too was initially meant for Linux and was largely used by Linux users. However, over time, this tool has gained popularity among Windows users for creating bootable drives. Here are the instructions to use this tool:
- Plug in your empty USB flash drive.
- Download Universal USB Installer from the official website.
- Click on the downloaded file to open it up.
- Accept licensing terms.
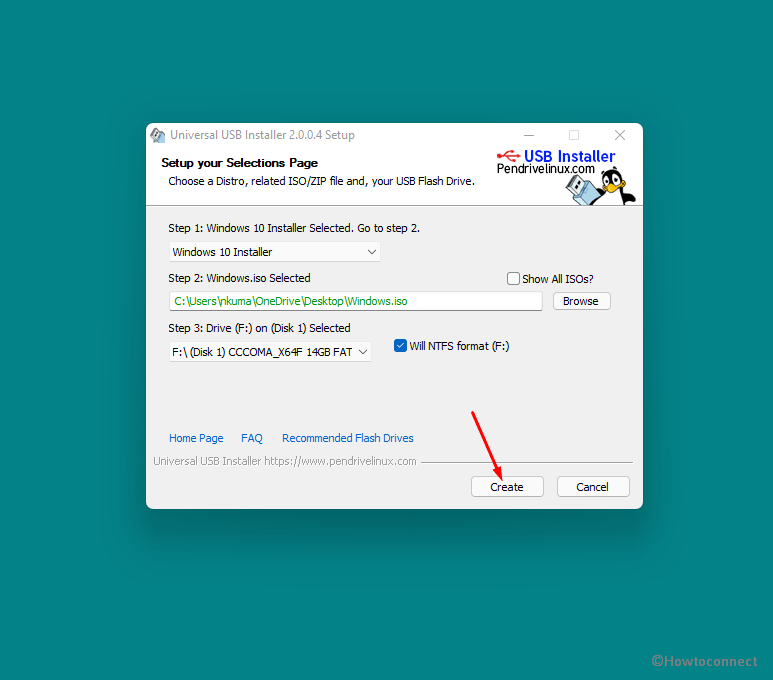
- Select the Windows version you’d like to have on the USB.
- Next, click on – Browse.
- Navigate and select the ISO file you have on your PC.
- In Step 3, you can select your USB drive.
- If you have not formatted the device already, you can click on the Check box enabling drive format.
- Hit Create and click on Yes.
- You can then see the screen showing the progress of media creation.
It might take some time to complete the process, but that is all you need to do!.
Download Universal USB Installer
That’s all!!