Black Screen with Cursor After Windows 10 April 2018 Update 1803 is one of the common issues that a substantial number of users are complaining about. Perhaps this is the most nagging problem as it does not give any error codes for you to troubleshoot or start the fix. This unexpected dark display can be a result of several reasons and it differs from PC to PC.
When you log in to your system, it shows a black screen with just a pointer and nothing else. This is just a common bug and we will discuss various fixes to recover your system to its normal condition. Usually, this type of issue is mostly observed in PCs due to outdated graphics driver; disable fast startup, integrated chips issue, malware, buggy update, lack of space on PC etc. Few other factors which can also lead to this are incompatible Hard drive or Memory or outdated BIOS.
Fix: Black Screen with Cursor After Windows 10 April 2018 Update 1803
Fix 1: Switch displays using shortcut Win+P
Numerous users are complaining about the black screen even on the login screen. If you are also facing the same, then there are possible chances of a change in the Project mode. After upgrading the OS to Windows 10 version 1803, the project mode automatically changes to Second Screen which eventually leads to the issue. In general, the project mode should always be in PC Screen only for the proper functioning and display of the screen.
So, to change the mode, first, you need to login to your system. Now, you may face little difficulty in providing your password as the login screen will also be not visible to you.
Step-1: Restart Windows 10 PC and after some time, hit Ctrl or Space keys. Now, type in the password and press Enter to move ahead.
Step-2: Again wait for some time and then press Win + P hotkeys. This will open a Project pane on the right corner of the screen. Now press the UP arrow key three times and then hit Enter.
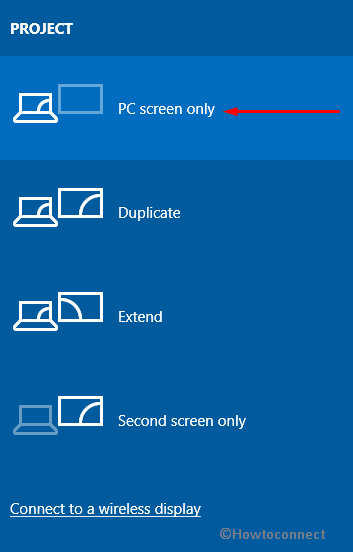
Step-3: If the process is successful, your black screen will fade.
Step-4: However, if your normal screen doesn’t appear you have to repeat the process a few times. This sounds little tiresome as you will not be able to view anything on the screen.
If this method fails to provide any relief, you should proceed towards the next solution.
Fix 2: Uninstall Problematic Applications
The occurrence of Black Screen with Cursor After Windows 10 April 2018 may also happen due to the presence of problematic applications on your PC. When you install certain programs such as Norton antivirus, iCloud, IDT Audio or a third-party firewall, you are likely to encounter black screen troubles.
To resolve this problem from the system, uninstall the problematic software one after another from your computer. Here is the detailed description of how to remove these applications:
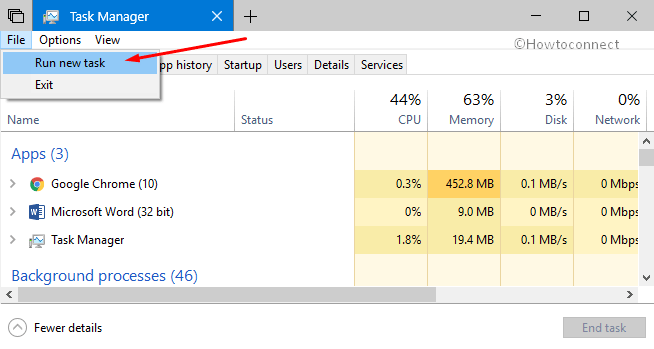
1. At first, press “Ctrl + Shift + Esc” together to open Task Manager. When the system monitor program opens up, click File on the toolbar and select the option namely ‘Run new task‘.
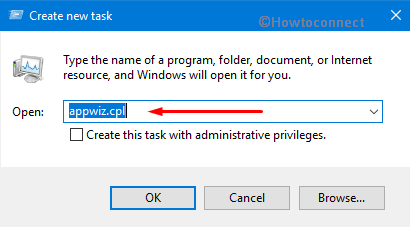
2. A small box will appear, type appwiz.cpl in the text field and hit Enter to execute it.
3. “Programs and Features” will open up with a list of all the applications that are installed on the PC. Here, locate the applications that are creating troubles and uninstall them.
Certain programs can’t be traced as they contain their files in the System32 folder. In this case, you have to manually delete the corrupted software manually.
While attempting to delete files, you need to be more careful as it can delete core file of Windows 10. By mistakenly if you remove any important file, you have to reinstall Windows 10 again.
Fix 3: Update Graphics Drivers
The black screen with just the cursor issue might be occurring on the system due to the use of outdated version or corrupt video drivers in the system. This is the most culprit one cause leading to Black Screen issue on the PCs. After updating to Windows 10 version 1803, you should always keep all the drivers up to date to avoid any complications. You can manually update the drivers to their suitable successor by downloading them from manufacturing website.
– First of all, get into ‘Safe Mode with networking’. To do so, ensure that the computer is completely OFF. Then hold down the power button and turn it ON. Again, press the power key to shut it down and repeat this few times until you notice “Preparing Automatic Repair”.
– Click Advanced Options button in order to launch ‘Windows RE screen’.
– Select Troubleshoot and moving ahead choose ‘Advanced options‘.
– Click Startup Settings to continue. Now, click Restart and on the following screen, you will notice various startup options.
– Finally, select “Enable Safe Mode with Networking“.
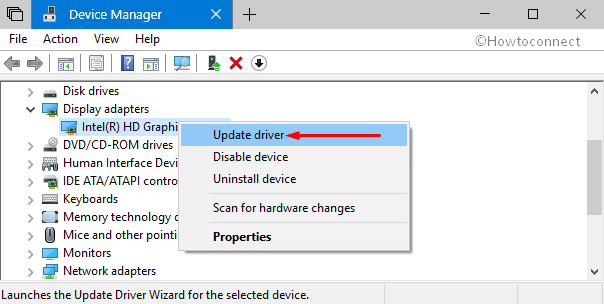
– Once PC boots into Safe Mode, right-click Start icon and select ‘Device Manager‘ from the list.
– Expand Display adapters and again perform a right-click on the graphics card. From the menu that shows up, choose Update driver. Wait for the update to happen.
Fix 4: Disable fast startup
Fast Startup might also fix the issue related to black screen error from the system. Here is the complete process to follow:-
Reboot your system and enter into Safe mode.
For reference, you can read How to Boot into Safe Mode from Login Screen in Windows 10.
Go to the search box (left bottom in desktop) and type in Control Panel and select the same from the result.
Once Control Panel opens up, locate and click “Power options“.
Now go to the left side panel and single click on the first option “What the power button does”. In the popped up window click on “Change settings that are currently unavailable”.
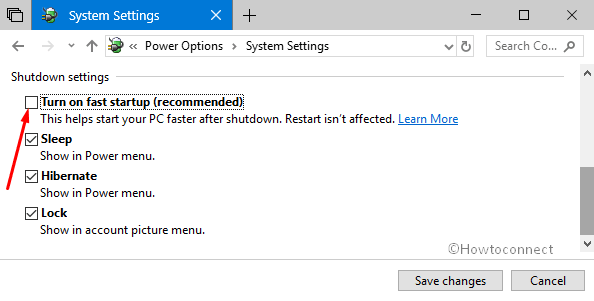
Here just unmark against the box “Turn on fast startup” which is under “Shutdown settings” and hit on the button Save changes.
Fix 5: Disable Integrated Graphics Card
If you are using an integrated graphics card in your system, the system recognizes it as dual monitors which might be the cause of Black Screen with Cursor After Windows 10 April 2018. The use of separate graphics card might resolve this issue in this particular case. Follow the below-written steps on how to solve this issue:
Just open the problematic PC into Safe Mode and press Ctrl + Alt + Del hotkeys altogether. From the list, click Task Manager.
In the Task Manager, you’ll be able to access “Device Manager” by pressing on the File menu and then clicking on the Run new task. This will open up a window.
Type in or copy-paste devmgmt.msc in the text field and hit Enter. The Device Manager will open, now go to the “Display adapters” section.
Here you can see the entire graphics card installed on your PC (Intel or AMD graphics card). Right click on it and then click on the Disable.
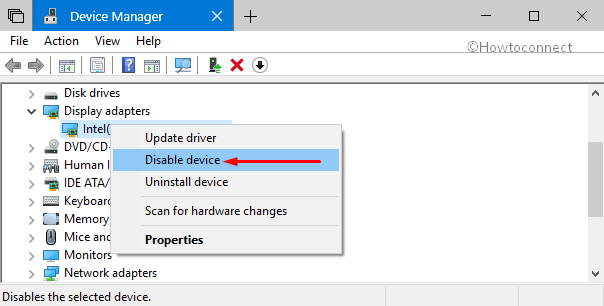
Finally, reboot the PC to see whether the Black Screen with Cursor After Windows 10 April 2018 issue is resolved or not.
Note: When you see more than one graphics card, don’t get confused. Just disable them one after another.
Fix 6: Log in using a different user account
Sometimes it is found that user profile itself is the culprit for the black screen troubles. Therefore it is good to log in to the PC with a different username and see whether the issue still persists or it was just a corrupt user related problem. Let’s also look at this fix and the steps which you need to follow to replace the corrupt one with a working user profile. Here’s the process to follow:
First & foremost, reboot your system in the Safe Mode and log in to the other user account. Proceeding ahead, navigate to the given-below path –
C:\Users\{working-user-profile-name}\AppData\Local\Microsoft\Windows\Caches
Here copy the “Caches” folder and save it somewhere securely to access it later on.
Now, return to the normal mode and get into the corrupted user account through Safe Mode.
Browse to the following path and paste the folder that you copied from working user profile.
C:\Users\{broken-user-profile-name}\AppData\Local\Microsoft\Windows\Caches
Note: If you are using only one working account you can create another profile by following this process:-
1. At first, ensure that you are using an ‘administrator Windows account’. Launch Start Menu and perform a hit on the cog icon to open Windows Settings.
2. Here, click on the Accounts category. Now go to the left pane and click on the “Family & other people”.
3. Now click on the “+” symbol against “Add someone else to this PC”. Follow the guidelines given on the screen (like email, next) which helps in creating new Account.
4. At last, your account is created; log in to your new account using the proper credentials. Hope Black Screen with Cursor After Windows 10 April 2018 problem will no more appear.
If your user account is not an inbuilt administrator account, you can create it one using the method below:
– First of all, type cmd in the search box. Here you will find Command Prompt as the Best match, just right-click on it and choose the option “Run as administrator”.
– Here type active:yes /net user administrator and hit Enter key. Restart your PC and see you can use your Windows with administrative privileges.
Fix 7: Reset the PC
If you have already tried all the fixes mentioned above and still the issue of Black Screen with Cursor After Windows 10 April 2018 persists, you have to “reset your PC”. This will reinstall the Windows entirely. The steps on how to reset the PC are as follow:
# At first, restart your system in Safe Mode.
# Here in the Cortana search box, type “settings”. In the popped up menu press on Settings.
# Now click on the category “Update & security”. Moving ahead, perform a click on the Recovery section on the left sidebar of the following page.
# Go to the option “Reset this PC” and at last, click on “Get started”.
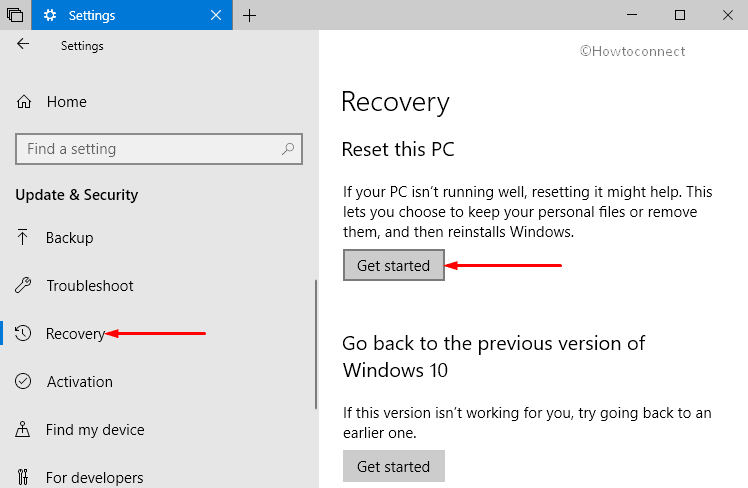
You need to follow all the instructions given by the system to reset it.
Fix 8: Remove the Battery (laptop only)
If you are running Windows 10 version 1803 on a laptop, try out to remove the battery. In many situations, the removal of battery for a few seconds worked as a charm. So, keep a hold on the power button and forcefully “shut down the PC”.
Now, take out the battery from the laptop and wait for approximately 60 seconds. Again insert the battery and check for the occurrence of Black Screen with Cursor After Windows 10 April 2018.
Fix 9: Update BIOS of the system
The corrupt or outdated BIOS into the system may also create problems which can lead to the Black Screen with Cursor After Windows 10 April 2018. Therefore, it is necessary to keep updating BIOS.
You can update your ‘BIOS’ by visiting the motherboard manufacturer website and search for the latest update. You will be provided a manual about the update procedure on its website itself. Ensure to go through the manual carefully before you proceed with the update.
Note: In BIOS, the graphics card should be set to use “PCI-E-slot”. If set otherwise, it would also lead to the black screen issue.
Fix 10: Disable Secondary Output from Device Manager
If you are having the Black Screen with Cursor After Windows 10 April 2018, you should disable the “secondary output/monitor”. Using one monitor instead of two or more is recommended. However, if you wish to continue you can follow the below-written steps:
#. First and foremost, open “Device Manager” using any of your preferred procedures. Here double click on the entry Display Adapters.
#. After expanding it, click View on the toolbar and select Show hidden devices.
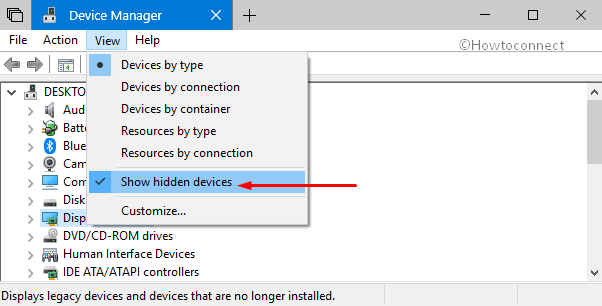
#. Now, perform a right click on the Secondary Output and click Disable Device. Just reboot your system to see the changes.
Fix 11: Set display output to IGFX
If you are experiencing the problem before login, you should give a try by changing the display output to “IGFX in BIOS”.
Restart the PC and while rebooting press on F2, F4 or Del Key for few seconds to enter the BIOS. The key depends on the system which you are using.
Once you enter in BIOS, go to the “Display output settings” and set it to IGFX. Doing this will make the integrated graphics the first display of your PC. Just save the changes made so far and press on Esc to exit from the BIOS.
Fix 12: Disable CPU Graphics Multi-Monitor/Dual Monitor from BIOS
Just reboot your system and then press on “F2 or Del” key (depends on the system which you are using) and get access to BIOS.
Now search and disable the “Dual Monitor function” & “CPU graphics” from the system. Again reboot your system to see whether the issue is solved or yet persists.
Note: If there is multi-monitor option present on your CPU graphics, you have to disable each of them to fix this issue.
Fix-13: Connect your monitor with both cables to your computer / connect an additional monitor
Very few users have fixed the issue with this solution yet you can try.
Connect your PC to another monitor with the help of either DVI and HDMI cable properly and then reboot the first.
Fix-14: Disable/enable dedicated Graphics card from BIOS
Sometimes just enabling or disabling the dedicated graphics alone settle down the error. Manufacturers provide the settings under Display section of Configuration menu in this regard. Follow the way –
Enter BIOS of the system, locate Graphics settings and Choose between switchable or discrete options.
- To Enable – Choose Discrete.
- To Disable – Select Switchable.
Black Screen with Cursor After Windows 10 April 2018 Update 1803 during install
Fix-1: Use integrated graphics card onto the PC
There might be the case when Windows 10 won’t recognize the inbuilt dedicated graphics card. Therefore, in this case, you need to use an externally integrated one and connect it to the PC’s screen. Doing this will solve the issue while installing Windows 10 onto your PC.
Fix-2: Check for additional displays connected to HDMI port
Before even installing Windows 10 on your PC, you need to ensure that the display device like monitor or even PC is not connected to the HDMI port. If you use any device connected to the HDMI port, it might be read as the main display by Windows 10 during the installation process.
Fix 3: Uninstall problematic software before the upgrade
Some applications are found to cause the Black Screen with Cursor After Windows 10 April 2018 Update 1803 issue. You need to disable the firewall or remove third-party antivirus if installed in the system prior to the upgrade. Uninstall certain tools too like OldNewExplorer, ClassicShell from your PC before getting Windows 10 V1803.
