Windows 10 often encounters crash particularly after getting bug through an update, using low trust 3rd party utilities or corrupt drivers. PHASE1_INITIALIZATION_FAILED is such a blue screen error. The issue indicates the system has encountered initialization failed. BSOD is a very critical fatality forcing the system to crash unexpectedly with continuous showing up of error messages. There is often irregular flashing on the screen as well as Windows might reboot unexpectedly since the system aims to minimize the data loss. This Blue Screen error also carries a bug check code of 0x00000032.
You can expect the PHASE1_INITIALIZATION_FAILED Blue Screen error in the system because of outdated drivers and corrupted system resources with invalid Catroot, Catroot2, and CodeIntegrity folders mostly. Besides, some other usual factors like outdated operating system, defective hard disk areas, and invalid Windows image files can cause a lot of damage leading to BSOD. Each of these reasons has got specific fixes but you need to try out many of these as the true cause is unknown. Check out the method list from below and navigate to each following the quick links –
PHASE1_INITIALIZATION_FAILED
Here is How to Fix PHASE1_INITIALIZATION_FAILED BSOD Error in Windows 10 –
1] Disable the Automatic Restarting
Blue Screen error is one of the most dangerous fatalities you can ever encounter and almost irrecoverable. The unexpected system crash forces lots of necessary data to be removed from the computer. On the other hand, system intends to keep the effect of this damage cooperatively low and reboots the system. Troubleshooting the error in this state is impossible.
In order to get rid of this loop, you have to disable the Automatic restarting feature of Windows changing default settings. This is not really a workaround instead; you are just creating a functional environment to apply the fixes. Here are the steps to follow for disabling this feature –
- Save all the ongoing tasks.
- Move to the desktop area pressing Win+D hotkey at once.
- Being moved, right-click on This PC icon and select Properties option from there.
- When the new window is visible, click Advanced system settings.
- Once the System Properties popup opens, move into the Advanced tab.
- Hover on the Startup and Recovery area and click the Settings option.
- After a new popup shows up, proceed ahead to System failure area.
- Uncheck the box that reads “Automatically restart”.
- Finally, click the OK button from the bottom to save the changes.
Changes will affect the default settings immediately and system will not reboot anymore unexpectedly and repeatedly. Thereby, the stability will be assured and you can start deploying the below workarounds one after another and fix the blue screen error.
2] Update the Operating System
PHASE1_INITIALIZATION_FAILED BSOD error is much expected in an outdated Windows 10 than an updated one. The reason behind this is, the latest update patches contain probable fixes and security modifications. Microsoft is very much keen about this and releases them at very close intervals. Installing the latest patches will keep the system healthy and out of risk from various bugs & issues. Therefore, follow the below guidelines and install the updates –
- Press Windows key and I to launch the Settings app.
- From the following UI, tap the Update & Security.
- After the next page is right on, select Windows Update from the left pane.
- Move to the adjacent pane and click on Check for updates button.
- When all the patches are available, click Download to begin the process.
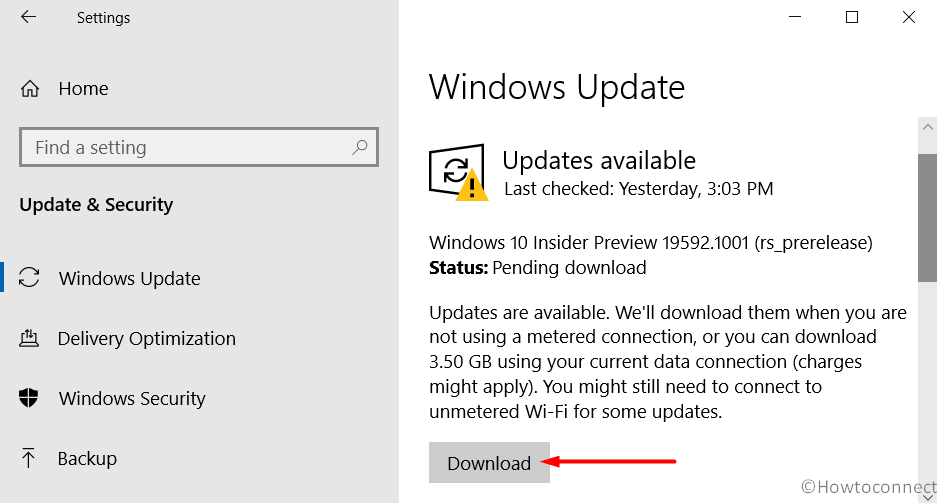
- You may be asked for approval before installation, click on Yes.
- Attend a couple of restarting in order to complete the process.
3] Make the system malware-free using Windows Security
Malware is the worst enemy in a system as they damage the resources helping to run the OS smoothly. It’s hard to find them in the system as they stay in disguise and look like a usual file. In order to keep the system malware-free, we need to be cautious initially and then try to strengthen the security shield. It may also happen that, threats have made the system files corrupted and you are getting PHASE1_INITIALIZATION_FAILED BSOD in Windows 10. Therefore, run a full system scan for virus and eliminate them using the below guidelines –
- Open the Start menu and approach alphabetically in the app list.
- Click Windows Security once found.
- From the succeeding window, select Virus & threat protection located at the left pane.
- Click on Scan options link from the adjacent right.
- Select the radio button set against Full scan and click Scan now button.
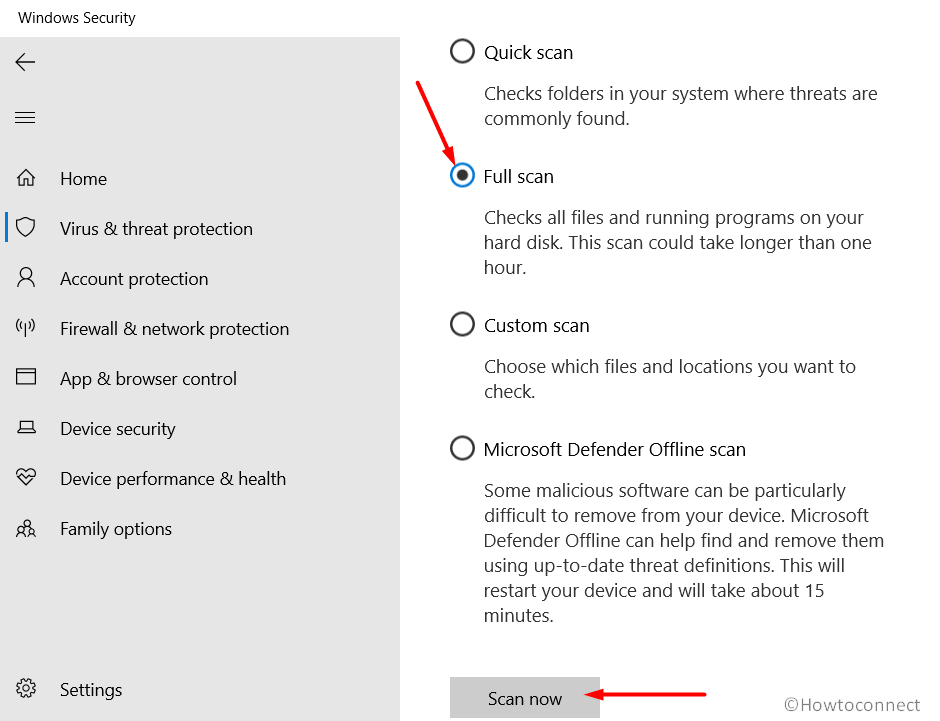
- When the scanning is over, tap the Clean Threat option if the utility displays some active malware in the system.
- From the next page, click Remove and the Start action buttons to clean up all the threats.
- Finally, Restart Windows 10 to make changes effective.
4] Make all the drivers up to date to Fix PHASE1_INITIALIZATION_FAILED
Whenever the drivers are outdated, the stability of the system deteriorates and it will lose functionality in a wide margin. Updating a driver is usually carried out while updating the Operating System to a newer build. In this way, many of these drivers left outdated and then eventually cause PHASE1_INITIALIZATION_FAILED BSOD in Windows 10. Let’s now update the drivers using Device Manager following the below guidelines –
- Press Win+X hotkey, select Run from the appearing list.
- Type devmgmt.msc in the empty text space and press Enter key.
- When the device console is upfront, search for any mark of exclamation in devices.
- If there is any, expand it by double-clicking. Right-click the outdated driver marked with yellow indication.
- Choose the Update Driver option from the appearing menu.
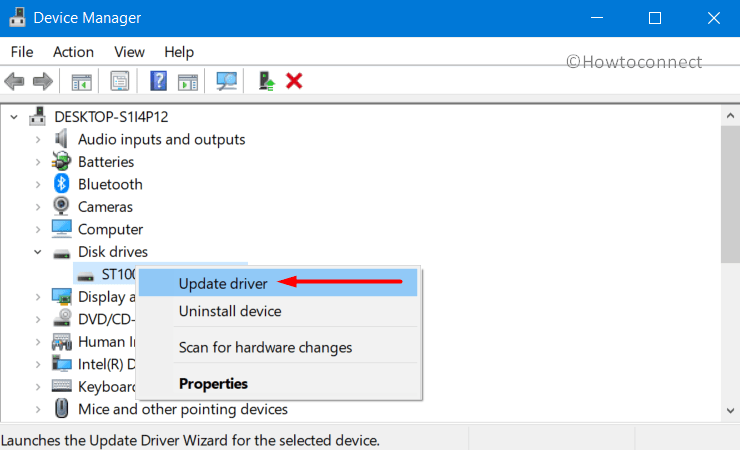
- Once a small popup floats on display, click Search automatically for drivers option.
- Update all the outdated drivers following the same procedure as above.
- Finally, restart the computer for bringing these changes into effect.
5] Collect and replace Catroot, Catroot2 and CodeIntegrity folders from another PC
The aforementioned BSOD error shows up in Windows 10 when the Catroot, Catroot2, and CodeIntegrity folders are found corrupted, missing, or in damaged condition. In order to fix the error, we have to replace these folders taking from any other fully functional computer.
Make sure that, the computer from where you are copying these files is having the same version and edition of Windows 10. You can check the Windows Specification from the System Settings to confirm. You are able to get the formation easily by following this article – How to Check Laptop Specs in Windows 10. Then go to C:\Windows\System32\CatRoot and C:\Windows\System32\catroot2 and copy them respectively. Replace these folders on your system with the copied folders. Reboot the system and after getting back to operation, check if the error has gone.
6] Run DISM scan to rectify corrupted Windows image files
Windows image files are the snapshots of the major upgrade that releases primarily for creating the CD-R or DVD-R components. These files are saved in ISO ISO-9660 format which can easily be corrupted by third-party applications and tools. Corrupted Windows image files are very much likely to cause PHASE1_INITIALIZATION_FAILED BSOD error in Windows 10. We can fix these images using Deployment Image Servicing and Management (DISM) tool and the guidelines are as follows –
- On Taskbar search, type cmd in the empty text space and hit Enter.
- Right-click Command Prompt in the search result. Select “Run as Administrator” option from the context.
- Click Yes when the User Account Control floats for permission.
- Type the below command at the blinking cursor –
DISM /Online /Cleanup-Image /RestoreHealth
- Press Enter key to execute the command and activate DISM tool.
- Wait until the tool repairs the faulty Windows image files.
- Restart the computer once it finishes.
7] Uninstall unnecessary applications to fix PHASE1_INITIALIZATION_FAILED
Sometimes installing unnecessary programs cause trouble as many are not trusted enough. Some may carry bugs and make the system to crash unexpectedly. Certain programs may come with different names or vendors but the functionality is the same. These applications contain similar system files that can collide later on and you may experience the worst software collision. This always led to crash system files, delete many of them forcibly, and finally, PHASE1_INITIALIZATION_FAILED BSOD shows up. Therefore, uninstall unnecessary program especially the duplicate ones using the below guidelines –
- Invoke Run and type appwiz.cpl in its blank text field.
- Click the OK button to open up Programs and Features window from Control Panel.
- Locate the problematic application in the list and right-click it. Select Uninstall.
- When the confirmation message becomes visible, click Uninstall.
- Follow the on-screen guidelines to complete this process.
- Restart Windows 10 PC and check if the error is resolved.
8] Perform System Restore to load the previous point
PHASE1_INITIALIZATION_FAILED BSOD can come up in the system after installing a new program or removing an existing application. The reason might be an unexpected change in the Windows registry which is a very sensitive area. Therefore, performing System Restore will simply load the previous point and you can get back to a state where the error was not prevalent. To perform the task, follow the below instructions –
- Access Taskbar Search pressing Windows key and S together.
- Type ‘rstrui’ in the text box and hit Enter.
- When System Restore wizard shows up, click Next from the bottom end.
- On the following page, you will see the most recent restore point. Check the box that reads Show more restore points.
- Now, you will be able to see all the previous points and choose any to where you opt to head back.
- Click Next to proceed ahead. Click the Finish button.
- A warning message will show up now, click Yes to continue restoring.
- A blue screen will arrive and restoring will take about 5 minutes and more.
- Once the process completes, system will reboot.
9] Run the System File Checker to identify and fix corrupted system resources
A corrupted file will lose the fixed components and structure in it and will appear as unreadable. The ultimate result is PHASE1_INITIALIZATION_FAILED Blue Screen which is very much detrimental to the system. System File Checker is another handy default utility in Windows 10 that helps to recover the missing resources and rectify corrupted ones. Here are the steps to run the tool –
- Open Run dialog box and type cmd in the text area.
- Press of Ctrl+Shift+Enter keys.
- Click Yes to provide consent when UAC prompts.
- In the black window appearing next, enter the below command –
Sfc /scannow
- Press Enter key to execute the command.
- System File Checker will detect and fix problematic components as well. If there are any missing DLL files, they too will also recover them accordingly.
- Once done, perform Restarting to Windows and check if BSOD has resolved once the next session starts.
10] Use the built-in Windows Blue Screen Troubleshooter
BSOD error shows up in the system with no fixed cause of origin and that complicates the troubleshooting a lot. Microsoft, in order to make the fixing easy and simple, introduced Blue Screen troubleshooter. The intention is to provide exactly the necessary solution based on the problem you are having.
In the beginning, Microsoft has placed this utility in the Windows settings app with all other troubleshooters. Coming to a recent build, tech giants have released an online version of the same tool so that users can take direct online help in case of Blue Screen issues. Here is how to run the troubleshooter to fix PHASE1_INITIALIZATION_FAILED BSOD error –
- Click this link and the default browser will take you to Microsoft’s online troubleshooting web page.
- Hover downward in the upcoming page and reach When did you get the error? area.
- Click any one of the radio buttons from here according to your problem.
- The page will now readjust and show some step-wise tasks in order to fix the Blue Screen error.
- Follow these steps properly and fix the error accordingly.
11] Disable Fast Boot mode to stop carrying over PHASE1_INITIALIZATION_FAILED BSOD
Fast Startup is a combined power option commingling Shutting down and hibernates in order to make the booting process faster. To make the operation, it simply collects all the data from the previous session and carries the over to succeeding startup. Programs as being served with past data, loads faster than usual, and the startup don’t take so much time.
Undoubtedly Fast Startup is one of the finest processes Microsoft has ever provided to the users. Yet, there is a sheer chance of carrying over blue screen error as well to the next session along with other data. Therefore, we need to disable this method for fixing PHASE1_INITIALIZATION_FAILED Blue Screen error. Here are the steps to follow –
- Move the pointer extreme right side of Taskbar and right-click on the battery icon.
- Select Power Options from the context.
- From the succeeding window, select Choose what the power button does link from the left column.
- After the next page unfolds, click on Change settings that are currently unavailable.
- Hover downward and uncheck the box set for Turn on fast startup (recommended).
- Finally, click the Save Changes button.
12] Remove Hardware accessories for some time
Hardware accessories like mouse, keyboard, external hard disk, speakers are very much essential to set up and run a system. Without these gadgets, we cannot get the maximum functionality out of a system. Unfortunately, a few users have come up with complain that they are getting PHASE1_INITIALIZATION_FAILED blue screen error after connecting the hardware accessories.
A big group of users has come up with a self-made resolution that, unplugging these devices, for the time being, can fix the BSOD error. Don’t miss out on the chance to fix the error using this very simple trick of the same happens with you. Make sure that, you have performed restarting after disconnecting them. Check if the error has fixed once the next session begins.
13] Run the Disk Checking tool to resolve PHASE1_INITIALIZATION_FAILED
Bad areas in the hard disk are yet another prime suspect to cause PHASE1_INITIALIZATION_FAILED Blue Screen error in Windows 10. A hard disk is considered as the soul of a system as it has the responsibility to store all the data to make a system fully functional. We seldom take good care of this and let the bad areas form in it. Usually, there two types of bad areas found namely hard or physical and soft or logical. The first one happens due to physical damage while later one occurs due to power outage or forcibly pulling a plug from the device. Here are the guidelines to accomplish this task –
- Access to the Elevated Command Prompt following guidelines from above workarounds.
- When the black window comes in, enter below commands at the base of the blinking cursor –
bootrec.exe /rebuildbcd
bootrec.exe /fixmbr
bootrec.exe /fixboot
- Execute the commands pressing Enter key after each.
- After completing the task, again type the below command and press Enter key –
chkdsk C: /f /r /x
- Execute Disk Checking tool to fix the bad areas accordingly.
- The process might take a while, wait for the full scanning to complete.
- Once done, Restart Windows 10 and make all changes effective.
Methods:
1] Disable the Automatic Restarting
2] Update the Operating System
3] Make the system malware-free
4] Make all the drivers up to date
5] Collect and replace Catroot, Catroot2
6] Run DISM Tool
7] Uninstall unnecessary applications
8] Perform System Restore
9] Run the System File Checker
10] Use built in Windows Blue Screen Troubleshooter
11] Disable Fast Boot mode
12] Remove Hardware accessories
13] Run the Disk Checking tool
That’s all!!