Webcam issue in a laptop occurs from both hardware and software sides. If you are sure that your hardware is not the cause then the methods here will be working to solve camera app error 0xa00f4292 Photo Capture Start Timeout. This code usually appears when you are trying to open the built-in application.
There are a number of reasons for this webcam problem in Windows 10 out of which 2 are main; outdated driver component and the lack of permission to run on the device. Sometimes a bug in your recent windows update or an improper, unsuccessful, and incomplete update could throw the error message. Furthermore, the corruption in camera app itself, the Windows Defender firewall blocking might be other causes too. In order to fix 0xa00f4292, we have listed a number of tried and tested solutions –
PhotoCaptureStartTimeout 0xa00f4292 Camera Error
Here is how to fix PhotoCaptureStartTimeout 0xa00f4292 Camera Error in Windows 10 –
1] Update the graphics driver – Trick
Some users on the Microsoft community forum write that after they tried everything like updating camera driver, reinstalling the app, SFC /Scannow didn’t work either. But only update of the display driver rectified Photo Capture Start Timeout, camera error 0xa00f4292. So try the solution using the below instructions –
- Press the – Windows + S.
- Type in – devmgmt.
- Hit the – Enter.
- Double-click the – Display adapters (on the Device Manager).
- Right-click on the driver listed there and select – Update Driver.
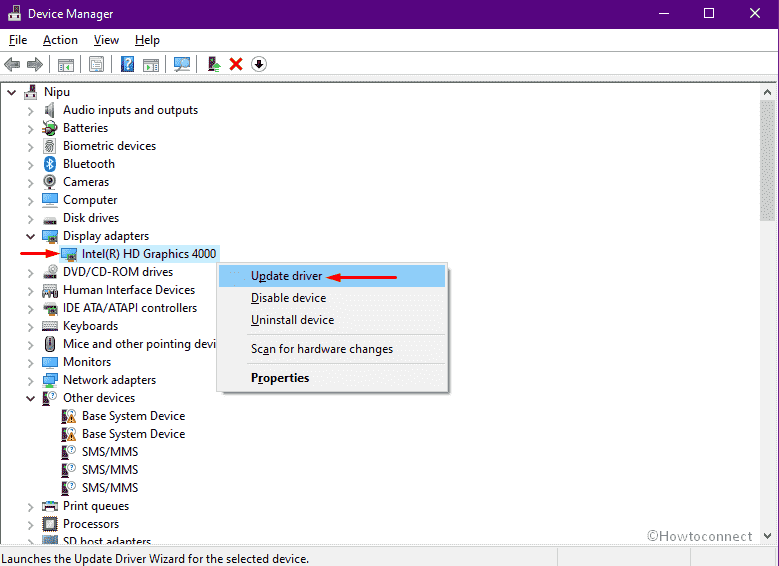
- Pick – Search automatically for drivers.
- After completion of the installation, close the console and restart the PC.
- In case, you promptly get a message – “The best drivers for your device are already installed” then go to the Manufacturer’s website.
- Download the most recent one and install it manually.
2] Reinstall graphics driver to solve Laptop camera error code 0xa00f4292
Due to the graphics driver application not installed correctly the camera error could also occur. When you launch the webcam app it can not get support from the driver software and creates the problem. So, reinstall the same using the following guidelines –
- Right-click the – Start icon.
- Select the – Device Manager.
- Expand – Display adapters.
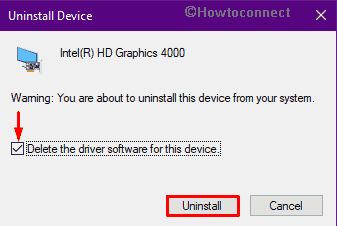
- Right-click the graphics driver and choose the – Uninstall device.
- Check the box set before Delete the driver software for this device.
- Click – Uninstall.
- Restart the device.
- When the device powers up, open a web browser.
- Visit the manufactures website of your graphics card and look for the most recent and compatible version of the software.
- Download and install the same.
3] Delete Camera roll folder
Camera roll is a location set by default to store the photos captured using the webcam. Any issue with the folder such as incorrect configuration, corruption, or malware infection might lead to PhotoCaptureStartTimeout 0xa00f4292 Camera Error in Windows 10. As a solution delete the folder and restart the device through the below steps –
- Press the – Windows + E.
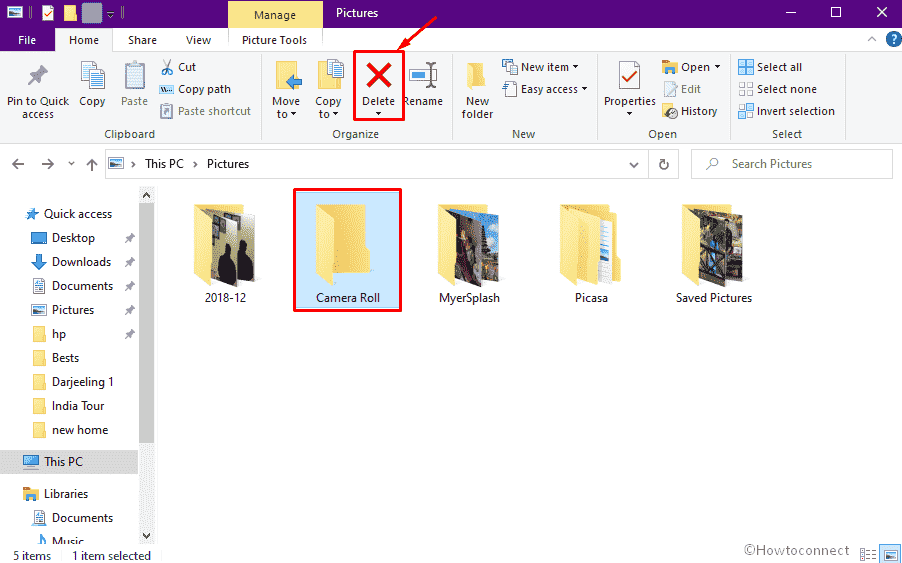
- Go to – This PC => Pictures.
- Select the – Camera Roll.
- Click the – Delete.
4] Run Hardware & Device Troubleshooter
Windows offers inbuilt troubleshooters to ease up you when any sort of issue occurs on your PC. The tools are simple to use and even a newbie can’t be bothered running them. These include Hardware & Device Troubleshooter that diagnoses issues in peripheral devices and the associated applications and fix them. So if you are getting camera app 0xa00f4292 error code whether in DELL, HP, Asus, run this utility.
- Click the – Search icon present on the taskbar.
- Type – powershell.
- Press – Ctrl + Shift + Enter.
- For the appearing User AccountControl, click the – Yes.
- Insert the following line of command in PowerShell window –
msdt.exe -id DeviceDiagnostic
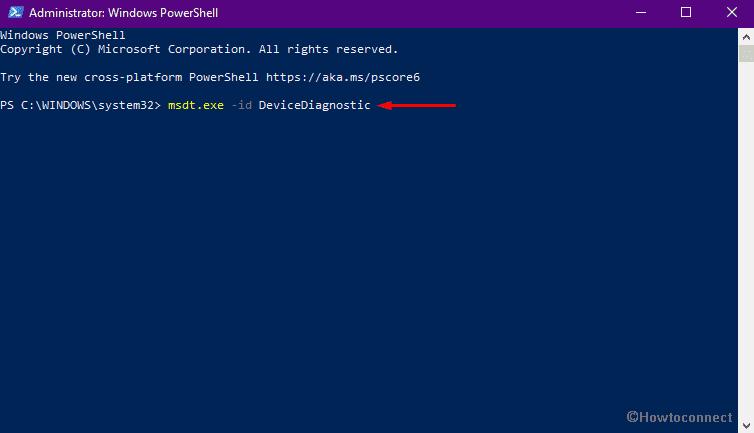
- Hit – Enter.
- When Hardware and Devices troubleshooter shows up, click – Next.
- Comply with on-screen guidelines if any.
5] Check if any program using camera background
Skype, Photos, and video calling services provider websites use the camera in background and use its functionalities. In this situation when you launch the app multiple processes get involve in a single task. Therefore, the camera app doesn’t open and crash with showing Microsoft camera error code 0xa00f4292. Before you access the application close the tasks using the following instructions –
- Right-click on taskbar and select – Task Manager.
- Click – More details.
- From the Processes tab, check which programs are currently running in the background.
- If you see an app that uses the Camera, right-click the same.
- Select – End task.
6] Run SFC scan to fix Webcam error code 0xa00f4292
Error 0xa00f4292 often comes up because of a broken or missing system file and running SFC scan could most probably resolve this nagging issue. A system file checker runs a series of scans to diagnose the corrupt files throughout the PC. It looks for broken or damaged system files and subsequently replace the same with the cached items to fix the issue. Let’s see how you can run SFC scan in a few simple steps:
- Press the – Windows + S.
- Type in – cmd.
- Select the – Run as administrator.
- When a UAC shows up, click – Yes.
- On the Command Prompt window, type – sfc /scannow.
- Hit – Enter.
This would have initiated the system file checker diagnosis, wait till the process finishes. Once the process ends, reboot your PC and go back to accessing your webcam again and check if the error 0xa00f4292 still comes up.
7] Allow your PC to access the Camera
Sometimes you unknowingly put restrictions on some of the essential applications on your PC and then forget about it. It could be an indirect execution after installing an app or by a human error. This could be a reason for error 0xa00f4292 to occur. So, simply undoing this action could very easily resolve this photo capture start timeout camera error 0xa00f4292. Follow the steps –
- Press Windows key and type – privacy.
- Press the – Enter.
- From the appearing result, select – Camera privacy settings.
- Move to the right pane.
- Switch on – Allow apps to access your camera.
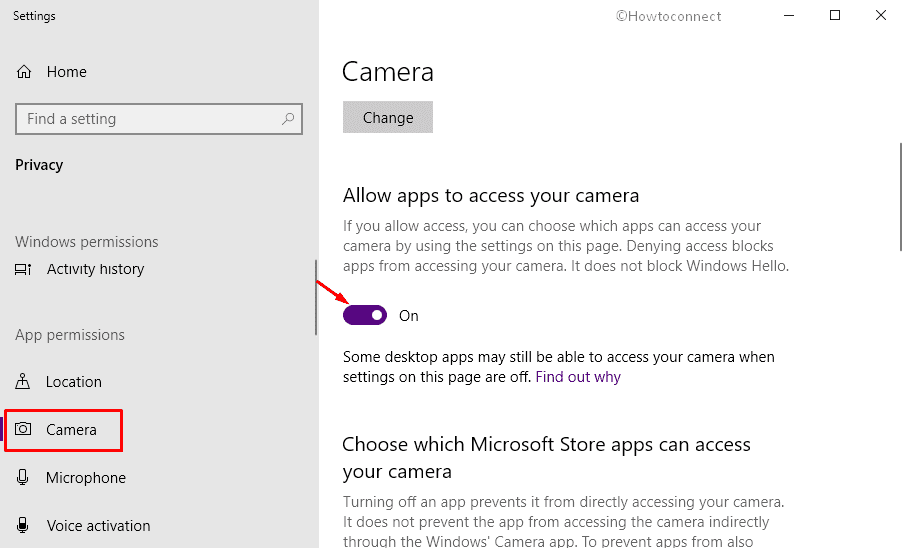
- Proceed to the “Choose which Microsoft Store apps can access your camera” section.
- Use the toggle switches available there to allow access to those applications you wish to use with the webcam.
- Close the Settings window and reboot your PC.
8] Permit camera access through Windows Defender Firewall
Firewall allows to allow or block an application before establishing communication on a PC. Many times, this feature might misinterpret a Windows app and include it in the block list automatically. So as you open the camera app Firewall applies the rule to it resulting in the error code. So check the block list and remove it by following instructions –
- Open Control Panel.
- Set the View by type to Large icons.
- Select the – Windows Defender Firewall.
- From left sidebar, click the – Allow an app or feature through Windows Defender Firewall.
- Find the – Camera app in the list.
- Uncheck the boxes from Private and Public columns.
- Click the – OK.
Once you are done executing the procedures make sure to restart the PC and then go back to launch the camera app and check if the error 0xa00f4292 still persists.
9] Update the Driver software of Camera
Sometimes the error may also come up because of an obsolete driver of your webcam.Since Microsoft releases updates for windows almost every month it could happen that the camera is not updated for a long period of time and an incompatibility arises.
The easiest way to resolve PhotoCaptureStartTimeout 0xa00f4292 Camera Error is to try updating your camera driver.
- Press the – Windows + Q.
- Type the – device manager.
- Hit – Enter.
- Double-click the – Cameras.
- Right-click on camera driver and choose – Update driver.
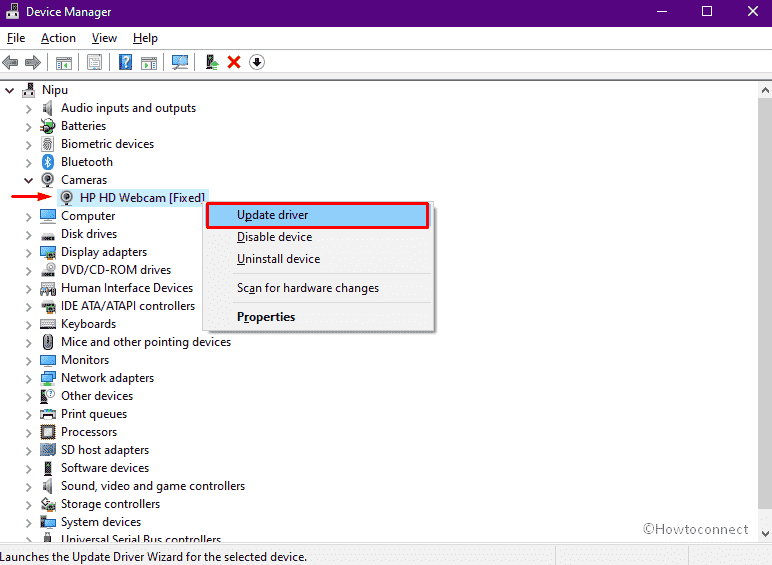
- Click – Search automatically for drivers.
- Follow the on-screen instructions to complete the process.
Once the process is finished restart your PC to incorporate the update and check if the error is still generated.
10] Reinstall WebCam driver
If all the above solutions don’t seem to resolve your issue as a last resort you can uninstall and reinstall your webcam driver software to fix this error. Many users have often recommended trying this workaround vociferously. Webcam driver re-installation will omit cached data stored on the system and fix the issue.
- Open Device Manager.
- Expand – Cameras.
- Right-click the camera driver and select – Uninstall device.
- Click the – Uninstall.
- Once the process finishes, click the Action tab in menu bar.
- Select – “Scan for Hardware Changes”.
See ways to fix more camera errors in Windows 10 –
1] Fix – Error Code 0xa00f4244 <nocamerasareattached> in Windows 10
2] Fix 0xA00F4289 ActiveCameraUnplugged Webcam Error in Windows 10
3] Fix 0xa00f4243 CameraReservedByAnotherApp (0xc00d3704) Windows 10
4] How to Fix Windows 11 Camera not working (Solved!)
Methods list
1] Update the graphics driver
2] Reinstall graphics driver
3] Delete Camera roll folder
4] Run Hardware & Device Troubleshooter
5] Check if any program using camera background
6] Run SFC scan
7] Allow your PC to access the Camera
8] Permit camera access through Windows Defender Firewall
9] Update the Driver software of Camera
10] Reinstall WebCam driver
That’s all!!

my camera is not working