Before moving around the reasons and solutions, first of all, let’s see what is disk usage. Disk usage in Operating system is the portion of computer storage that HDD or SSD is reading and writing. In normal state, the usage remains under 10% and you can check this easily from Task Manager. But when certain abnormalities occur the percentage value of disk usage shoots up in Task Manager. So in this post, you will see ways to fix Windows 11 disk usage 100% or high.
When windows 11 disk 100 percent problem appears, the computer will become slow, programs will open late after clicking them, and games will hang repeatedly. This is really frustrating and can make your Windows 11 experience worse. There are a few reasons leading the disk usage to go higher such as too many startup programs, obsolete driver software, virus, some services monopolizing the disk or so many applications running at the same time. Additionally, Windows search index, negligible RAM to fit in with SysMain and inability of HDD to leverage native command are potential causes too. However, such high disk usage issues can be fixed if you hit the right points with effective workarounds.
Windows 11 Disk usage 100%
Here is how to fix Windows 11 disk usage 100% –
1] Reboot Windows 11
Whenever a problem arises in Windows 11, the resolution that gets priority over any other is restarting the device. This is simple and not likely to resolve the underlying root causes in most cases but will definitely boost up the system. If you are having high disk usage issue, rebooting will bring down it to lower level.
Restarting forces the OS to reload the resources therefore, some minor glitches are fixed quickly. Oftentimes it gives better results than shutting down a computer completely. To reboot Windows 11, follow the guidelines –
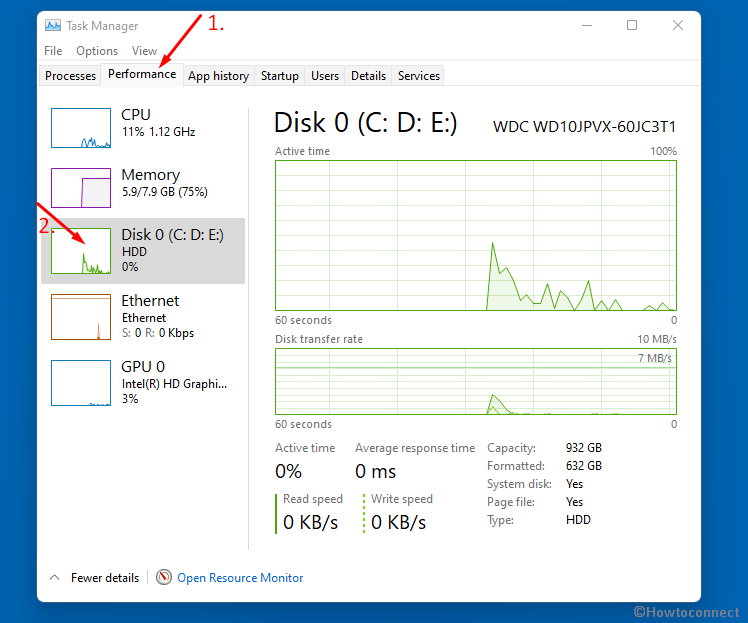
- Press – Windows key to open up Start menu.
- Click the Power icon.
- Select – Restart.
- Once the device completes restarting, press – Ctrl+Alt+Del key combination.
- From the blue screen, choose – Task Manager.
- Click More details if the window is not expanded already.
- Go to the Performance tab and click on Disk.
- Check if the Disk usage has been lowered down.
2] Perform a check for malware to fix System high disk usage
Protection against viruses is mandatory nowadays as it could also lead to high Disk usage of the system. Malware is a designed software to seize your machine and eventually steal necessary data from it. Moreover, these will cause severe harm to the system components by corrupting them.
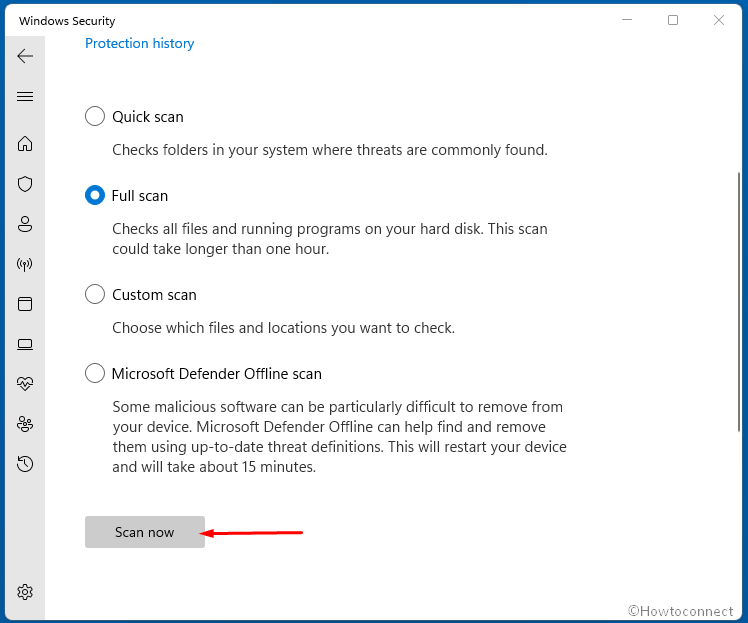
Malware includes Trojan horses, adware, worms, ransomware, and spyware that can easily keep their identity hidden. Without a powerful security suite, your computer can be a host for these bugs and get into trouble. Windows Security is provided with the OS has a very powerful built structure which can deal with the malware perfectly. In order to fix the Windows 11 disk usage 100%, do virus scan in your system and eliminate the threats if found any. Follow the below guidelines to scan and dismiss viruses –
- Click – Windows icon from Taskbar.
- Hit – All apps from the top right corner.
- Navigate to Windows Security app.
- Click the same to open in a separate window.
- From the left pane, choose – Virus & threat protection.
- Move on to the corresponding right side and click – Scan options link.
- Choose the radio button set for Full scan.
- Click – Scan now.
Scanning will start immediately and it may take some time to complete, bear with it for that. You can continue on working on projects while system carries out malware scanning in files, folders, and other data.
- Once traced out viruses, you will be given options to take necessary actions. Follow the guidelines on the screen to resolve them.
- Restart Windows 11 to make the changes effective.
3] Reset Virtual memory to solve Disk at 100% for no reason
Virtual memory in Windows 11 allows the OS to expiate if the physical RAM falls into indebtedness. It will momentarily transfer the additional data from virtual memory to the system storage. This is also a very much powerful management idea in recent times to control multitasking and the flexibility even the RAM of the device is a bit low.
Virtual Memory in Windows 11 can lead to some trouble despite being a great feature. Oftentimes it triggers Windows 11 disk usage 100% issue from errors in the pagefile.sys file. If your hard drive is not so old, resetting the virtual memory can fix this issue. To reset, follow the below guidelines –
- Press – Windows + I.
- From the Windows Settings app, select – System.
- Click About from the right pane.
- Scroll down on the next Settings page.
- From the Related links section, click – Advanced system settings.
- A popup will open with Advanced tab opened in it.
- Hit – Settings button present beneath Performance area.
- Enter into Advanced tab in the newly opened window.
- Click – Change located in the Virtual memory segment.
- After a new wizard unveils, uncheck the box set for Automatically manage paging file size for all drives.
- Click the radio button before Custom size and adjust the maximum size to a larger number.
Note – No need to set this value to a very high number, keep it about 1.5 times of your RAM.
However, you can see every small detail here – How to Tweak Paging File for better Windows 10 Performance.
- Once done, click – Set and then OK to make the change.
- Close all the windows and open Run dialog by pressing – Win + R.
- Insert – temp in the command box and click – OK.
- When the Temp folder appears, press – Ctrl+A keys together.
- Right click any selected item and choose – Delete.
- Once done, restart the Windows 11 device and check if the issue is resolved.
4] Change Power plan to High performance
In order to improve battery life in laptops, Windows choose to set the Power plan into Balanced. This is very much prone to increase the disk usage which can be settled down by shifting into High-performance mode. The idea will consume more battery power of course but thanks to the modern manufacturers to provide the battery with more capacity. Hence if you are having Windows 11 disk usage 100% issue, change the power plan settings. For that, follow the below guidelines –
- Click Search from the taskbar.
- Choose – Power Options.
- When a new window comes into the view, check if there is any power plan named High performance in the right pane.
- If not, click – Create a power plan located at the left sidebar.
- From the following window, select the radio button set before High performance.
- Give the plan a name.
- Click – Next button.
- Set the sleep and display settings as you prefer.
- Hit – Create.
- By default, the newly created power plan will be applied.
5] Turn off Windows search
Windows search is one of the core services that index the data saved in the computer. This basically renders a quicker proceeding in searching whenever you need to look for something in the OS. Many of the users have found out their disk usage reached to higher limit with the Windows search service enabled.
In order to fix the Windows 11 disk usage 100% issue, disable the service temporarily to check whether it helps. This is not recommended always being a core component but for instance, you can do that. Follow the guidelines to disable Windows Search service –
- Press – Windows + S.
- Type in – services.msc.
- Press Enter key to open the dedicated app.
- From the right side pane of Services window, look for – Windows search.
- Right click the service and select – Properties from the context.
- Set the Startup type to Disabled.
- Click – Stop button.
- Finally, Hit OK to save the changes.
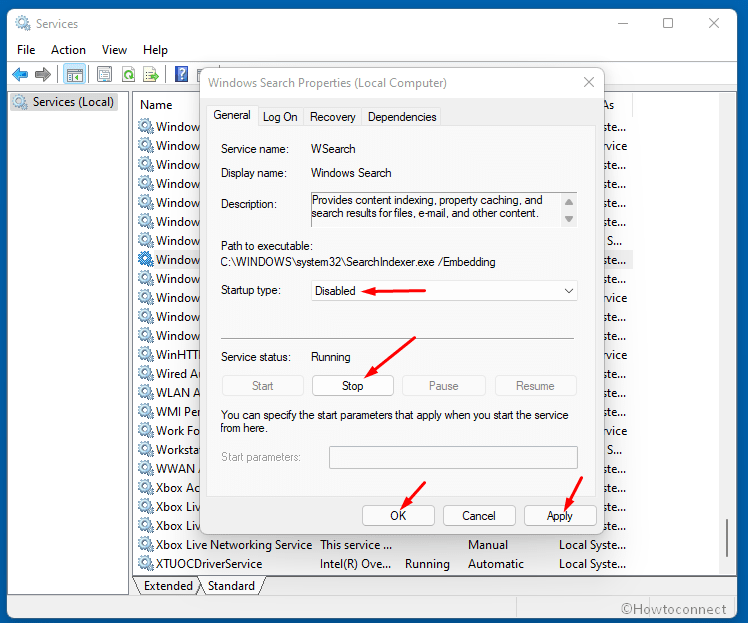
- Now, restart the machine and check if the disk usage has come down.
- You can enable the service again if the issue is resolved.
6] Disable the SysMain to fix Windows 11 disk 100 percent problem
SysMain is the present name of Superfetch service that helps to pre-load the application commonly used in Windows. This also ensures the enhancement of the system performance. Additionally, this service can keep a record of apps you use on specific days in a week or in other patterns to optimize the apps open accordingly.
Some users have come up with Windows 11 disk usage 100% issue in their system and when SysMain remains enabled. Despite of being a very lucrative feature in medium and high end configuration computers, this service does not give the best outcome in slightly lower end devices. A machine with relatively low RAM and frequency, SysMain will transfer the load from RAM to VRAM. This will make the situation even worse and increase disk usage to a higher percentage. In order to fix the issue, disable the service now going through below steps –
- Press – Windows + X.
- Select – Run.
- In the command box, type – services.msc.
- Press – Enter key to open the app.
- Go through the services list to find – SysMain.
- Right click the same and select – Properties.
- Choose – Disabled from the drop-down list of Startup type.
- If the Service status is running, click – Stop.
- Hit OK from the bottom to make the changes effective.
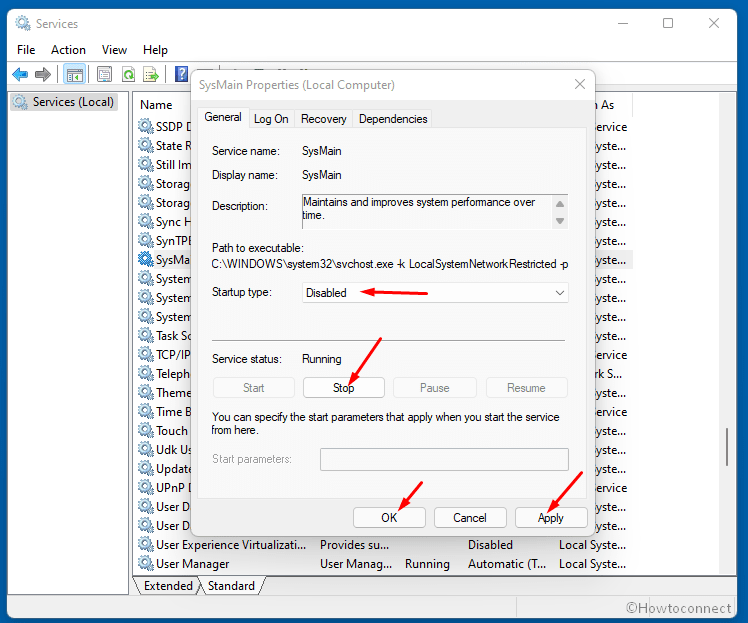
- Reboot Windows.
- When the system powers up, check if the issue is fixed.
- Re-enable SysMain service if the disk usage is relatively less.
7] Update the hard Drive firmware
Firmware is a unique type of software in computers that offers low level control for specific hardware peripherals. It usually accommodates the programming for storage in the hard drive. Furthermore, firmware also maintains the communication between the electromechanical data storage device and the computer itself.
Many users have come with unique idea of resolving the Windows 11 disk usage 100% issue just by updating the hardware firmware. It’s not mandatory to carry out this drill quite frequently rather let’s give this a try. Follow the below guidelines to update hardware firmware –
- Press – Win+R hotkey.
- Insert – devmgmt.msc in the Run dialog box.
- Click – OK button from the wizard.
- When the Device Manager opens up, look for – Disk drives.
- Double click the same to expand the driver list.
- Note down the name of the driver from here.
Note – If you have external hardware devices connected, make sure you identify the main driver.
- Open a web browser in Windows.
- Search for the latest driver you noted down.
- Download and install the latest driver software from official website.
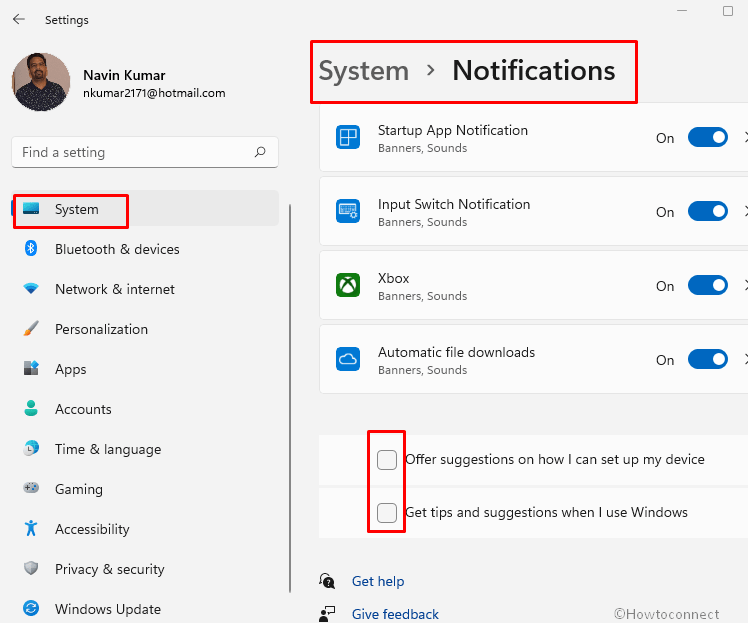
8] Turn Off Windows notification and tips
Tips and notification in Windows 11 is an amazing feature as it keeps updated about applications, system updates, new incoming emails and similar events. Alongside, various tips related to the best features out of an operating system are also available. You can see the tips and notifications will arrive at the most bottom right corner of the computer screen.
This is somewhat useless to people who check email regularly and keep tracking events. Moreover, this feature is a bit heavyweight and increases disk usage drastically sometimes. So, this might be the cause that is making Windows 11 use 100% disk. This way, disable Tips and notification feature immediately and check if the issue persists anymore.
- Right-click on Start button and choose – Settings.
- Select – System.
- From the right pane, click on – Notifications & actions.
- Scroll down to Notifications on the adjacent right side pane.
- Uncheck the box set before Get tips and suggestions when I use Windows.
- If you think of disabling notification from specific apps, scroll down a bit and toggle the slider beside that application.
- Once done, check if the disk usage percentage has decreased.
9] Disable telemetry to fix system using 100% disk in Windows 11
Telemetry in Windows 11 usually runs in the background and you won’t notice it every time. This functionality collects the related information and data about how you use the OS and various troubleshooting. Later on, the feature will share that information with Microsoft server.
Many people have come up with a doubt that the feature is a big concern for the privacy of individuals. Although we often ignore the fact that, telemetry increases the disk usage to a big number. Hence if you are having Windows 11 disk usage 100% and the telemetry service is enabled, disable this now. Follow the guidelines to accomplish this workaround –
- Press – Windows key.
- Type – services.
- Select the “Services” from the Best match.
- When the app is upfront, look for Connected User Experiences and Telemetry service.
- Right-click on the service and choose Properties.
- Navigate to Startup type area in a newly opened window.
- Click the drop-down for Startup type and Select Disabled option.
- Hit the ‘Stop’ button located in ‘Service status’ area.
- Lastly, click on ‘OK’ at the bottom to save the changes.
- Restart Windows 11 and check if the disk usage is lowered down.
10] Toggle off real-time protection in Windows Security
Anti-virus suites often run malware scan in the background which leads to CPU high usage in Windows 11. Whenever this scanning process malfunctions, or makes collision with other processes, the disk usage shoots to a very higher value.
If you are facing the Windows 11 disk usage 100%, the first action should be to check is there any scanning going on. The Real-time protection n feature in Windows Security is an amazing feature to keep you safe from viruses especially while surfing on the internet. Disabling this will lower down the high CPU usage but don’t keep it turned off for long. To do that, follow the instructions –
- Click the magnifier icon in the Taskbar.
- Type – Windows security.
- Press – Enter.
- When the app opens up, select Virus & threat protection icon from the left pane.
- On the right, scroll down to “Virus & threat protection settings” area.
- Click Manage settings link.
- After the next page is upfront, toggle the switch under Real-time protection to Off.
- You will come across a User account control dialog; click on Yes.
- Restart the computer and check if the disk usage is lowered.
- Re-enable the setting after checking the functionality.
11] Carry out Clean Boot
Clean Boot is a special type of startup method where only a minimal number of programs and services are loaded. The system will run excluding the lower priority and third party suits and that will help you to identify the areas from where Windows 11 disk usage 100% issue is coming. Eventually, you can use fixes accordingly in order to fix the problem.
You have to follow the instruction to perform a Clean Boot –
- Press –Windows key.
- Type – msconfig.
- Click – Enter to open System Configuration.
- Select the radio button present before Selective startup.
- Uncheck – Load startup items.
- Shift to Services.
- Select the checkbox present before Hide all Microsoft services.
- Click – Disable all.
- Move to the Startup
- Click the link – Open Task Manager.
- When the window turns up, disable all startup programs.
- For this, select an application and then choose – Disable.
- Go back to System Configuration.
- Click Apply and then OK.
- Restart the PC.
- When the computer starts in clean boot mode, check if the High CPU usage is lowered down.
12] Fix the StorAHCI.sys Driver
Some experts have traced out that, the StorAHCI.sys driver is responsible for Windows 11 disk usage 100% issue. The reason here is Advanced Host Controller Interface PCI-Express that encounters trouble in the operating system.
In order to fix the trouble, you have to follow the below steps –
- Open the Run dialog box (Win+R).
- Type devmgmt.msc.
- Press Enter key to open up Device Manager.
- In the new window, look for IDE ATA/ATAPI Controllers.
- Double click the device to expand the driver list.
- Do a right-click on Standard SATA AHCI Controller.
- Select Properties option from the context.
- Enter into the Driver tab on the window.
- Click Driver Details and check if there’s a storahci.sys file.
- Shift into the Details tab and scroll down to Property.
- Click the dropdown menu and select Device Instance Path.
- Copy the file that starts with VEN.
- Now close Device Manager and open Run dialog again.
- Type regedit and Press Enter key.
- From the Registry Editor window, navigate to the following path –
HKEY_LOCAL_MACHINE\System\CurrentControlSet\Enum\PCI\ \\Device Parameters\Interrupt Management\MessageSignaledInterruptProperties- Double click on MSISupported.
- Change the value to 0.
- Click OK to save the changes.
- Restart Windows 11 and check if the high disk usage issue is resolved.
13] Run disk checking utility
High CPU usage in Windows 11 can also happen from defective areas in the hard disk. Therefore it’s very much important to settle down the corrupted areas in order to fix Windows 11 disk usage 100%.
Disk checking utility in Windows 11 is an awesome tool to detect and fix hard disk corruption. The tool will be activated in the Elevated Command Prompt by executing a specific command. To run the tool, follow the below guidelines –
- Hit the – Win+R.
- Type – cmd.
- Press – Ctrl + Shift + Enter.
- When the user account control dialog will prompt up on the desktop, select – Yes.
- In the command prompts, type the following syntax and hit enter –
chkdsk C: /f /r /x- Once the disk checking is finished, Restart the computer.
- Check if the high disk usage issue is resolved.
14] Disable background apps to solve Task Manager disk usage 100%
Some applications in Windows computers don’t really close once you exit from them. Instead, they keep on running in the background, receive data, do refresh to stay alive. These programs are one of the greatest reasons to cause Windows 11 disk usage 100%.
Disabling the application will stop them to be opened in the background, close other functions. You can re-open manually anytime required next but the action will reduce the high CPU usage to a great amount. To disable the background apps, follow the below guidelines –
- Right-click on the Start from Taskbar.
- Choose Settings from the list.
- From the Settings, click Apps.
- Select Startup located at the right pane on the following page.
- Turn off all the apps from the Startup page and check if the problem of high disk usage still persists.
15] Update Windows 11
Windows gets updates regularly and Microsoft impulses users to install them and again. This is necessary for the OS to receive an extra bit of energy, a big blow as many improvements and bug fixes are included. An update patch is a compact package of the latest built-in tool, UI improvements, enhanced security features, and fixes of bugs.
On the contrary, an outdated operating system renders more trouble with time passing by. Bugs may easily make it prey and viruses will get in as a great host too. Windows 11 disk usage 100% issue has been found to occur very much unlikely in the updated operating system. Therefore, follow the instructions to check for the latest patches and install them –
- Right-click on Start button and choose – Settings.
- From the Settings app, click – Windows udate.
- Go to the right side pane.
- Click – Check for updates.
- When there is a stable internet connection available in the device then Windows will search pending patches.
- Downloading followed by Installation will take place automatically.
- Restart the Windows and check if the High CPU usage issue is resolved.
16] Disable Native Command Queuing for SATA AHCI Controller
In case the above solutions have not yet found a way to resolve the Windows 11 disk usage 100% issue, divert the attention a bit to SATA AHCI Controller driver. You have ensured that the default native command queuing is performing well in Windows 11. The reason is, Windows 11 has been found to be a bit inefficient to allow native command queuing for the hard drive. The issue will lead the system to a massive failure and increases CPU usage to a greater amount.
In order to fix this problem, you can try to tweak the Windows Registry i.e. in the SATA AHCI Controller driver and disable the Native Command Queuing. Although this fix might turn adversely as disk drive will be a bit slower, it can resolve the existing issue very well. Keep in mind that, this workaround is effective only if you have traditional HDDs. Skip this if you are using the SSD or else, follow the below guidelines to disable native command queuing for your SATA AHCI Controller –
- Right-click the Start icon from Taskbar.
- Select Device Manager for the list.
- When the app opens, navigate to the IDE ATA / ATAPI controllers.
- Expand the driver list by double-clicking it.
- Right-click the Standard SATA AHCI Controller.
- Choose Properties from the context menu.
- Move to Details tab in the opened popup.
- Scroll down to Property and click dropdown menu to set Device Instance path.
- Right-click on the path listed under Value and select Copy.
- Press Windows key and R at once.
- Type regedit in the Run dialog box.
- Press Enter key.
- When you User Account Control prompts, click Yes to get permission for opening Registry Editor.
- In the app, navigate to the below path –
Computer\HKEY_LOCAL_MACHINE\SYSTEM\ControlSet001\Enum\PCI- Once reached the location, select the last part of the path i.e. PCI.
- Now, right click the selected area and paste the previously copied path from Driver Details.
- Press Enter key and move back to left side pane.
- Double click the Device Parameters key to expand it.
- Next, expand the Interrupt Management key and click MessageSignaledInterruptProperties.
- Go to the right side and locate MSISupported DWORD.
- Double click the same to edit.
- Set the Value data to 0.
- Click the OK button to disable the native command queuing.
- Restart the Windows and check if the disk usage is lowered.
17] Block sites from running Flash
Flash is one of the most vulnerable programs in recent times for leaking personal information. Therefore, this should be disabled from the browser as soon as possible. This is also one of the culprits to cause Windows 11 disk usage 100%. Thankfully, Google Chrome and other major browsers have removed this functionality. If the functionality of flash is restored anyhow in future you should focus on this as an important factor of high Disk usage and disable it.
18] Uninstall applications taking high memory
Some applications take up high CPU usage while running like Skype or any other similar programs. It’s a fact that we need these software in order to have video chat, formal interviews, and so many other reasons. However, if Windows 11 disk usage 100% hits you, temporarily uninstall them.
To do so, follow the below steps –
- Press Windows key and I together.
- Click Apps from the left pane.
- From right, select Apps & features.
- Look for the application eating more amount of disk.
- Click 3 dots icon and select Uninstall.
- Hit Uninstall once more when prompts.
- Follow the on-screen guidelines to complete uninstalling.
- Restart the computer and check if the CPU usage has come down now.
19] Remove Adobe flash
Adobe flash is a very handy multimedia platform and has served users a lot but this program has a bad reputation for sneaking into users’ privacy. Thankfully, Adobe has stopped supporting flash since December 2020. However, flash has created Windows 11 disk usage 100% issue reported by many users. Hence, uninstall this program and the browser linked with it.
Follow the below steps to accomplish this task –
- Ensure all the browsers using flash player are closed.
- Open the web browser in Windows.
- Visit this link and download the Flash Player uninstaller.
- Double click the uninstall_flash_player.exe file and follow on screen guidelines.
- Navigate to the folders containing Flash folders and delete them.
- Open the Run dialog box.
- Copy and paste the following text in the box – C:\Windows\system32\Macromed\Flash
- Press Enter key to open the folder.
- Delete all the files in the folder.
- Similarly, delete all the associated files from the below locations –
C:\Windows\SysWOW64\Macromed\Flash
%appdata%\Adobe\Flash Player
%appdata%\Macromedia\Flash Player
- Once done, restart the Windows device.
- Check if the disk usage is lowered.
20] Turn Off Diagnostic Tracking
No matter which level of computer user you are, the machine will run into trouble either way around. This is the point when Microsoft introduced Diagnostic tracking in order to keep the device healthy. However, the feature has been rejected by a good number of users due to privacy concerns. Moreover, this feature is also responsible for Windows 11 disk usage 100%.
If you have enabled the diagnostic tracking in Windows 11, consider disabling this to resolve. To do that, follow the below guidelines –
- Press Windows key.
- Type – cmd.exe.
- Right click on Command Prompt.
- Select – Run as Administrator.
- When the user account control appears for permission, click Yes.
- In the open command prompt 13 Ways to open Command Prompt as administrator in Windows 11 window, insert below text –
Input sc config “DiagTrack” start= disabled
![]()
- Press Enter key to execute the command.
- Again, enter the following command and press Enter –
Input sc stop “DiagTrack”
- Once done, restart Windows 11.
21] Update SATA drivers
Windows operated devices always use SATA connections for the optical drives, traditional hard drives or solid state drives (SSD). If the SATA driver is outdated, this will lead to Windows 11 disk usage 100%.
To avoid this issue, follow the below guidelines and update the driver –
- Right click the – Start.
- Select – Device Manager.
- Navigate to the – Storage controllers.
- Double click the device to reveal drivers list.
- Look for the correct controller for your SATA devices.
- Right click the driver.
- Choose Update driver option from the context.
- After clicking for the update, you will get a dialog box asking you How do you want to search for driver software.
- Click on the Search automatically for updated driver software.
- The second option Browse my computer for driver software indicates that you have the software stored in your computer and will be updated from there.
- If the software is installed then you will get the below message or else the installation will take place.
- So, the Update will be completed in a few seconds.
22] Re-adjust WaasMedicAgent.exe service in Windows Registry
WaasMedicAgent.exe is an important component of Windows Update medic service. Microsoft uses this file in order to check the downloaded patches. In case of arising any trouble with data, the update files will be re-downloaded and that will lead Windows 11 disk usage 100% issue.
To fix the problem, you have to adjust the WaasMedicAgent.exe service in Windows Registry. Follow the below steps to do that –
- Open the Registry Editor window.
- To make a backup of the Registry; click File, and select – Export.
- Save the backup to a safe place.
- Now, navigate to the below path from the left side pane –
Computer\HKEY_LOCAL_MACHINE\SYSTEM\CurrentControlSet\Services\WaaSMedicSvc- Move on to the right side pane, and double click Start.
- Set the value data to 0.
- Click OK to save the changes.
- Restart Windows 11 and check if the high disk usage issue is settled.
23] Clear up Steam cache
Steam is a digital delivery system widely used in Windows Operating System to aid Gaming. The application causes the background downloads to stuck in a loop while updating the delivery. Several of us don’t know the fact that jammed Steam cache files cause high CPU usage too in the operating system.
In order to fix the Windows 11 disk usage 100% issue, clear up the steam cache from the device. Before doing so, exit from the app as it will likely to be freeze when you try to exit later. Having said that, follow the below guidelines to accomplish this task –
- Press Windows key and X at once.
- Select Run from the listed options.
- In the provided box, type steam://flushconfig.
- Press Enter key.
- When you will see a dialog box to confirm clearing caches, click OK.
24] Upgrade RAM for the device
If you have come this far means, Windows 11 disk usage 100% issue is still present on your system. It’s high time you have thought about upgrading the Random Access Memory (RAM). When the a user attempts to perform a task in Windows and its required RAM is more than available in the system, OS will offload that specific task to hard disk. This action is well known as paging and at that time, the virtual memory that will give proxy for RAM is called ‘Pagefile’.
While upgrading the RAM of the machine, you must follow the correct procedure, ask for help from experts for the best outcome. You have to check the current RAM in the system too before proceeding to buy one. To find how much RAM is available in the machine, follow the below guidelines –
- Press Ctrl+Alt+Del keys altogether.
- Select Task Manager.
- Enter into the Performance tab.
- Click Memory from the left pane.
- You can see the installed RAM on the top rightmost corner of this window.
25] Reinstall Windows 11
If none of the workarounds we have discussed couldn’t help you fix the Windows 11 disk usage 100%, you have to think out of the box now. Reinstalling Windows 11 can be a preferable resolution and you can do this task without losing any data.
There are few ways to re-installing Windows 11 without losing data, such as installing from the Media Creation tool, installing from a bootable USB device, from Resetting the Windows. Same outcome can be achieved from Using System Recovery Drive and from the Repair Upgrade. However, we have explained here to reinstall Windows 11 using Bootable USB device. Follow the below steps to accomplish –
- Insert the bootable USB into a port or CD/DVD into the optical drive.
- Open File Explorer (Win+E) browse to reach – This PC.
- Right-click on DVD drive or USB and select – Open in new window.
- In the “new Window”, double click on exe.
- Click Yeson User account control dialog prompt.
- You will come across a window – Get important updates window showing 2 options –
Download and install updates (recommended)
Not right now
- If you are connected to internet then select the first option.
- But if you haven’t a working network then check – the second one – Not right now.
- If you have selected the second option then uncheck the box reading – I want to help make the installation of Windows better.
- Click on the – Next.
- On the next screen, agree with license terms by clicking – Accept.
- The setup will start downloading the updates, if available.
- The installation process will go on and you will see a few messages on the screen. Then a window will ask – What to keep.
- On the next window, check the option – “Keep personal files and apps”.
- Click – Next.
- Finally, “Ready to install the window” will appear, select – Install.
- Your PC will restart several times to Reinstall Windows 11 without losing data.
- Once a screen loads, select your country, language, keyboard layout, and time zone.
- On the next screen, click the – Customize settings.
- Change the default privacy settings as per your need.
- Now, you require to sign in with your Microsoft account.
You can also see a method here – How to Reinstall Windows 11 without losing data.
Methods list:
1] Reboot Windows 11
2] Perform a check for malware
3] Reset Virtual memory
4] Change Power plan to High performance
5] Turn off Windows search
6] Disable the SysMain
7] Update the hard Drive firmware:
8] Turn Off Windows notification and tips
9] Disable telemetry in Windows 11
10] Toggle off real-time protection in Windows Security
11] Carry out Clean Boot
12] Fix the StorAHCI.sys Driver
13] Run disk checking utility
14] Disable background apps
15] Update Windows 11
16] Disable Native Command Queuing for SATA AHCI Controller
17] Block sites from running Flash
18] Uninstall applications taking high memory
19] Remove Adobe flash
20] Turn Off Diagnostic Tracking
21] Update SATA drivers
22] Re-adjust WaasMedicAgent.exe service in Windows Registry
23] Clear up Steam cache
24] Upgrade RAM for the device
25] Reinstall Windows 11
That’s all!!