Error 0x800705aa is a code that shows up when automatic Windows update or upgrade assistant failed to install an update in Windows 11 or 10. This problem might occur due to a shortage of free space in the disk drive, malware, corrupted update cache, and incorrect time & zone. 0x800705aa prevents the Windows update from installing on your system and comes in the category of annoying error.
Windows 11 update error 0x800705aa can be fixed by checking Date and Time Settings, managing free space reset of update cache, and removal of third-party programs. Follow the methods carefully.
Windows 11 update error 0x800705aa
Here is how to fix Windows 11 update error 0x800705aa –
Way-1: Correct the Date & time Settings
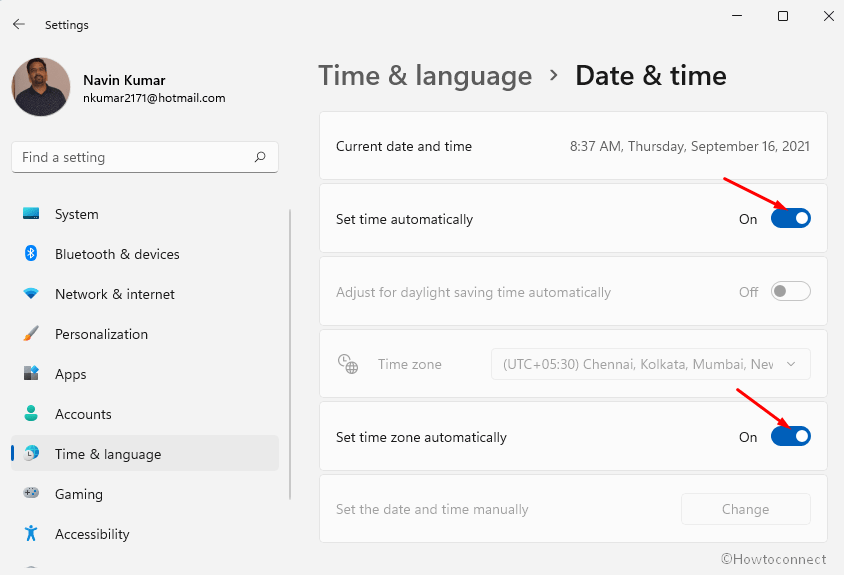
Often this Windows update problem occurs because of misconfigured time and zone settings in Windows 11 or 10. Microsoft follows DST and TZ to deliver updates to an Operating system and when it is incorrect there is a chance of getting errors. So check the settings twice and modify if needed –
- Press – Windows + I.
- Click – Time & language.
- Select – Date and time from the right pane.
- Turn on the toggle for – Set time zone automatically.
- In the same way, turn on – Set time automatically.
Way-2: Run Windows Update troubleshooter
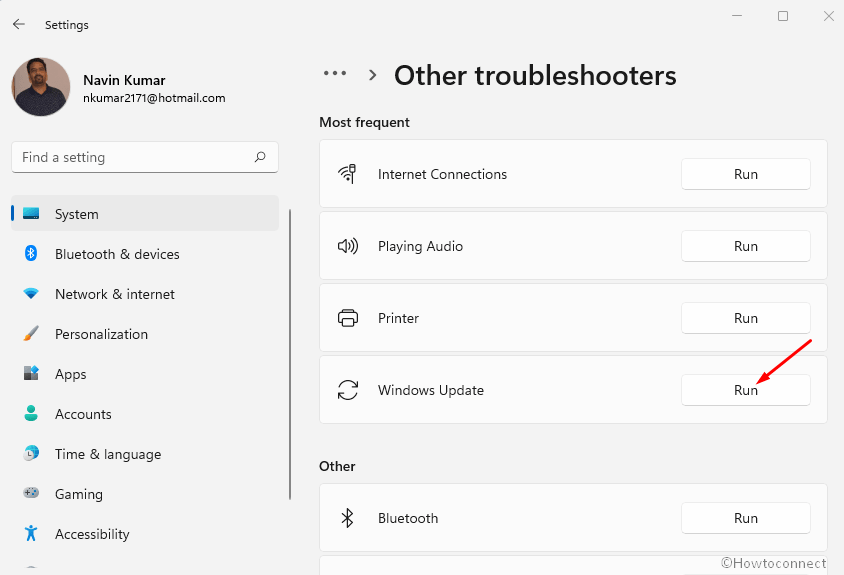
Windows update troubleshooter is a tool to fix any update related problems with minimum amount of effort. The Fix It utility check all the services that may affect Window update whether they are in running status or not and modify them if needed. Furthermore, the troubleshooter reset the Windows update agent to a limited extent. In brief, it is the easiest built-in tool to rely on in order to fix 0x800705aa in Windows 11.
- Press – Windows + I keys.
- When Setting app appears, click Troubleshoot from the right pane.
- On the next page, click on Other troubleshooters.
- Click Run in the Windows update section.
- The troubleshooter will detect the reason and fix it accordingly.
Way-3: Reset Windows update component
Commonly Windows 11 update error 0x800705aa will occur when Windows update components are broken. The components are responsible to store the update files like cache and deploy them when needed. Once they are corrupt Windows update will fail time and again at the time of downloading or installing. Here are the easy steps –
- Click Search from the taskbar.
- Type – cmd.
- Select – Run as administrator.
- Choose Yes from UAC when prompted.
- Once Command prompt as administrator appears, copy-paste the following texts –
net stop wuauserv
rd /s /q %systemroot%\SoftwareDistribution
net start wuauserv
- Restart your computer and check if 0x800705aa is fixed otherwise continue with the next step here.
- Click Start, type cmd, and press enter.
- When the command prompt opens up you need to stop Windows Update Service (wuauserv), Background intelligent transfer aka BITS service, and Cryptographic service (cryptsvc). For this, copy each line of the following commands, paste and enter –
net stop bits
net stop wuauserv
net stop cryptsvc
- Now you need to delete the qmgr*.dat files. Therefore, type the below command, and then press ENTER:
Del "%ALLUSERSPROFILE%\Application Data\Microsoft\Network\Downloader\qmgr*.dat"
- Skip this step and jump straight to the next one if this is your first attempt for fixing the error. But if you have already run the troubleshooter or tried other resolutions then follow this step. Enter the below commands in command prompt –
%Systemroot%\SoftwareDistribution\DataStore
%Systemroot%\SoftwareDistribution\Download
%Systemroot%\System32\catroot2
- Now copy-paste there underneath command and press Enter –
Ren %Systemroot%\SoftwareDistribution\DataStore DataStore.bak
Ren %Systemroot%\SoftwareDistribution\Download Download.bak
Ren %Systemroot%\System32\catroot2 catroot2.bak
- Reset the Background Intelligent Service (BITS) furthermore the Windows Update service (WUAUSERV) to the default security descriptor. So, run the following command by pasting each one and pressing enter successively –
sc.exe sdset bits D:(A;;CCLCSWRPWPDTLOCRRC;;;SY)(A;;CCDCLCSWRPWPDTLOCRSDRCWDWO;;;BA)(A;;CCLCSWLOCRRC;;;AU)(A;;CCLCSWRPWPDTLOCRRC;;;PU)
sc.exe sdset wuauserv D:(A;;CCLCSWRPWPDTLOCRRC;;;SY)(A;;CCDCLCSWRPWPDTLOCRSDRCWDWO;;;BA)(A;;CCLCSWLOCRRC;;;AU)(A;;CCLCSWRPWPDTLOCRRC;;;PU)
- Next, run the below command as you have done with the above –
cd /d %windir%\system32
- The further steps will include re-register BITS files and Windows Update files. In order to do this, type the following commands one by one and press ENTER each time –
regsvr32.exe atl.dll
regsvr32.exe urlmon.dll
regsvr32.exe mshtml.dll
regsvr32.exe shdocvw.dll
regsvr32.exe browseui.dll
regsvr32.exe jscript.dll
regsvr32.exe vbscript.dll
regsvr32.exe scrrun.dll
regsvr32.exe msxml.dll
regsvr32.exe msxml3.dll
regsvr32.exe msxml6.dll
regsvr32.exe actxprxy.dll
regsvr32.exe softpub.dll
regsvr32.exe wintrust.dll
regsvr32.exe dssenh.dll
regsvr32.exe rsaenh.dll
regsvr32.exe gpkcsp.dll
regsvr32.exe sccbase.dll
regsvr32.exe slbcsp.dll
regsvr32.exe cryptdlg.dll
regsvr32.exe oleaut32.dll
regsvr32.exe ole32.dll
regsvr32.exe shell32.dll
regsvr32.exe initpki.dll
regsvr32.exe wuapi.dll
regsvr32.exe wuaueng.dll
regsvr32.exe wuaueng1.dll
regsvr32.exe wucltui.dll
regsvr32.exe wups.dll
regsvr32.exe wups2.dll
regsvr32.exe wuweb.dll
regsvr32.exe qmgr.dll
regsvr32.exe qmgrprxy.dll
regsvr32.exe wucltux.dll
regsvr32.exe muweb.dll
regsvr32.exe wuwebv.dll
- Run the below command then press ENTER to Reset Winsock –
netsh winsock reset
- Now start the services back which you stopped in the beginning using the underneath commands –
net start bits
net start wuauserv
net start cryptsvc
- Reboot your PC and the error will no longer persist.
Source – Windows Update – additional resources
Way-4: Manually install from Microsoft update catalog
However, Windows 10 offers automatic updates to the system at the same time .msu copy of the files are kept on another website by Microsoft. Yes, Microsoft update catalog hosts all the updates you receive on your computer as patches every month. This way you have any time an alternative ready when Windows update fails to install on your PC. You need to follow the guideline only –
- Press Winkey +I.
- Select Windows update when you are on the Settings app.
- Note the KB number of the update which failed to install.
- Next, open Microsoft Edge or a browser of your preference.
- Type ‘Microsoft update catalog’ in the search bar or address bar and press ‘Enter’.
- Open the website coming in the first place in the result.
- In the Search box of Microsoft update catalog website, type the KB number you have noted.
- Press – Enter.
- Go down and find the update file matching with your CPU architecture (such as x64, x86, ARM64).
- If you don’t know the bit of your system then Go to Settings > System > About and see System type. This will show the architecture of your CPU.
- Now find the file on the Microsoft update catalog website and click on Download.
- A separate page will be prompted, click the link located there.
- After the update is downloaded, right click on it and select Install.
- Go along with onscreen instructions to install the Windows update.
Way-5: Uninstall third party antivirus and other software
Several users report that the removal of 3rd party programs has solved 0x800705aa error code that occurred when trying to install Windows update., The external software may conflict with the integrity of system files or if it is a firewall it may block the patches itself. To avoid the interference of the programs simply uninstall them and if you seriously need you can install them later.
- Press – Win+R.
- Type appwiz.cpl.
- Hit Enter to access the Programs and Features window.
- Explore the third part software, right-click on it and select Uninstall.
- Pursue the steps of the uninstallation wizard.
- Repeat this method with all the third party software in the list.
- Restart your computer and check if the error is fixed.
Way-6: See if your PC has enough space
Lack of free space might be a big reason behind any Windows update failure so with 0x800705aa. Therefore, double-check the space remaining on your computer because old systems came with small hard drives and memory. If the space is occupied by unwanted data you can use disk cleanup to wipe out them preparing room for the Windows update to install.
- Click Search located on the taskbar.
- Type in Cleanmgr.
- Press Enter to open Disk Cleanup: Drive Selection dialog.
- Select (C:) and click OK.
- On the next window that appears, click – Clean up system files.
- Again select the same drive and click on “OK”.
- Select all the boxes in Files to delete section and then select “OK”.
- Click “Delete Files” on the confirmation dialog.
Way-7: Clean boot your PC
Getting Windows update in clean boot is almost guarantee for its successful installation. This method will start Windows 11 with the set of only basic drivers and services so there is no chance of mishap. Follow the steps –
- Click on the “search”.
- Type msconfig and hit Enter.
- Once System configuration appears, go to the Services tab.
- Check the box for – Hide all Microsoft services.
- Now click on Disable all.
- Finally, click Apply and OK.
- Select – Restart.
You can also try system restore to fix 0x800705aa in Windows 11
Methods list:
Way-1: Correct the Date & time Settings
Way-2: Run Windows update troubleshooter
Way-3: Fix Windows update component
Way-4: Manually install from Microsoft update catalog
Way-5: Uninstall third party antivirus and other software
Way-6: See if your PC has enough space
Way-7: Clean boot your PC
That’s all!!