While updating to the Windows 11 or 10 version, you may encounter error 0xc1900223 that prevents the upgrade on a certain percentage. Or if the update is downloaded somehow, PC gets stuck during restart.
Commonly, this stop code points out that a problem has occurred either in system configuration or selected updates. Furthermore, not enough disk space may cause this Windows update error too. We have made a list of resolutions that may help you to fix this fatal code along with other Windows update errors.
Windows Update Error 0xc1900223 in Windows 11/10 Solutions
Here is how to Fix Windows Update Error 0xc1900223 in Windows 11/10 –
1] Check Internet connection
A good number of Windows update problem occurs because of weak and unstable internet access. Make sure the connection is fast and reliable and not creating any disturbance. Also, check if metered connection is not enabled and disable if it is.
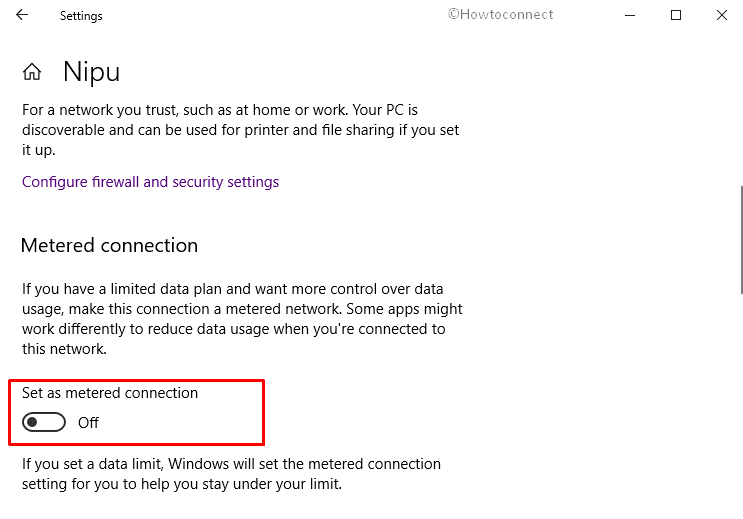
Disable metered connection
For Windows 10
- Click on Wi-Fi icon available on the right side of Taskbar and then select Properties from underneath the Network name.
- When the related settings page comes up in a separate window, move down a bit and turn off the toggle switch for Set as metered connection.
For Windows 11
- Press – Windows + I.
- From left column, choose – Network & internet.
- Move to right and click – WiFi.
- Click the Properties option of your connected network.
- Look for Metered connection and turn off the toggle button present next to it.
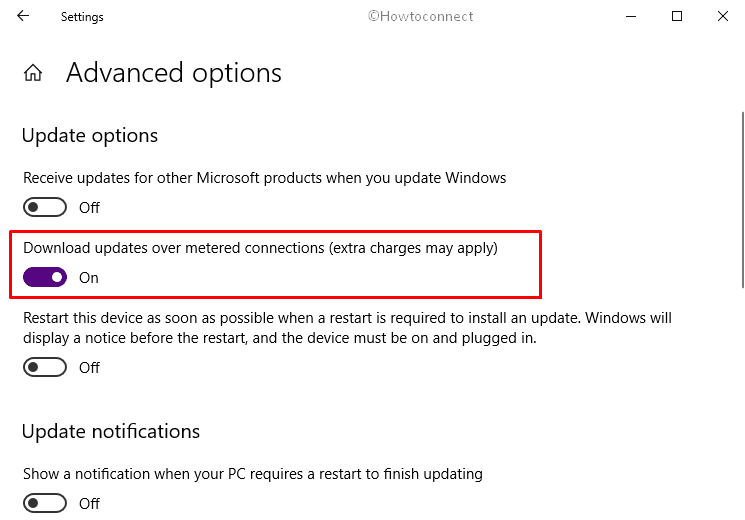
Download updates over metered connections
In case of not having a problem with extra charges, you can use metered connection to download Windows update also.
For Windows 10
- Launch Windows Settings app (Win+I) and click Update & Security.
- Go to the right pane and click on Advanced options.
- Next, turn off the toggle switch for Download updates over metered connections (extra charges may apply).
For Windows 11
- Open Settings app.
- Choose – Windows Update from left sidebar.
- Shift to right pane and click – Advanced options.
- Turn on the toggle switch set for Download updates over meter connections.
2] Run DISM and SFC tools
Sometimes corrupted system files block the usual procedure of update and stop the installation of Windows 10 or 11 with error 0xc1900223. To settle this issue, you need to restore the health of your PC by executing the required command lines. Here is how to proceed –
- Press Win+R.
- Type cmd.exe in the text field and press Ctrl+Shift+Enter on your keyboard.
- Type the following line after blinking cursor and hit Enter –
DISM.exe /Online /Cleanup-image /Restorehealth
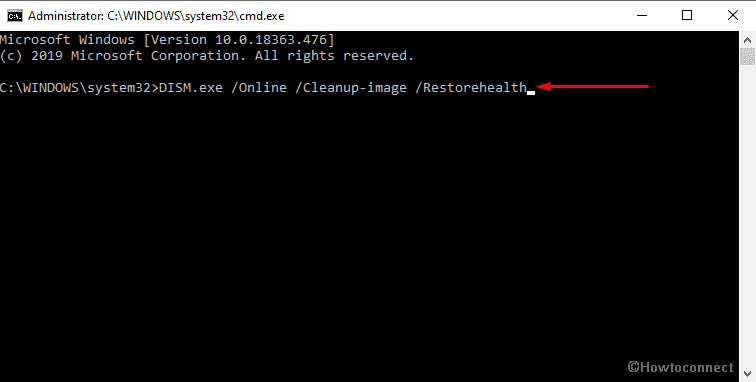
- After 100% completion, reboot your PC.
- Once the system powers up, once more open Command Prompt as Administrator and this time enter the below command –
sfc /scannow
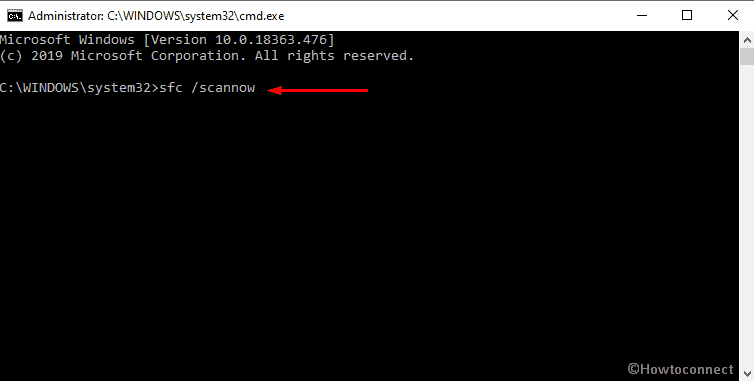
- Wait until the process is finished completely, restart and then check for the error 0xc1900223.
SFC /Scannow, DISM.Exe, CHKDSK Windows 10
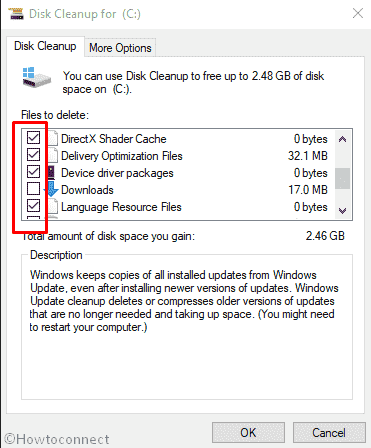
3] Make sure device has enough space
To receive an update, a PC must have at least requisite space in the drive where the files will be installed. Ensure that space exists in your system. If not or you have doubt then delete temporary and unnecessary files. Accomplish this task using Disk cleanup by following steps –
- Click on the search icon located at the Taskbar and type cleanup.
- Hit Enter.
- When Disk cleanup wizard appears, click – OK.
- Hit Clean up system files from the bottom.
- For next pop-up, click – OK again.
- The time it finishes calculating how much space you can empty, click OK to get rid of the junks. Uncheck Downloads and Recycle bin if any necessary file exits there.
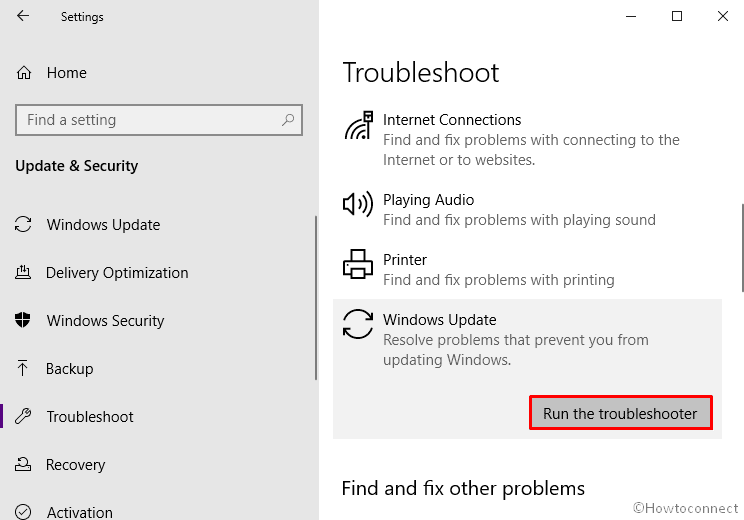
4] Use Windows Update troubleshooter
Windows Update Error 0xc1900223 often goes away by running Windows Update troubleshooter. This built-in utility at first analyzes the issue and then resolves it automatically.
For Windows 10
- Press Win+I and then click Update & Security.
- Choose Troubleshoot from the left column and shift to the right.
- From right, click – Additional troubleshooters.
- Click Windows update and subsequently select Run the troubleshooter.
- The tool will immediately start scanning for the culprit that is causing Windows Update Error 0xc1900223 and recommend a resolution for the same. Click Apply a fix and then follow the guideline showing on the Wizard.
For Window 11
- Right-click on Start button and choose – Settings.
- From the right pane, scroll down a bit and choose – Troubleshoot.
- Click – Other troubleshooters.
- Hit Run button present next to Windows update.
5] Reset Windows update component
Unfortunately, if the troubleshooter didn’t work to fix the Windows update error, there might be a possibility that the component itself is corrupted. In such a case, reset the same is the thoroughgoing solution. Here is how to proceed –
- Press Win+S and type in cmd.
- When the result shows up, click Run as administrator.
- Click the Yes button if a UAC prompts.
- On the Command Prompt window, type the following and press Enter after each line –
net stop wuauserv
net stop cryptSvc
net stop bits
net stop msiserver
- Thereafter, copy-paste the underneath commands and press enter as earlier –
ren C:\Windows\SoftwareDistribution SoftwareDistribution.old
ren C:\Windows\System32\catroot2 Catroot2.old
- In the end, you need to run the below commands one by one –
net start wuauserv
net start cryptSvc
net start bits
net start msiserver
After completion, go to Windows Update settings page and Check for updates.
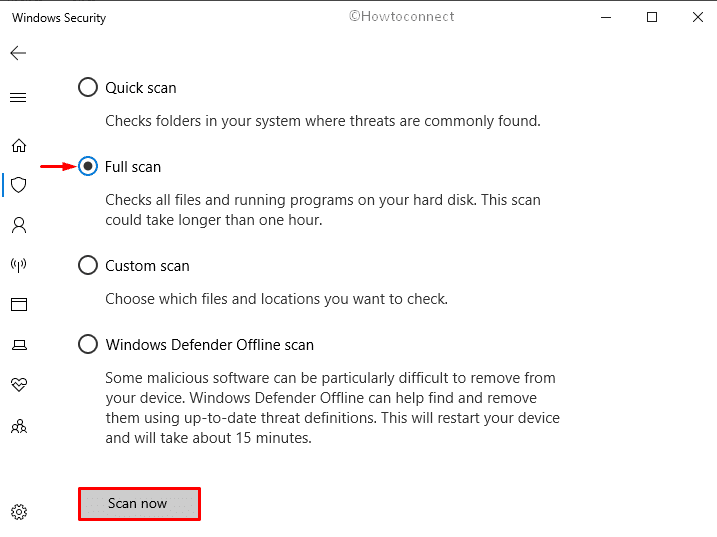
6] Scan your full system
Malware or Virus attack may corrupt the update related components moreover lead to Error 0xc1900223. Windows security app comes as rescuer in this situation. Here is the method –
For Windows 10
- Right-click on Start button and choose Settings.
- After Settings app is appearing, Click Update & Security.
- Choose Windows Security from the left pane and move to right.
- Click Virus & threat protection.
- When Windows Security turns up, hit Scan options link from the right pane.
- Click the radio button settled with Full scan and click on Scan now button.
- When the scanning process is done, remove malware if found any by going along with on-screen instructions.
For Windows 11
- Press – Windows key + I.
- From the left column, choose – Privacy & Security.
- Move to the right and click – Windows Security.
- Once on the next page, select – Virus & threat protection.
- From middle column of the appearing window, click – Scan options link.
- Select the radio button set before Full scan and then click – Scan now.
7] Put security suite out of action
There are times when the built-in security suite itself or third-party antivirus receives a false impression while downloading updates and terminate the update unfinished with Windows Update Error 0xc1900223. Hence, you can disable them for a while to check if the issue buzz off.
Turn off Windows Defender Firewall
- Press Windows key and R together.
- Type control in the text field hit Enter.
- Set the view by option of Control Panel to Small icons.
- Locate and click Windows Defender Firewall.
- Next, click the link Turn Windows Defender Firewall on or off from the left column.
- Select the radio button allocated for Turn off Windows Defender Firewall (not recommended) for both Private network settings and Public network settings.
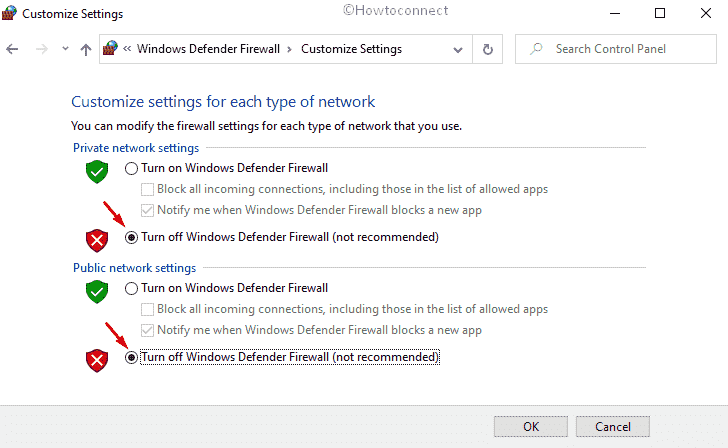
- Finally, click the OK button.
Note – Don’t forget to undo the same after installing Windows 10 or 11.
Disable third-party antimalware program
- Click the arrow icon from the Notification area.
- Right-click on the third-party antivirus icon and select Disable. Though the option may vary for other antimalware programs, all the time it will be related to shut down or stop.
8] Detach extra hardware to fix Windows Update Error 0xc1900223
Hardware accessories like additional HDD, SD card, printer, scanner, and similar peripherals are much necessary nowadays. Though it may sound weird, some people reported that these external accessories are generating error 0xc1900223. And only after disconnecting the same, the update started working fine. So, give a try it once to settle the issue.
9] Check Date & time
Sometimes a conflict moreover inconsistency takes place between the systems and updates Date and time. To fix it –
- Open Control Panel and make sure the View by type is Small icons.
- Look for Date and Time and click the same.
- Switch to the Internet Time tab and click on the Change settings button.
- Next, check the box located beside Synchronize with an Internet time server and click Update now button.
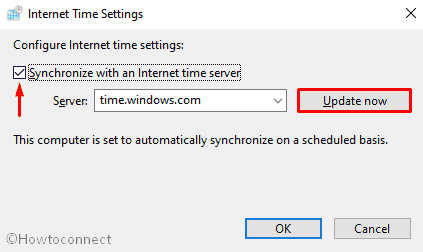
- Lastly, hit OK and reboot the system.
10] Make use of Windows update assistant
We are mostly used to get the latest version of Windows in an automatic process. As it is creating error 0xc1900223 lately, take the help of Windows update assistant for downloading the upgrade manually.
To accomplish this job, navigate the official webpage of Microsoft and click Update now button.
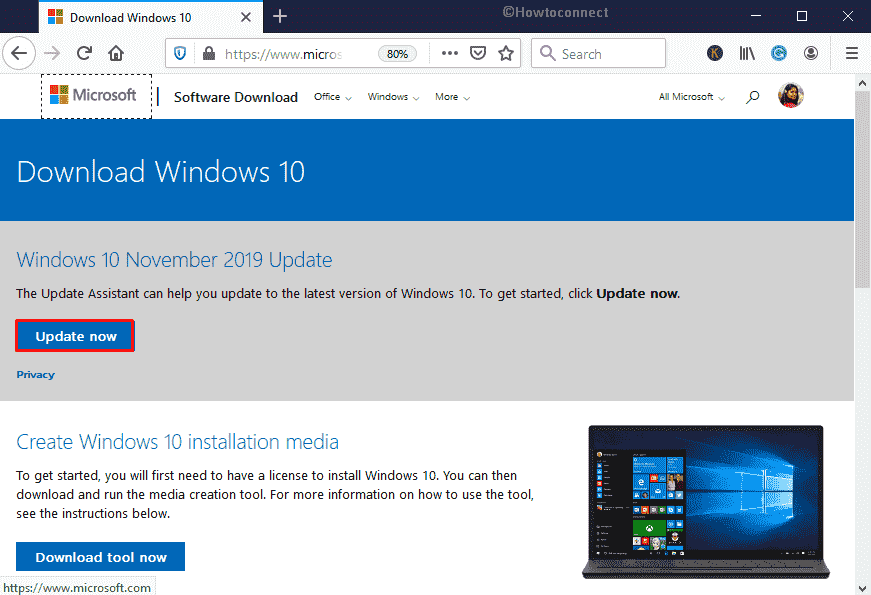
Hereafter, wait until the process finishes.
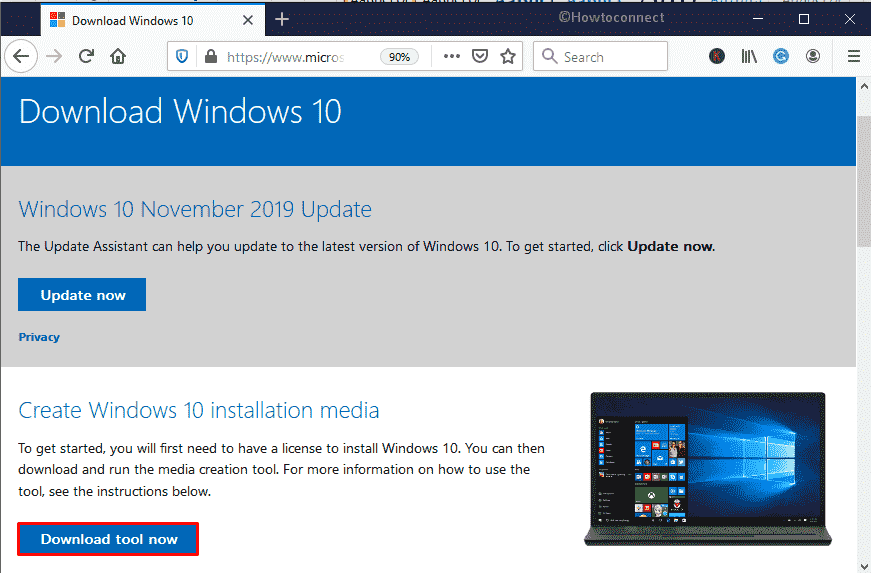
11] Install the update with Media creation tool
When nothing works to fix error 0xc1900223, either wait for a few days and try to receive the update later. Alternatively, take the help of Media creation tool to avail the same right away. Follow the instructions –
- Launch a web browser and visit the official page of the Microsoft Website (for Windows 10). In the case of Windows 11, go to its download page and follow in respect to this version.
- Scroll down to reach Create Windows 10 installation media area.
- Select Download tool now.
- After completion, go to the Downloads folder and double-click on the file you just grabbed.
- If a UAC rolls out, hit Yes.
- Once Windows 10 Setup wizard appears, click the Accept button.
- Opt for Create installation media (USB flash drive, DVD, or ISO file) for another PC option and hit the Next button.
- Take a look at the Language, Edition, and Architecture for your computer selected by the system. If everything is okay, click on Next.
- Click the radio button connect with ISO file and hit Next.
- Later, set the directory where you want to store the copy of the file and click Save button.
- The downloading will start in a short time and after reaching 100%, click on Finish.
- Finally, you are ready to install the recent version of Windows 11 or 10.
Methods:
1] Check Internet connection
2] Run DISM and SFC tools
3] Make sure device has enough space
4] Use Windows update troubleshooter
5] Reset Windows update component
6] Scan your full system
7] Put security suite out of action
8] Detach extra hardware
9] Check time & date
10] Make use of Windows update assistant
11] Install the update with Media creation tool
That’s all!!