Windows update process is a risky task having dual nature because the process triggers problems on plenty of occasions but when you are successful to install it adds important improvements. While trying to upgrade your current Windows version, error 80072ee2 may arise during the downloading process or after a certain portion has been downloaded. The code mostly appears when the System searches for updates automatically via Windows Update. A stable internet connection is fundamental when you try to update Windows through WSUS or from the update center, thus, a poor network can be the culprit. This could be the reason why the system fails to establish a connection to the server and ends up with update error 80072ee2. However, the same fatal code can also take place when there is high network traffic and the dedicated server is overloaded with requests.
Windows update error 80072ee2 often strikes due to other reasons as well. In most cases, missing system components, incorrect registry keys, corrupt drives, and virus attacks are found to cause the issue. Besides, glitches in the Windows update store folder can bring forth the mentioned update error too. Though error 80072ee2 is not the one you cannot fix, the troubleshooting process can be time-consuming since there is no firm reason to focus on.
Windows update error 80072ee2
Here is how to fix Windows update error 80072ee2 –
Way-1: Check the internet connection
To download the update files, a stable internet connection is mandatory and if the access is intermittent the process may not start or it may stop at a certain percentage. Once the update files get stuck at a point, there is a possibility of Windows update error 80072ee2.
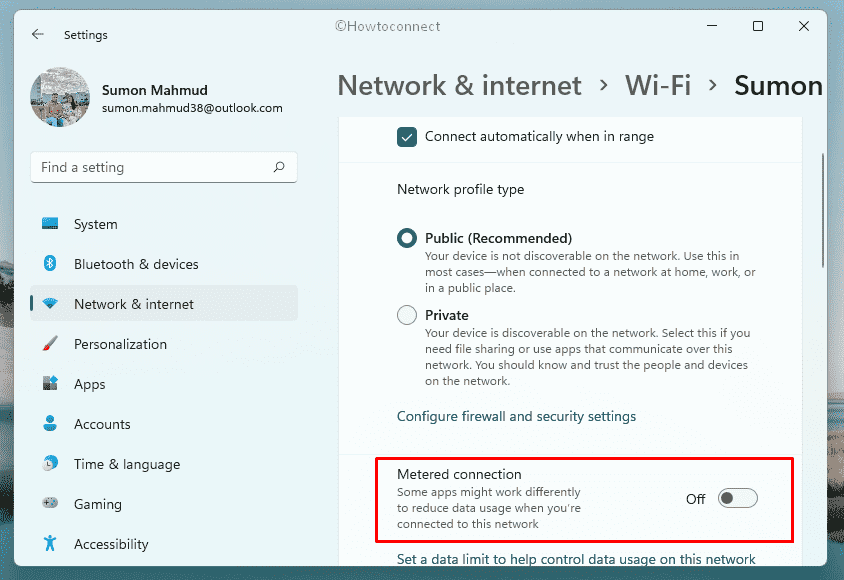
Before proceeding with Windows Update, make sure the internet connection is perfectly stable. If a glitch is discovered, restarting the router may help sometimes or you can also call the service provider for resetting the router and fix the issue soon as possible. Sometimes, downloading a large file doesn’t start for the network that is set to Metered connection. Make sure the settings are disabled too and then start preparing for Windows Update. To set up metered connection, follow the way –
- Press – Windows + R.
- In the Run command, insert – ms-settings:network-wifi
- Click – OK.
- From the right overlay of the appearing settings page, select your Wifi network or Properties.
- Scroll down to reach Metered connection section.
- Turn off the toggle button present under Set as metered connection.
Way-2: Delete SoftwareDistribution Folder
Windows directory holds a folder named SoftwareDistribution where all the update components are temporarily stored and then installed in the system. The operation of this folder is controlled by Windows Update (WU) agent and it’s a requirement for the update module. However, the components of this folder may be corrupted and cause Windows update error 80072ee2 issue.
In order to fix this glitch, delete the SoftwareDistribution folder from Windows and its contents. To do this, follow the below guidelines –
- Press – Windows key + E.
- Click its address bar and insert – C:\Windows in it.
- Hit – Enter.
- Look for – SoftwareDistribution folder.
- Right-click on the folder and choose – Delete.
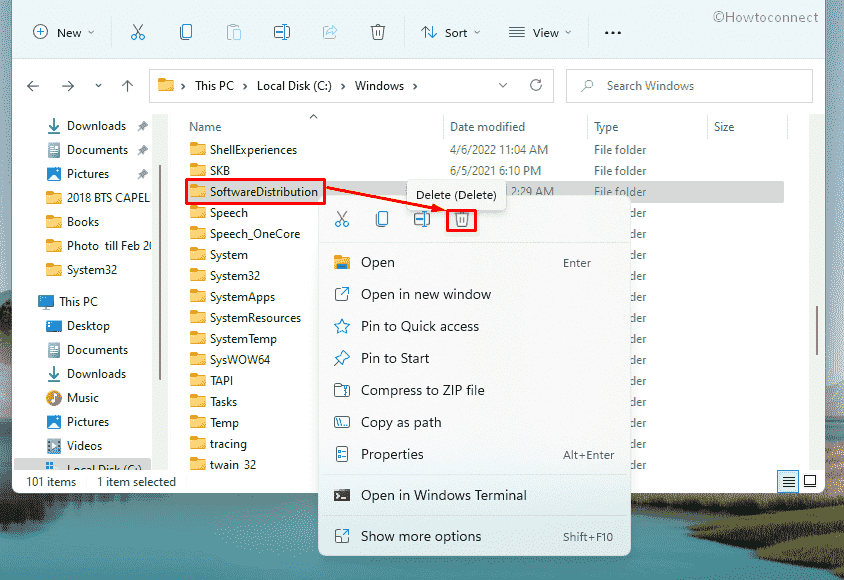
- After removing the folder, reboot your PC.
- Once you do so, the system will re-create the default state of deleted SoftwareDistribution folder.
Way-3: Remove the automatic update server settings tweak registry
Automatic Windows Update Server schedules the installation of update files in Windows and the system gets updated in time. However, some glitches in Administrator Settings can lead to Windows update error 80072ee2 issue as well.
To fix the problem, you have to delete the Automatic Windows Update key from Windows Registry. For that, follow the below guidelines –
- Press – Windows + S.
- In Windows search, type – regedit.
- Hit – Enter.
- For appearing User Account Control, click – Yes.
- When Registry Editor rolls out, navigate to the following directory –
HKEY_LOCAL_MACHINE\SOFTWARE\Policies\Microsoft\Windows\WindowsUpdate- Right-click WUServer DWORD key and choose – Delete.
- In the same way, delete WIStatusServer too.
- After removing the keys, restart Windows.
Way-4: Reset Windows Update components
Corrupted Windows update components are very much prone to cause trouble in the automatic updating of the system. That could be the reason for encountering Windows update error 80072ee2 issue which won’t be resolved unless the resetting dedicated components. The whole process includes restarting BITS, MSI Installer, Cryptographic, and Windows Update services. Along with the previous, renaming of the folders SoftwareDistribution and Catroot2 where the installer files are stored temporarily to implement Windows updates.
The process will force the system to delete the corrupted components and re-create necessary files related to updates from the scratch. To do so, follow the below steps –
- Press – Windows key.
- Type – cmd.
- Opt for – Run as administrator.
- For the User Account Control pop-up, click – Yes.
- When the elevated Command Prompt opens up, insert the following lines in it successively and hit Enter after each –
net stop bit
net stop wuauserv
net stop appidsvc
net stop cryptsvc
Del "%ALLUSERSPROFILE%\Application Data\Microsoft\Network\Downloader\*.*"
rmdir %systemroot%\SoftwareDistribution /S /Q
rmdir %systemroot%\system32\catroot2 /S /Q
regsvr32.exe /s atl.dll
regsvr32.exe /s urlmon.dll
regsvr32.exe /s mshtml.dll
netsh winsock reset
netsh winsock reset proxy
net start bits
net start wuauserv
net start appidsvc
net start cryptsvc- Now, close Command Prompt.
- Restart your Windows PC to make the changes effective.
Way-5: Run Windows Update Troubleshooter
Errors and issues during Windows updates are pretty common and users are being deprived of the modification done to the system. Some reasons to prevent Windows from getting an update are complicated. To resolve this puzzle, Microsoft has offered a game-changing tool called Windows Update Troubleshooter. Wherever is the problem regarding Windows Update, the utility will fix the root cause and initiate the process.
If you are having Windows update error 80072ee2, run the Windows Update Troubleshooter using the below guidelines –
Windows 11
- Press – Windows + I.
- From the right-hand side of appearing settings page, select – Troubleshoot.
- Click – Other troubleshooters.
- Hit – Run located next to Windows update.
- Comply with on-screen instructions to initiate the diagnosis process.
- If the utility finds out any abnormalities and offers a fix, click – Apply this fix.
- Close troubleshooter.
- Reboot your Windows PC.
Windows 10
- Open Windows Settings.
- Choose – Update & Security.
- From the left sidebar, select – Troubleshoot.
- Shift to the right overlay.
- Click – Additional troubleshooters.
- Select – Windows update.
- From the expanded tray, click – Run the troubleshooter.
- Follow on-screen instructions to make the tool work and fix the issue.
Way-6: Temporarily disable Windows Firewall
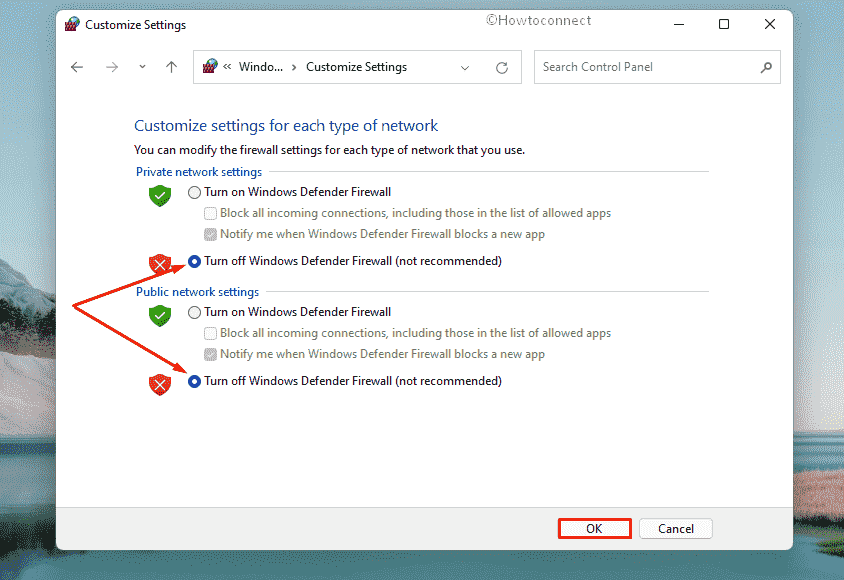
Windows Firewall is a built-in application in the operating system that filters incoming data and blocks the potentially harmful ones. This way, it protects the device from spyware and internet worm intended to steal sensitive information. The program is enabled in Windows by default of course for safety reasons.
However, Windows Firewall often misinterprets the update files as malicious and significantly blocks them. Ultimately, the process gets terminated and the system encounters Windows update error 80072ee2. To resolve the issue, you can temporarily disable the application and re-enable the same after the updating takes place successfully. For that, follow the below guidelines –
- Press – Windows + R.
- In the Run command, insert – control firewall.cpl.
- Click – OK.
- When the dedicated window opens up, click – Turn Windows Defender Firewall on or off from its left sidebar.
- Select the radio button set before Turn off Windows Defender Firewall.
- Do the same for both Private and Public network settings.
- Finally, click – OK.
Way-7: Adjust Time and Date Settings
Sometimes, update files are ready to be downloaded but the process does not commence because the time and date settings are incorrect. This is a buzzing issue and you have to ensure the settings are correct. If you are in a different time zone, the same issue may arise and you will get Windows update error 80072ee2 on screen. Therefore, re-check the Time and Date Settings and adjust as required following the below guidelines –
- Right-click on the Start button and choose – Run.
- In the appearing command box, type – control.
- Hit – Enter.
- Make sure the View by option of Control Panel is set to Category.
- Click – Clock and Region.
- From the right-hand side, select – Date and Time.
- Once on the new wizard, shift to its Internet Time tab.
- Click – Change settings.
- Select the checkbox present before Synchronize with an Internet time server.
- Click – Update now.
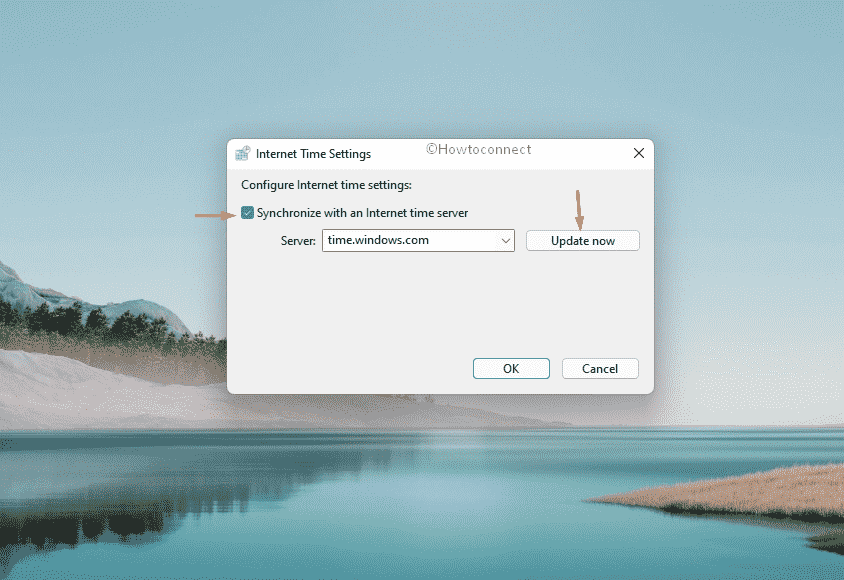
- Finally, hit – OK to save the changes.
Way-8: Completely reset Windows Update modules
Windows update error 80072ee2 is quite widespread and the scenario got complicated when Microsoft changed the validity date on the server-side in the main update XML file. This is never a wise option to edit the XML file as it would void the digital signature at the users’ end. In this condition, resetting the Windows Update module completely can resolve the problem significantly. To do that, follow the way –
- Open Command Prompt as admin.
- Now, run the following commands one by one –
net stop wuauserv
cd %systemroot%
ren SoftwareDistribution SoftwareDistribution.old
net start wuauserv
net stop bits
net start bits
net stop cryptsvc
cd %systemroot%\system32
ren catroot2 catroot2.old
net start cryptsvc
regsvr32 Softpub.dll /s
regsvr32 Wintrust.dll /s
regsvr32 Initpki.dll /s
regsvr32 Mssip32.dll /s- After completion, restart your computer and check if the problem is solved.
Way-9: Check the Proxy and Firewall Settings
If you are using a Proxy server, Windows Firewall can significantly block the connection to Windows Update. In that circumstance, the downloading will never start instead, you will have Windows update error 80072ee2. Therefore, ensure the Settings of the Internet Explorer are correct and the proxy you are using doesn’t need a Username and Password to connect. There is a way out to disable the proxy server at the time of checking, downloading, and installing the update files. You can also change the settings in such a way that, Windows Firewall will allow the connection to download update patches without using the Proxy server.
However, while connecting to the internet via Windows Firewall, make sure the following websites are not blocked in the settings –
HTTP: //*.update.microsoft.com
HTTPS: //*.update.microsoft.com
HTTP://download.windowsupdate.com
Way-10: Reset the Proxy Server Settings
Settings in the Proxy Server can often have a serious impact on the automatic Windows Updating Process. When spyware invades the security interface, it tweaks internet explorer settings in order to use a proxy server. As a result, you encounter Windows update error 80072ee2.
In order to fix this, re-setting Proxy Server settings will be just right and the task is to be carried out by a suitable command in CMD. To do this, follow the below guidelines –
- Click search icon present on the taskbar.
- Type – cmd.exe.
- Press – Ctrl + Shift + Enter.
- When User Account Control shows up, click – OK.
- In the command prompt, insert the following commands and hit Enter after each –
netsh winhttp reset proxy
netsh winhttp import proxy source=ie- Now, close (exit) Command Prompt and reboot Windows.
- After signing back in, again, open Command Prompt with admin privilege.
- Execute the following commands to restart the Windows update service –
net stop wuauserv
net start wuauserv
Way-11: Re-register Windows Update DLL files
Dynamic Link Library (.DLL) files are very important system components and they also take part in the automatic windows updating process. Sometimes, these files become unregistered in Windows due to various glitches like malware infection or sudden power outage. As a result, you encounter Windows update error 80072ee2.
In order to fix the problem, re-register the DLL files by executing commands in Elevated Command Prompt. Here are the commands to run –
regsvr32 oleaut32.dll
regsvr32 jscript.dll
regsvr32 vbscript.dll
regsvr32 softpub.dll
regsvr32 msxml.dll
regsvr32 wintrust.dll
regsvr32 initpki.dll
regsvr32 cryptdlg.dll
Now, you will have to restart the Windows update service to check whether the issue is fixed. For that –
- Press – Win+X.
- Select – Run.
- In the dialog box, insert – services.msc.
- Click – OK.
- Look for – Windows Update.
- Right-click the same and choose – Stop.
- After that, open File Explorer by pressing Windows + E.
- Navigate to – C:\Windows\SoftwareDistribution
- Press – Ctrl + A to select all items available here.
- Now, press – Ctrl + D.
- After clearing SoftwareDistribution folder, go back to Services window and start Windows Update service.
Way-12: Change MTU Setting to 1492
Setting the Maximum Transfer Unit (MTU) on the router at an optimum value usually boosts the overall network speed performance. On the contrary, choosing the wrong setting can also cripple the whole network and the speed would crash devastatingly. The same setting can also be responsible for Windows update error 80072ee2. The optimum value to be set is at 1492 which can be done by executing commands in elevated Command Prompt. To do so, follow the below guidelines –
- Press – Windows + S.
- Type – cmd.
- Press – Ctrl + Shift + Enter.
- To allow User Account Control, click – Yes.
- Once on the Command Prompt, insert the below line in it and hit Enter –
netsh interface ipv4 set subinterface "Ethernet" mtu=1492 store=persistent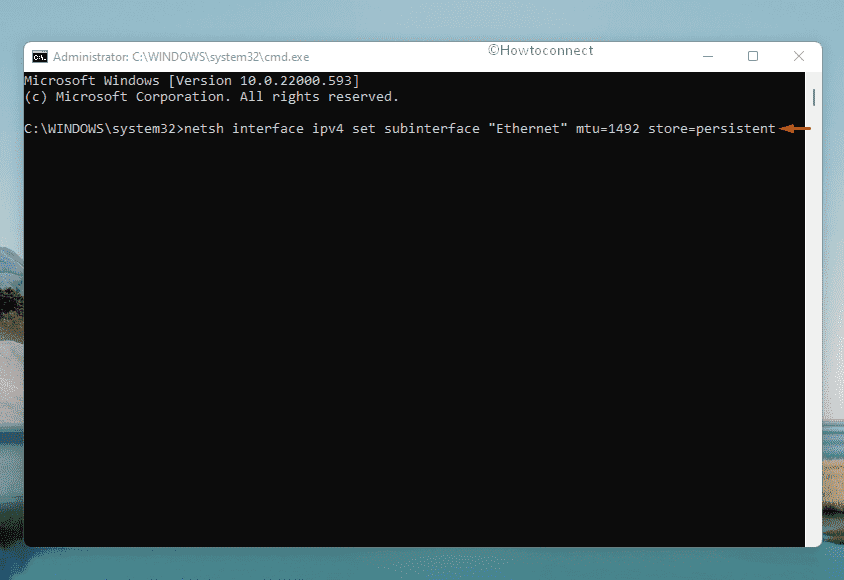
Way-13: Repair damaged System Files using SFC and DISM scan
System files are the primary components that help the system to run smoothly without any trouble and carry out various tasks. These files the very much sensitive in nature and are the prime targets of malicious invaders. When a virus gets into the system, it will damage the integrity of the system files and the system will be unstable.
Windows update error 80072ee2 occurs frequently if the system files are corrupted, a similar result will be there for damaged image files too. Both these components can be repaired by running SFC and DISM scans. For that, go through the below steps –
- Open Command Prompt as administrator.
- In the appearing black terminal, insert – DISM /Online /Cleanup-Image /ScanHealth.
- Hit – Enter.
- Don’t interrupt until the scan ends.
- After that, execute – DISM /Online /Cleanup-Image /RestoreHealth in the same way.
- Once the scanning process ends, reboot Windows PC.
- After signing back in, once again open command prompt with admin privilege.
- Run – Sfc /scannow command.
- When the process reaches 100%, close Command Prompt.
- Restart the machine to make the changes take place.
Way-14: Download problematic patches via Update Assistant
Coming to another utility, Windows 10 Update Assistant is an official utility designed to help people get the updates available for the system. The tool works great as a solution for those who are in a struggle with updating the system in a traditional way. Here is the way to follow –
- Visit the webpage of Microsoft Update Catalog.
- Click the search bar of the website.
- Type the KB number you want to get.
- Hit – Enter.
- Look for the compatible setup file that matches your PC specs.
- Click Download present next to the suited version.
- From the newly appeared window, click the link that ends with msu.
- If prompted, choose Save File and then click – OK.
- Go to the directory where the system stores downloaded items.
- Double-click the MSU file you got.
- For appearing User Account Control, click – Yes.
- Comply with on-screen instructions to complete the installation process.
Methods list:
Way-1: Check the internet connection
Way-2: Delete SoftwareDistribution Folder
Way-3: Remove the automatic update server settings tweaking registry
Way-4: Reset Windows Update components
Way-5: Run Windows Update Troubleshooter
Way-6: Temporarily disable Windows Firewall
Way-7: Adjust Time and Date Settings
Way-8: Completely reset Windows Update modules
Way-9: Check the Proxy and Firewall Settings
Way-10: Reset the Proxy Server Settings
Way-11: Re-register Windows Update DLL files
Way-12: Change MTU Setting to 1492
Way-13: Repair damaged System Files using SFC and DISM scan
Way-14: Download problematic patches via Update Assistant
That’s all!!