Do you notice CHKDSK scanning involuntarily at every startup on Windows 10? You can cutoff the process using a small registry tweak or running a command forever. Here you will find the methods to Stop ChkDsk in Progress in Windows 10 and permanently as well.
CHKDSK is an inbuilt utility that is equipped with Windows system to check the integrity of system drives and to repair issues as bad sectors, directory errors. Unlike previous versions, Microsoft has developed the tool to run as part of an Automatic Maintenance routine in Windows 8 /10. CHKDSK starts at either start or boot as a schedule; relaxing you from running the command manually.
You can run CHKDSK for any drives where you have to type the name of the drive on the command line; the specified drive is dismounted and then scanned. However, in case of the drive being in use, the scan runs on the next boot.
How to Stop CHKDSK in Progress in Windows 10
With CHKDSK being a part of Periodic maintenance, you may encounter the scan involuntarily at every startup. Let’s see the way to Stop ChkDsk in Progress in Windows 10
You would find a Cancel icon (x) on the pop up. This will abort the scan by simply a single click. In addition, you can terminate the disk check by hitting any key within seconds’of time.
Another way to abort a scan in progress is force powering off your system.
However, it is advisable to let a CHKDSK run completely as stopping in the middle can lead to system errors. So we recommend following a registry key hacking or using command line tool to finish it completely.
How to Stop CHKDSK at Startup Permanently
Through Registry Editor
Step-1: Type regedit.exe in the taskbar search bar and hit Enter.
Step-2: Copy the below string, and Enter into the Registry editor address bar
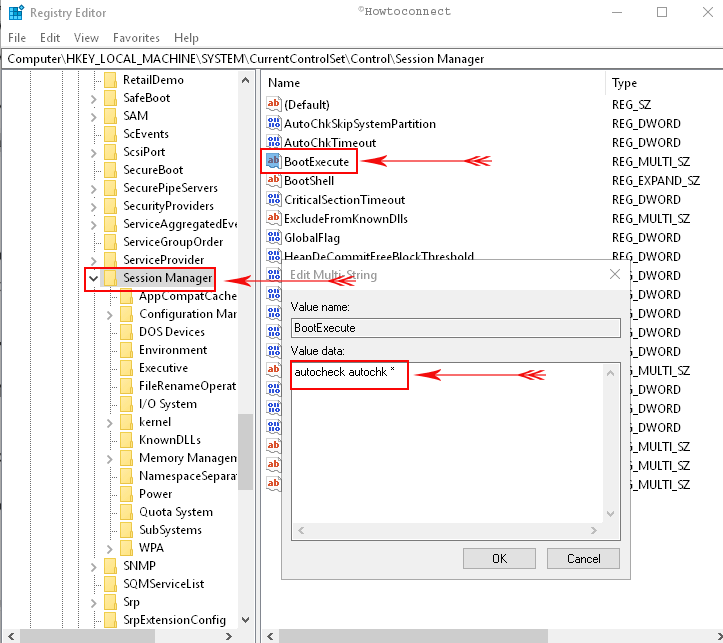
HKEY_LOCAL_MACHINE\SYSTEM\CurrentControlSet\Control\Session Manager
Step-3: Check for the BootExecute entry in the right pane of the console. Perform a right click on this Value and select Modify from the list.
Step-4: You will find Value data autocheck autochk * / for the name. change its value to autocheck autochk *.
Step-5: Close the Registry Editor and restart your system. You may notice that CHKDSK would not run this time.
Stop CHKDSK in Progress in Windows 10 Using Command Prompt
- Type cmd.exe after pressing Windows logo key.
- Once you notice Command prompt Desktop app under Best match, make right click on it.
- Select Run as administrator.
- Input chkntfs /x c: in the black window and press Enter.
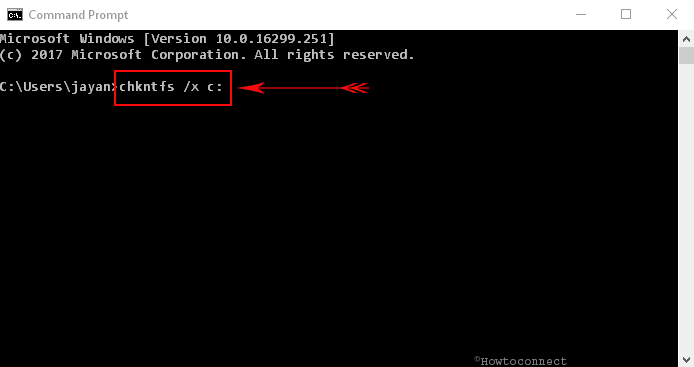
These will Stop CHKDSK in Progress in Windows 10 moreover permanently.
O/S Windows 10 Pro, PC: MS Surface Pro 2018(?)
I had the problem of CHKNTFS running at startup for a couple of months, but since that only caused a horribly slow boot, and I lack time to look at it, I ignored it until yesterday.
Interestingly enough, I found that running chkntfs /x c: in an elevated command prompt, had no effect. My experience with batch files/command prompts told me that switches (e.g. /x) were usually entered after, not before the drive letter. But I fixed the problem with a Registry edit before I considered trying that.
After accessing the Registry entry, I saw that in place of the value “autocheck autochk * /”, there was a double-line referencing Norton Utilities Disk Doctor. I closed the Registry and ran Norton Utilities\Repair Drives which reported there were problems with the hard drive. But CHKDSK /F, running from an elevated command prompt, reported the disk as having no errors.
I reopened the Registry and changed the value to “autocheck autochk *”, and rebooted. CHKNTSF no longer ran at startup and Norton no longer reported disk problems.
I’m guessing that when I had problems with the PC previously, I ran the Norton app hoping to fix it, and the results it found were moved to the Registry entry which was invoked as part of the boot process. The Norton app never really helped – I finally reset the OS using the Recovery option.
Thanks for publishing the tip to modify the Registry.
Now, if there were some help somewhere to keep NordVPN from blocking my MS Exchange & POP3 e-mail . . .
Toyman 12/24/18