Windows 10 has introduced Disk Cleanup tool with an advanced feature. Disk Cleanup is very useful tool for Windows and it permits you to regenerate the space by removing unnecessary files created by default. You can use this utility to increase space in your disk drive. Formerly, It worked in a simpler mode due to which you could delete only those files which were related to your current user account. But on Windows 10, it deletes unuseful files also associated with the administrator account to extend your disk space.
Now Windows 10 added system Compression option in Disk cleanup which means you can compress the whole system. This means you can create more space using this utility. In this article, we are elaborating tips on Include System Compression in Disk Cleanup on Windows 10.
How to Include System Compression in Disk Cleanup on Windows 10
You can follow the given tips to add this option:
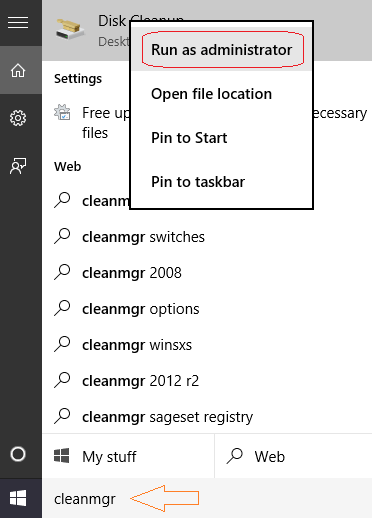
1. Click Search on the taskbar.
2. Write – cleanmgr.
3. Right click on the Disk Cleanup and select – Run as administrator.

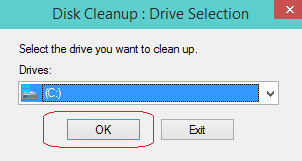
4. Choose the drive on which your Windows 10 is installed (usually it is (C:)
5. Next, click – OK.

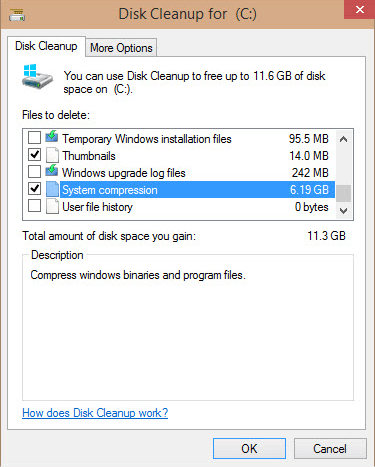
6. Wait for a little while unless the Disk Cleanup is running. After then, you would get the Disk Cleanup window. Under Files to delete you can see many options. In these options, one is System compression. Tick the box before System Compression.

7. In the end, you are able to Include System Compression in Disk Cleanup on Windows 10. Click OK to compress the system files.
It is not clear to say that what exactly data gets compressed but from the description, appears that the system will use the built-in NTFS compression. Earlier, Disk Cleanup was added in Windows XP but it was removed from Vista. This tool provides you compress a large amount of space from the disk drive on Windows 10.
