Sometimes, out of nowhere, you get to see Phantom Drive Letter in Windows 10 File Explorer. Ghost or phantom drive letter means that it doesn’t exist in reality but visible on your computer. It appears in This PC view but goes out of sight in Disk Management. Few complain that they are unable to install any software on their local drive when this spectrally happening takes place. Today, we will present you two ways to remove this stubborn drive from your system.
What are Ghost or Phantom drive letter?
When you attach a new hardware to computer right from the start of its assembly, its respected drivers are installed in the system as a part of system files. This includes motherboard, hard drives, USB devices, graphics cards, processor, and even CD Rom drivers. Though these files are recognized and installed automatically, they are not removed when the hardware is dislodged.
This might be an issue easy to ignore at the start, but with time, this often leaves a number of fake or ghost drivers. These types of drivers create Ghost or Phantom Drives. They appear on your PC with virtual letters along with other “hard disk drives“. There are various tools that can easily remove these drives. Though every method has its own reliability, we will show you one of the most reliable ones.
How to Remove Ghost or Phantom Drive Letter in Windows 10
You need to fulfill few requirements before you make an attempt to Remove Ghost or Phantom Drive Letter in Windows 10. See ahead –
Requirements
01. Log into the system with admin authorities or a member of the administrator group.
02. If you are connected to a network, your network settings might also prove to be an obstacle, preventing you from enhancing or removing the drive properties. Hence, you may choose to disable the internet connections before following these steps.
How to Remove Ghost or Phantom Drive Letter in Windows 10 Through Computer Management
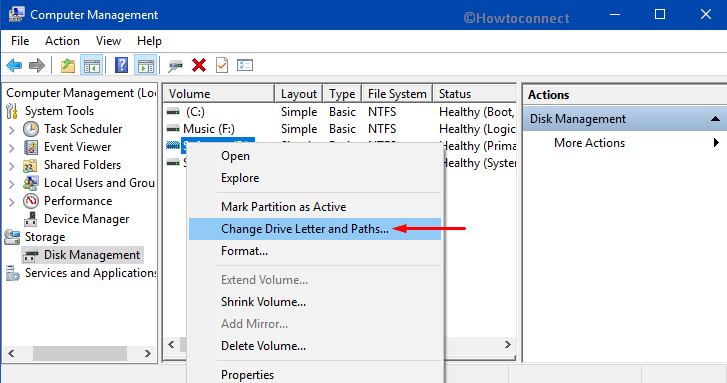
Step-1: First of all, perform a right-click on This PC icon on Windows 10 desktop and click Manage option to quickly open Computer Management.

Note – If you are finding trouble in launching this MMC snap-in, simply right-click Start and choose “Computer Management” from Power User Menu.
Step-2: Go to the Storage option and click on Disk Management at the left sidebar.
Step-3: Now, you will see the list of the drives connected to the system. The list will also contain all your phantom drive letters of the drives that are not present in the system anymore. Moreover, you will also find related information to the drive such as disk space, status, and its health.
Step-4: Conduct a right-click on a ghost drive and choose the option “Change Drive Letters and Paths“.
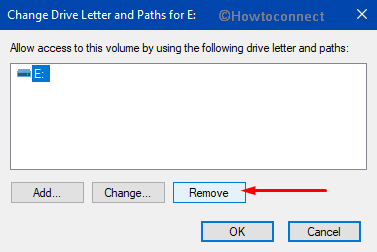
Step-5: Finally, to do away with the drive letter, click Remove button on the dialog. However, you can also do any of the following as per need.
To Assign a New Drive Letter
On the dialog that pops-up, click on Add button. Choose the drive letter you wish to use and henceforth click OK.
To Modify a Drive Letter
Make a click on the Change button as shown in the given image. Moving ahead, pick up the drive letter you wish to assign and then click OK.
However, clicking the Remove button is best and the easiest for manually removing the ghost drive letters in your system.
An important thing to note here is that you need to be careful while modifying the drive letters and names. There are several MS-DOS and Windows applications that take reference of a specific drive letter. For instance, the path environment shows a specific one in coordination with the names of the applications.
How to Use Command Prompt to Remove Ghost or Phantom Drive Letter in Windows 10
I. Type “CMD” in Cortana search text field. When Command Prompt appears as the result, press Ctrl + Shift and Enter keys simultaneously. Upon the prompt of UAC, click Yes to affirm and proceed further.
II. Once the black panel opens up, type diskpart and hit Enter.
III. Next, type in or copy-paste list volume and press Enter to run it.
IV. Go through the list of drives that appears on the Command Prompt. Locate the Phantom Drive letter from the list and insert the below command.
select volume #
Note – Ensure to replace # with the Ghost or Phantom drive letter.
V. Finally, type the below commands in the same sequence and hit Enter after each one. Doing so will immediately Remove Ghost or Phantom Drive Letter in Windows 10.
remove
exit
This method works wonder when the drive letter shows up in File Explorer but not in Computer Management.
Naming of the Drives in Windows 10
In the drives list, you can see maximum up to 26 letters. Commonly, the system performs the standard method of naming by assigning the two letters “A” moreover “B” for “floppy disk” only.
Whereas the naming of the hard disk volume is from letter C to letter Z. This is the list that might contain the ghost or phantom drive letters in Windows 10. Here, map network drives are given the letters in reverse order i.e. from Z to B.
The OS prevents you from changing or removing the letters of the “system boot volume”. When you try this, an error message may show up.
The same applies to the “CD-ROM drive” or any other removable drives. This is because they are used by another program in the system. You might solve the issue by closing the program.
Conclusion
The ghost or phantom drive letters in Windows 10 is such an issue that has not seen any improvement as of yet. However, third-party software continues to develop technological protocols in order to remove the problem with single steps. Some of them can do the job easily such as Device Remover, Ghost Buster, Device Clean up Tool and DriveCleanup. While you need to download them from the internet, it is always more convenient to go for traditional Windows settings in order to remove the ghost letters through the above methods.
In W11, in File Explorer under Quick Access, just click on the phantom drive (with letter) and from the drop menu select remove!
Hi,
I had 4 phantom USB drives in Windows Explorer that were driving me crazy. Your simple fix removed them.
Thanks so much!!
Roy
To remove Phantom Network Drives you will want to follow this Microsoft Article: https://support.microsoft.com/en-us/help/932463/a-mapped-network-drive-appears-to-be-disconnected-after-you-install-or
Hi,
Thank You-Great article. Only one way it could be better. What if the drive, (G:) in my case only appears in Explorer, not disk management or Diskpart.
In Disk management, adding the partition sizes of the correct drives equals almost exactly the capacity of the HDD. There is no room for my G: drive showing 195.31 GB in Explorer.
In Diskpart the G: is simply not there.
This drive was not put in by some driver error, I need to explain.
When I set up my HDD I originally omitted using letter G:, so it could be assigned to other hardware used by USB ports. Much later I did decide to use it because USB was using other letters anyway. I assigned it to the 195gb HDD partition, but I didn’t use it for some time.
Recently I downloaded a backup program I wanted to try, (“AOMEI”). I choose my J: drive to experiment with by having AOMEI Place it’s backup image on G:. The image seemed to be OK, (at first). Then I discovered the Drive was mysteriously marked “Read Only”. I couldn’t get the “Read Only” Removed. Yesterday I found the status of G: had changed again. Now when I try to Open the drive I get the error: Drive G:\ is not accessible. The file or Directory is Corrupted and Unreadable.
At this point, I am not interested in Data recovery, just in getting Explorer corrected, hopefully with the return of G:\ as a drive letter.
Strange situation. If you have any ideas, I would be glad to hear them. But anyway, I did enjoy reading your article and trying your well-explained suggestions.
Many Thanks,
David