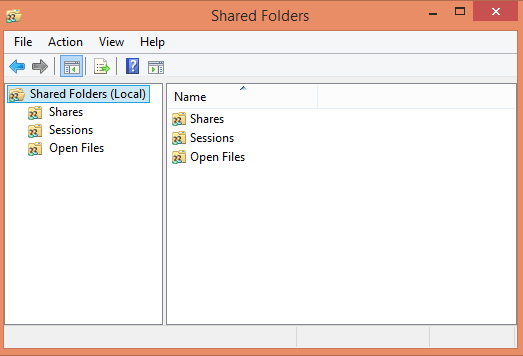
Create Shared Folder Shortcut on Windows 10, 8. – Shared folders allow to create, view, open, and manage files between two PCs connected through a network. All the authorized users who are connected to a network can easily create, view, open, and delete the files on the computers in the same network. If a user works with shared folders time and again he uses to put some effort to open it. A shortcut of shared folders removes complexities to manage these folders.
Hence we are presenting tips to Create Shared Folder Shortcut on Windows 10, 8 using which you could easily launch these from anywhere on your PC.

How to Create Shared Folder Shortcut on Windows 10, 8
Manually
By following steps you can easily create shared folders shortcut yourself.
1. Right click on blank space on your Desktop screen.
2. Click on New and then on Shortcut.
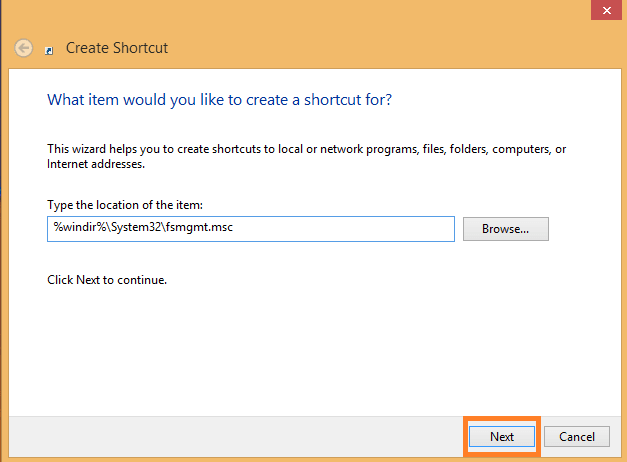
3. It will open a new window named Create Shortcut.
4. Write %windir% \System\fsmgmt.msc into the Blank area.
5. Click on Next button.

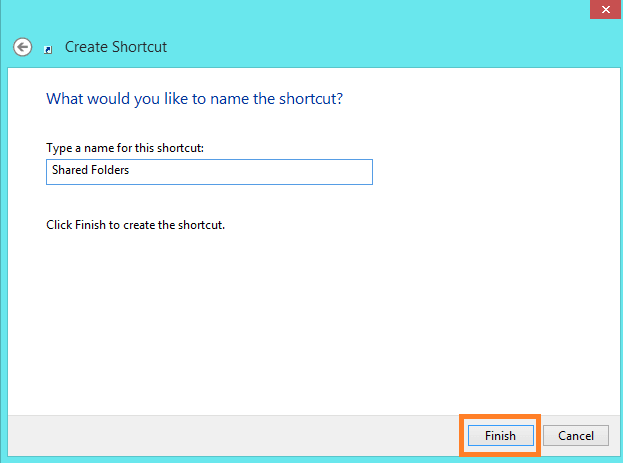
6. Write Shared Folders in the blank space. You can also write any name you would like.
7. Click on Finish button.

Your shortcut is created. Move the shortcut to any place on your PC where would you like. Pinning Shortcut to Taskbar, Quick Launch or on Start Screen of your PC may ease your work.
Must Read: How to connect Computer to wireless Router to access Internet
Download Shared Folders Shortcut from Web
Using this way Shared Folders shortcut will be downloaded from the web.
1. Open this link in your web browser
2. It will download a folder automatically.
3. Extract Shared Folders shortcut from where you have downloaded.
4. Copy shortcut on your Desktop.
5. Run the Shortcut.
6. It will show the warning message and ask you for confirmation to open this file.
7. Allow it to Run or Open.
It will open Shared Folders window on your PC. You can also move this shortcut to your desired place.
Change Shared Folders Icon On your Windows 10, 8
Shared Folders icon is simple and slightly different from other folder icons. Changing the icon will help you to identify it. So follow the steps to change shared folder shortcut icon.
1. Right Click on the Shared Folders icon.
2. Click on Properties.
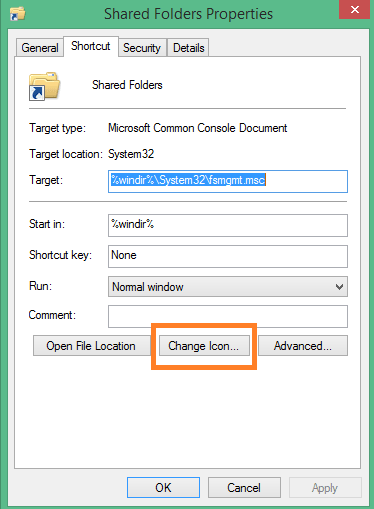
3. Go to Shortcut tab.
4. Click on Change Icon button, shown in below picture.

5. In the Look for icons in this file blank space type %SystemRoot% \System32\imageres.dll .
6. Choose your desired icon.
7. Click on OK and then on Apply button.
![]()
Your folder icon is changed. Hope that this post will help you to Create Shared Folder Shortcut on Windows 10, 8.
Recommended: Create Shortcut to Transfer Files through Bluetooth on Windows 8
