Way to disable and enable Time lapse in Camera App on Windows 10 with steps. – What do you do when you want to capture multiple pictures using the Webcam? Well, clicking the Camera button continuously is definitely a tiresome task. Time lapse is a feature of the Camera app in Windows 10 that lets you take still photographs at the set time period. Find a related guide How to Take a Bunch of Photos Rapidly in Windows 10.
Time lapse in camera app on Windows 10 allows you to capture images every few seconds by clicking the Camera button just once. After choosing the timer, click the Camera button and the app will keep on capturing the images until you click it again. See Windows 10 – How to Show Slideshow Images from Camera Roll to learn more. Let us now head towards the steps and see how this feature works and helps you in taking images continuously.
Time lapse in camera app on Windows 10
Step 1 – Open Start Menu, navigate to the C section of applications. Locate Camera and select it.
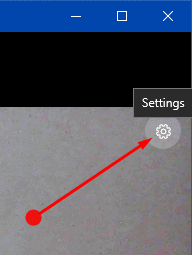
Step 2 – Once the Camera app opens up, click Settings in the top right corner.
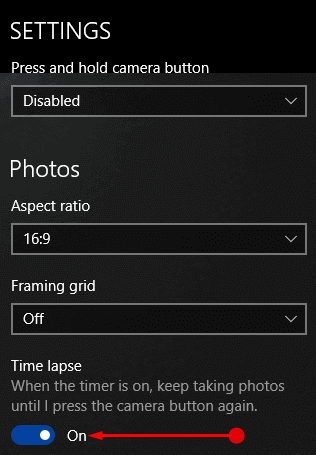
Step 3 – This will launch the Settings pane of the Camera app. Find the setting Time lapse.
Turn On Time Lapse
Step 1 – To turn on Time Lapse, toggle ON the option Time lapse by pulling the slider towards the right.
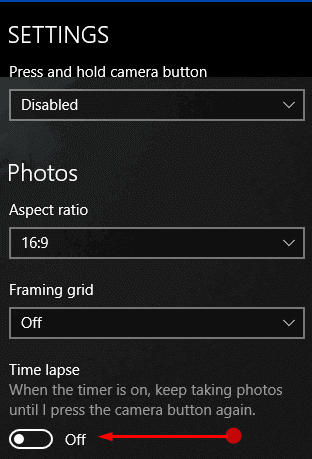
Turn Off Time Lapse
Step 1 – Switch the slider of Time Lapse to OFF and this will disable the feature.
How to Use Time lapse in camera app on Windows 10
Step 1 – Once you turn On Time Lapse, you will notice two buttons on the top. One is Photo timer and the other one is Exposure compensation.
Step 2 – Click the Photo timer button and set it for either 2-seconds, 5-seconds or 10-seconds.
Note – By default, the Photo timer is Off.
Step 3 – After setting a timer, click the Camera button on the app. Now, depending on the timer you choose, the Camera app will take still pictures.
Step 4 – The app will keep on taking still images until you press the Camera button again.
Step 5 – Now, click the Exposure compensation button to make the photographs brighter or darker. A slider will appear on the right-hand side, use it to adjust the exposure level accordingly.
Note – Navigate to File Explorer => Pictures => Camera Roll and find the images. You can also Change Location to Save Photos by Camera App in Windows 10.
Conclusion
So, you have seen that using Time lapse in camera app on Windows 10 is pretty much easy. Time lapse is a very attractive feature that most of the cameras of today’s generation have. If you have more tips on Time Lapse in Windows 10, do write them to us.