Solutions to BUGCODE_USB_DRIVER here will guide you to fix the BSOD issue. The bug check value of this Blue screen of death error is 0x000000FE. The code is self-explanatory and indicates that USB driver is the cause of the problem. Moreover, the fatal generally occurs because of bugs in certain system driver files such as usbhub.sys, winusb.sys or usbport.sys. Addition to USB, bad drivers, malware or virus attacks, defective system components, missing system files might also be a reason.
If you have been getting BUGCODE USB DRIVER, refer to this guide as we have put together all the possible workarounds. Now, depending on the situation with your computer, the solution will work.
Table of Contents
BUGCODE_USB_DRIVER Error BSOD in Windows 10 Solutions
Here is how to fix BUGCODE_USB_DRIVER Error BSOD in Windows 10 –
1] Disable automatic Restart
A big headache that comes along with such BSOD error is computer randomly restarts. You see, Windows 10 reboots automatically when getting BUGCODE_USB_DRIVER. Even though it is a good thing for the system, it can really test the patience of the users. What’s worse is if they have been working on something important and the system leads the computer to crash.
So if you too are in the victim-list, here is a quick workaround for you to try. It’s possible for users to stop your computer from shutting down automatically. All you need is a simple change in settings. Follow the below steps for the same –
Step-1: If you have been working on anything, save it and close the applications. Once you are on desktop, right-click on This PC icon. Choose Properties.
Step-2: From the Properties window that comes up, select “Advanced system settings”.
Step-3: It will be followed by the System properties wizard. In the same, select the Settings button under the head entitled “Startup and Recovery”.
Step-4: This will launch the Startup and recovery wizard.
Step-5: Further, go to the ‘System failure’ section. There, uncheck the box located next to Automatically restart.
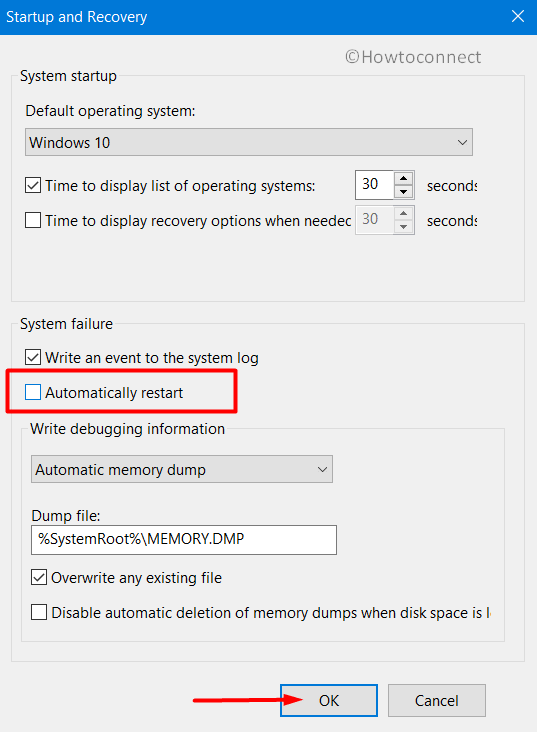
Step-6: Finally, click on OK.
There! You have successfully blocked out the automatic system restart.
2] Scan USB device to Fix BUGCODE_USB_DRIVER
As you can see in the error’s name itself, it might be related to some external device that you recently connected. So, if you started getting the error BUGCODE_USB_DRIVER after connecting some USB device to your system you might want to run a scan on the same and see whether it is infected by any kind of malware. Some viruses that may find a way into the USB drive can cause the error Bugcode USB Driver.
In order to scan for any malicious activities in the said device, you can simply use your antivirus utility. Depending on the tool that you use, there would be a USB scan or custom scan option somewhere. You just need to run the same.
3] Uninstall USB Controller
In the case of BUGCODE_USB_DRIVER BSOD, many users found it helpful to simply uninstall USB driver for once. Given below is the sequence of steps for uninstalling the USB controller –
- First of all, type devmgmt.msc in the Windows search and press Enter in order to open Device Manager console.
- In the list, find and expand “Universal Serial Bus Controllers”.
- When it expands, you’ll see a list of drivers listed there. Right-click on the first driver and then, click Uninstall device. Confirm uninstalling when asked.
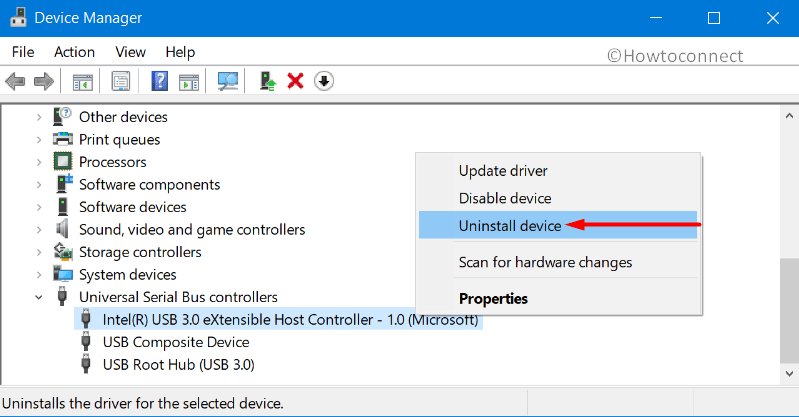
- Repeat this uninstall procedure for all the other drivers present in the expanded menu.
- Finally, go for a system restart.
4] Use Microsoft Windows Security to resolve BUGCODE_USB_DRIVER Error
Not just the USB-drive, but malware attacks in other important areas of the device may cause the said BSOD error. It is possible for viruses to enter your system through various internet-based or offline sources. Once entered these can be quite problematic in many cases. This nasty software may interfere with the working of the system and delete important files. It may even corrupt the system components. Virus or no virus, it would be quite healthy for your device if you do a periodic scan for any kind of malicious software on your PC. The best thing is we won’t even need any external utility for the same. Now that Windows comes with its own security tool that is Windows Security, you can keep your device safe with that. Here are the simple steps to use the utility.
- First of all, simply launch the Windows Security application from the system tray. Just select the shield icon there. You can even search the same in the Windows search bar.
- There, navigate to Virus & threat protection once you are in the app. The option is available on the left-hand side.
- Select the Scan options link and then select the Full scan radio button. This would initiate a complete scan of the system and its components and every file in it. It would ensure that nothing is left behind.
- Then, click on the ‘Scan now’ button.
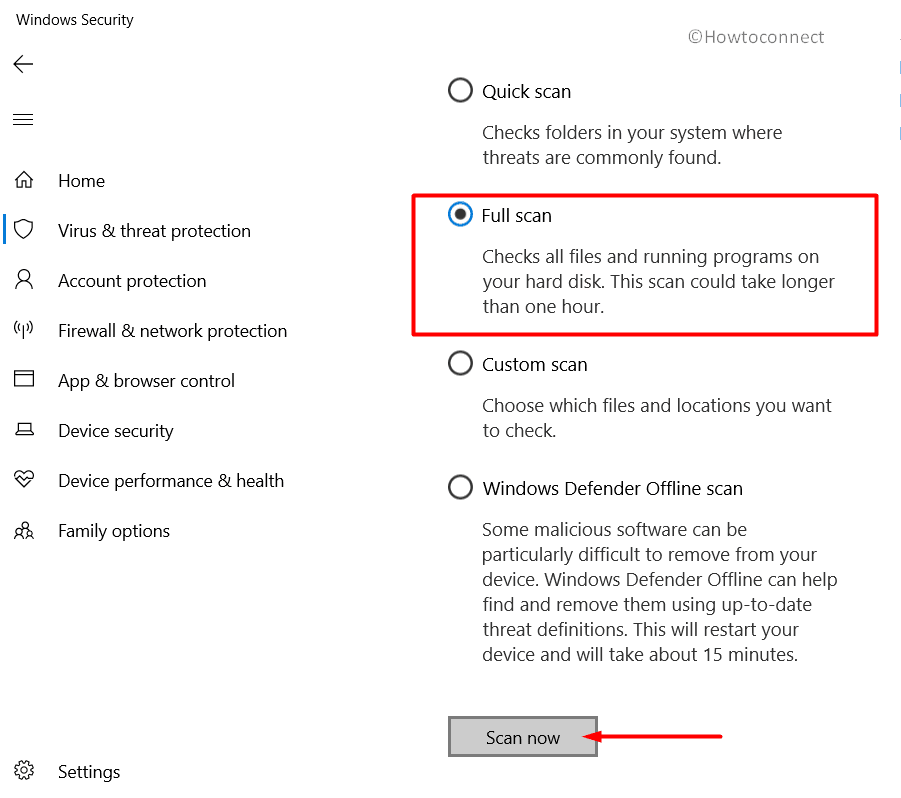
- It might take some time as the program scans through each and every file on the hard disk.
- Once the check is over it would display the results found during the process. Then simply click on the Clean Threats button.
- Select Remove in the subsequent option and finally hit on Start actions button. This would clear out all those threats detected in the course of the scan.
5] Install Patches
Updating the Windows is pretty much a simple process and it can go a long way in keeping your PC trouble-free. Windows updates are carried out automatically the most systems. However, some users may deliberately postpone the update process which may sometimes lead to errors like BUGCODE_USB_DRIVER. If that’s the case with you too, there is nothing to worry still. You can carry out the process manually too. Moreover, manually downloading Windows 10 updates is an equally simple method. Here’s what you need to do to check for the available new cumulative updates or builds –
- Open the built-in Settings app by pressing the key with Windows key + I together. Alternatively, you can search it or can launch from the Action Center => All settings.
- Once the application shows up, go to the Update & Security category.
- In the right pane of the subsequent page, click on Check for updates button.
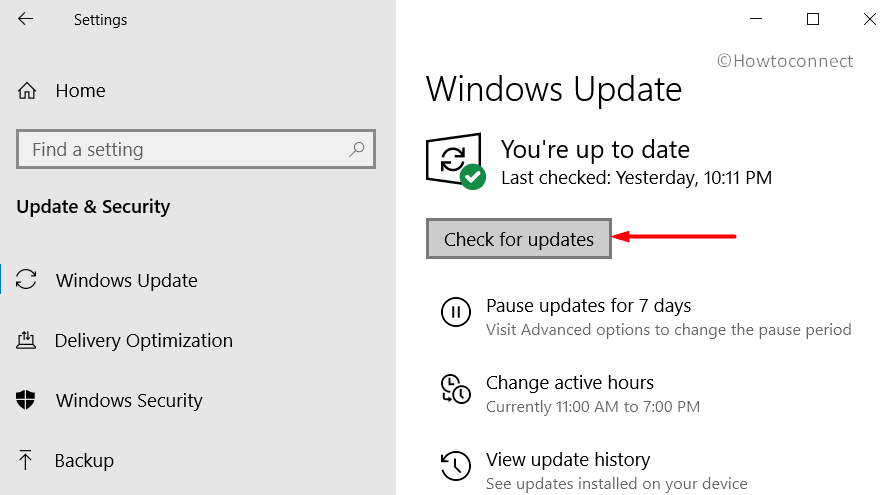
- With this, your system will start a scan for new updates. In case new patches are available, they will be listed and you need to click the “Download” button to get them.
- Finally, once your OS installs the new updates, restart the system when prompted.
The BUGCODE USB DRIVER BSOD would be fixed in case the new updates resolve the bugs and problems causing it. A tip for users here – have secure connectivity while downloading new patches. It prevents problems like incomplete installation.
6] Deal with the driver related issues
In order to make hardware components of a computer work properly drivers play the most crucial role. They essentially instruct and makes those components function. There would be a driver or even multiple drivers for every device connected to your PC. Therefore for ensuring the proper functioning of every hardware component of your system, you need to keep your device drivers up to date. Failing to do so may cause glitches and errors all along.
Especially, in the context of the Bugcode USB Driver BSOD in Windows 10, you might want to pay close attention to any USB device drivers. Here is exactly what you need to do for checking and updating these devices –
- In the Run window (Win logo + R key) or Search box, simply type “devmgmt.msc” and press Enter.
- When the Device Manager opens up, go through the list and see if any of the devices listed there has a yellow exclamation mark on them. Pay particular attention to USB connections.
- If so, click and expand the specific device. You will now be able to see the respective drivers of it.
- Now right-click on each of the drivers of the device and select Update driver option from the fly-out menu.
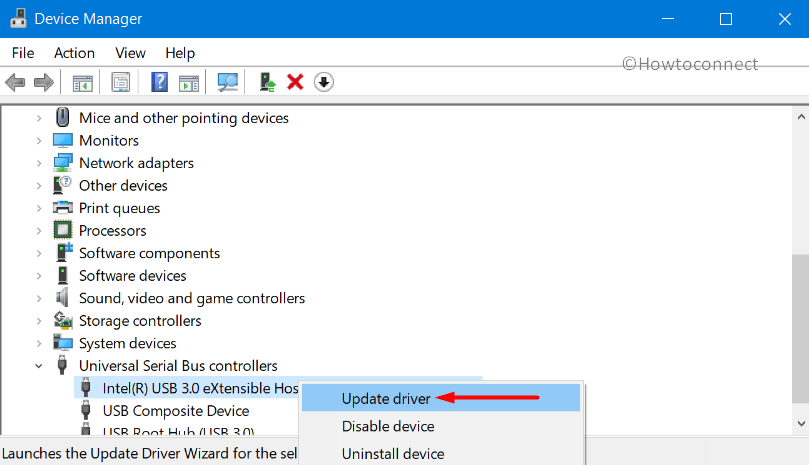
- The system will scan for any available updates for the driver. If found simply follow the onscreen instructions to install the same. Finally, reboot the system.
7] Clean Junks to Fix BUGCODE_USB_DRIVER
Just like flatter at your home or workplace can slow you down, the junk heaping up in your computer can cause a lot of trouble for it. They can even cause various errors such as BUGCODE_USB_DRIVER. These unwanted and temporary files heap up in your system as you browse through the internet or in the course of downloading and deleting various files. Therefore, in order to ensure the healthy functioning of your computer, you should occasionally clean up junk files or unwanted files piling up in your download folder. There is the Disk Cleanup utility in Windows that you can use for this.
Now, something that you need to remember in the course of cleaning up these is that you may end up deleting some files that are important to you as well. So, before you initiate the Disk Cleanup, double-check that you have moved any important files in these folders.
- The first step is pressing Win + R hotkey together in order to open the Run dialog box. In it, type ‘cleanmgr’. Then you can either hit the Enter key or can click on the OK button you see there.
- A small pop-up window would appear asking for selection of the drive you want to clean up. Select C: drive as that’s where all the junk gets stored.
- Then, choose OK. The Disk Cleanup utility will now do the calculation of the space in which it can release junk.
- Click Cleanup system files button.
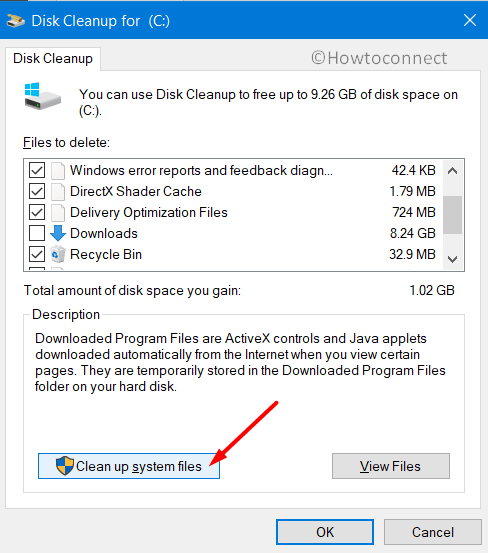
- In the small window that follows with a list of a folder, select all boxes other than Downloads (just in case there is an important document in there). We’d rather suggest you filter out any important documents from all those folders in advance and move them before you start the cleaning process. This way, you will be able to clean up all the temporary and unnecessary files that remain.
- Now, once selected, go for the Ok button there. This would start the cleanup process, which may take some time.
- Lastly, reboot the device normally when the procedure ends up.
8] Run RAM test
Random Access Memory is an integral part of your computer system. RAM has a role to play in every task that is being performed on your PC. Therefore, having any kind of trouble in the memory area can cause serious interruptions in the functioning of your device. There are many factors that can cause problems in RAM, like power surge, device overheating, etc. Such troubles are also known to be creating blue screen errors as well including BUGCODE USB DRIVER. So make sure that you check for any kind of RAM issues if you are facing BSOD. Here’s what you can do about it –
- Either select ‘All settings’ from the notification area or simply press Windows key + I. This would open the Windows Settings app on your computer.
- Then, search the keyword ‘memory’ in the text box on the top of the Settings app.
- In the results that are loaded, double-click on “Diagnose your computer’s memory problems” to launch Memory Diagnostic.
- When the window kicks in, select the first option which would also be the recommended option, saying “Restart now and check for problems“. Don’t forget to save any unsaved work before you allow restart, or it may be permanently lost.
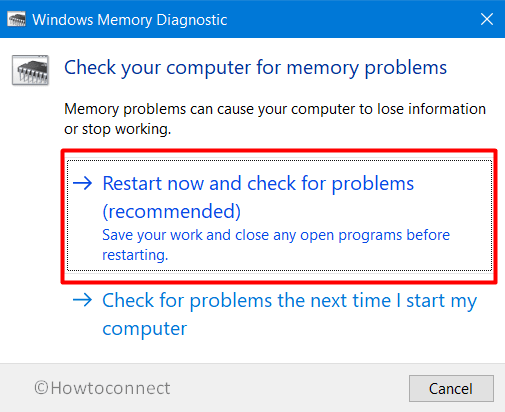
- Then, the system will go through its initial restart. There would be two rounds of restart in this fix. When the PC powers up, a blue screen will show up, which will display the progress of the problem diagnosis.
- The system will restart once again then after the memory problem scan is over. Any detected issues will be displayed on the screen after reboot.
9] Remove anti Malware software
You probably know that Malware can cause a lot of problems in any computer system. So it would be fair if you have a third-party antivirus tool on your PC. What you might not know is that such third party apps sometimes can cause conflict with Microsoft’s own security application that is Windows Security. Even though it is very rare, you might want to try uninstalling those tools to see if they are the ones causing the errors. Here’s how you can uninstall the program –
- Open the Control Panel by searching cp in the search box.
- Go to the Programs and Features applet.
- From all those applications listed there in that section simply select the third-party antivirus tools that you would like to uninstall.
- Click on the Uninstall button on the top ribbon once you have selected the app.
- Confirm when prompted and see whether the BUGCODE_USB_DRIVER error that you have been facing is resolved.
10] Enter Safe Mode to solve BUGCODE_USB_DRIVER
“Safe Mode” is one of the options in Windows that you can use in case you are unable to figure out what is wrong with your PC. It is a good option to get rid of, at least temporarily any problematic components. When you boot Windows 10 in safe mode it will be having only the basic default settings and programs. No third party software will be able to function or interfere or cause an error in such a state. Here is how you can enter Safe Mode –
- Click on the Start menu and then the Power button. Select the Restart option and simultaneously press the Shift key.
- In case you are encountering difficulty in normally starting your Windows then the OS will automatically display the recovery options after failing to start up multiple times. Simply press on the Advanced Repair options that you see on the Recovery options screen.
- Thereafter, select Troubleshoot and then Advanced options.
- In the Advanced options screen you have to select “Startup settings“.
- This will be followed by a list of Advanced boot options. There select the Restart button. Finally, execute a hit on the respective number that corresponds to the Safe Mode. In order to enable safe mode, F4 is the number that you need to press.
11] Perform a Disk Check
The system may experience fatigue or functionality problems when working for long hours continuously. In a few instances, this can eventually lead to BUGCODE_USB_DRIVER. However, the quick fix for this situation is trying the check disk function in Windows. What it basically does is checking the overall integrity and performance of the system and finding any problems or with logical file systems or such. Another function it does is marking the hard bad sectors so that they will be stopped from being put to use and thereby from making any interruptions.
Using this function is pretty easy and you just need to pass a simple command to work this. Here is what you need to do –
- Get access to the elevated Command Prompt using any of the preferred procedures.
- In the command line copy-paste or type the following command –
chkdsk C: /f /r /x - Finally press Enter. The disk check function will start.
12] Run Blue Screen Troubleshooter to fix BUGCODE_USB_DRIVER
One of the smooth simple and easy methods of fixing many types of errors with computers would be troubleshooters. They make the whole error resolving task simple for us. Windows moreover have specific troubleshooters for some commonly occurring errors or issues. Blue screen troubleshooter is one of them, thankfully for us. So whenever you confront BUGCODE_USB_DRIVER or any other kind of error, try this function. It may fix blue screen of death once and for all. In order to use the blue screen troubleshooter functionality simply follow along with the steps given below –
- Launch the Windows Settings application and go to the Update & security tile.
- Navigate to the Troubleshoot section on the left. Find Blue screen option on the right pane and select it.
- Click Run the troubleshooter button. Restart the system after the process ends and see whether the problem has been resolved.
13] Uninstall similar applications installed on the system
If you have multiple applications on your system that perform the same functions, this could be the problem too. Duplicate or similar applications mainly cause various conflicts. So, uninstall any duplicate apps on your PC that you are not putting to use. Here is how you can do this –
- Right-click on Start and choose “Apps and features” from the Win+X menu.
- On the subsequent page, locate the programs that are serving similar purposes. Select them and click Uninstall.
- Go through the guidelines of the app to remove it from the device.
Uninstalling an application would be as simple as that.
14] Getting rid of problematic updates
In a few rare cases, there have been some serious bugs and compatibility issues with certain updates released by Microsoft. The problem could even arise when the updates fail to properly install on your system. Furthermore, incomplete download or trouble in installation can also cause discrepancies in the functioning of your computer. So, if you think that’s the case with you, or if you have been facing the BUGCODE_USB_DRIVER after getting the latest patch you can try uninstalling the same. To get rid of the latest updates, here are the steps that you need to follow –
- Open the Settings application on your device and then, navigate to Update & Security.
- Click on the link saying “View update history” followed by a hit on Uninstall updates on the following page.
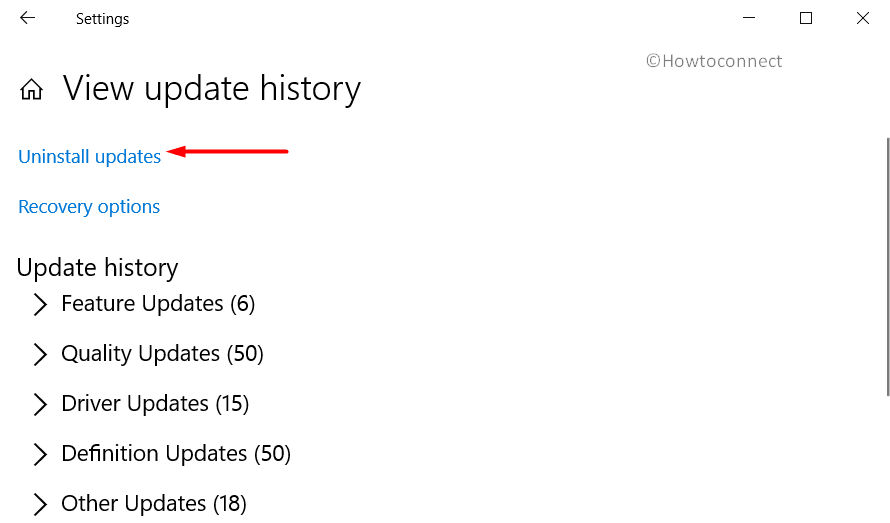
- When the ‘Installed updates’ window of the Control Panel launches, select the latest patch here. Hit on the ‘Uninstall’ button on the top.
- If UAC prompts up, allow it to remove the patch.
15] Disconnect and check for any faulty hardware accessories
There have been some cases where compatibility problems of hardware components of a device caused BUGCODE USB DRIVER error. To check if that’s the case with you, please disconnect any hardware device that you recently connected to your computer. Once you remove it, restart Windows 10 PC and check if the problem still persists. You can then reconnect the same.
Take note that the issue can be with the obsolete device driver also. If that’s the case you can go to the manufacturer’s website and see if there is an update available for the same.
16] Run System File Checker
Even if a single system component or file goes missing the entire working of the computer can be disturbed. Everything in a PC, thus, has its own importance. It would be great if you can check out any problems in these areas. Thankfully for us, checking for any faulty or missing file is not as complex as it seems like. Here’s the simplest method for you to check the same with this System File Checker.
- Press”Win + Q” hotkeys and type cmd.exe in the search box. Right-click on Command Prompt. Choose “Run as administrator”.
- Click Yes when UAC asks for permission to go ahead.
- A black window will open up. When it does simply type the following command where the cursor blinks –
sfc /scannow - Press Enter to start the scan and as you may see on the screen itself, it is going to take a while.
- So, don’t get impatient and let the PC scan and complete the process. In the end, if, there is any discrepancy with the system components or there have been any missing files, Windows will automatically fix it.
17] The final options: System Restore or Reinstall Windows
In case none of the above fixes or anything else is working, you can do either of the two things – “System Restore” or complete reinstallation of Windows 10.
For doing a System Restore, you should already be having a restore point that you previously created. In case you have a restore point, simply search and open the tool and follow the on-screen instructions to complete the procedure.
Note that in both these cases, you may lose files on your PC. So, make sure you take a backup of all important stuff on your system. Following is the index of fixes to explore them in detail –
Methods:
1] Disable automatic Restart
2] Scan USB device
3] Uninstall USB Controller
4] Use Microsoft Windows Security
5] Install Patches
6] Deal with the driver related issues
7] Clean Junks
8] Run RAM test
9] Remove anti Malware software
10] Enter Safe Mode
11] Perform a Disk Check
12] Run Blue Screen Troubleshooter
13] Uninstall similar applications installed on the system
14] Get rid of problematic updates
15] Disconnect and check for any faulty hardware accessories
16] Run System File Checker
17] The final options: System Restore or Reinstall Windows
That’s all!!