Windows 10’s new feature Mixed Reality aims at providing 3D experience to the viewers. However, the feature has flexibility in use. If you want to avoid it completely or if the hardware is not compatible, you can effortlessly Delete Mixed Reality Portal App.
Microsoft has come up with their latest edition of Windows that is Windows10 with a view to give users the best experiences of the tech world. Introduction of version like Creators update is one of the examples. Furthermore, they have come up with another superb feature- Mixed Reality. Users popularly call it as Windows Holographic or sometimes refer it as HoloLens also. Its objective is to provide the virtual reality as well as top-class 3D experience to you all.
Technology is a blessing to all and it has the flexibility of use depending on user’s choice. As a matter of fact, it also demands some minimum requirements. So, without talking too much, let’s come to the action to delete the app.
Table of Contents
How to Delete Mixed Reality Portal App in Windows 10
Method 1
Windows 10 gives you a provision to Delete Mixed Reality Portal App straightaway from the Settings program. However, for certain users, Mixed Reality is not present in the Settings application. This is because the support fails to fulfill the minimal hardware requirements to run Holographic items.
But there is nothing to worry about if you do not see its settings page. By performing a registry hack, you can get back Mixed Reality in the Settings application.
Show Mixed Reality Settings Page
Step 1 – To get back Mixed Reality Settings page, first, open Registry Editor by typing regedit on Cortana and hit Enter.
Step 2 – Once Registry Editor shows up, follow the path on its left sidebar.
HKEY_CURRENT_USER\Software\Microsoft\Windows\CurrentVersion\Holographic
Step 3 – On the right side of the page, you can see a DWORD FirstRunSucceeded. You can notice that the value is set to 0.
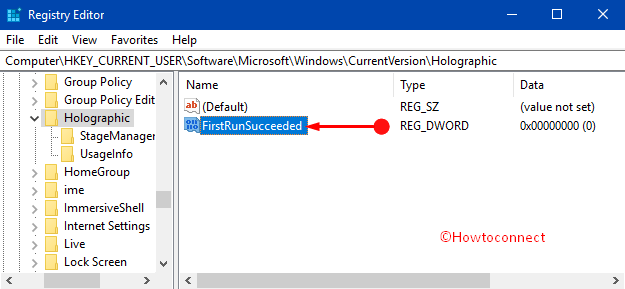
The reason behind this value is, if your machine is compatible and has the minimum hardware requirement, Windows 10 will run a Configuration Wizard automatically and during the installation, the value will be set to 1 and the Mixed Reality page will appear in the Settings program.
In the case of incompatibility, the value is automatically set to 0. Therefore, the Settings program does not include Mixed Reality page.
Note – If you don’t find the same DWORD in the Registry Editor, you need to generate it manually. Then name it as FirstRunSucceeded. It will enable the setting page in the app.
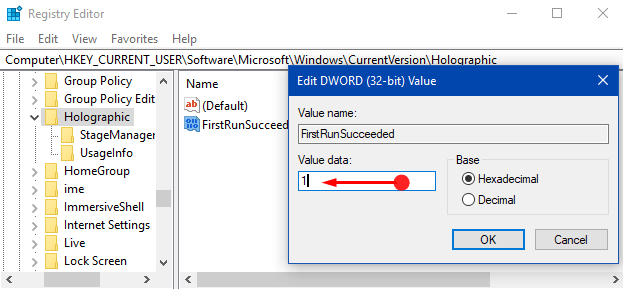
Step 4 – So, double-click the DWORD and assign its value accordingly –
- Value of FirstRunSucceeded = 0 (hides Mixed Reality settings page)
- Value of FirstRunSucceeded = 1 (shows Mixed Reality settings page)
Delete Mixed Reality From Settings App
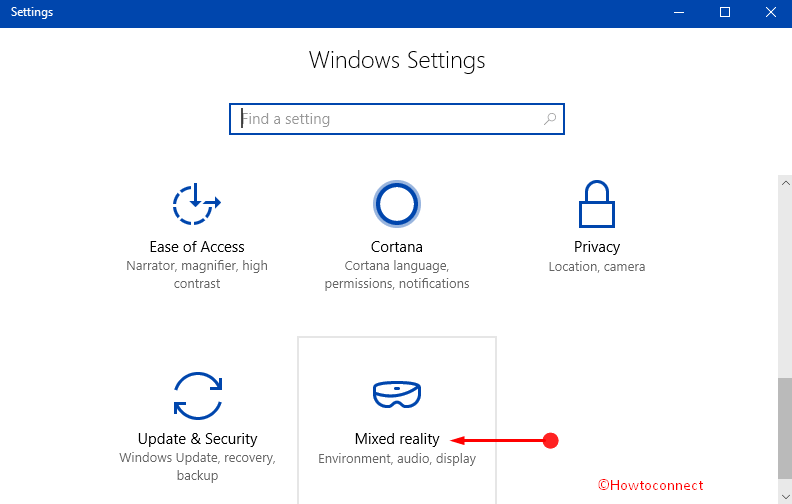
Step 5 – Moving ahead, press Win+I keys and you can see Mixed Reality category in the Settings app.
Step 6 – Select Uninstall section on the left sidebar of the next page. On its corresponding right pane, click the Uninstall button.
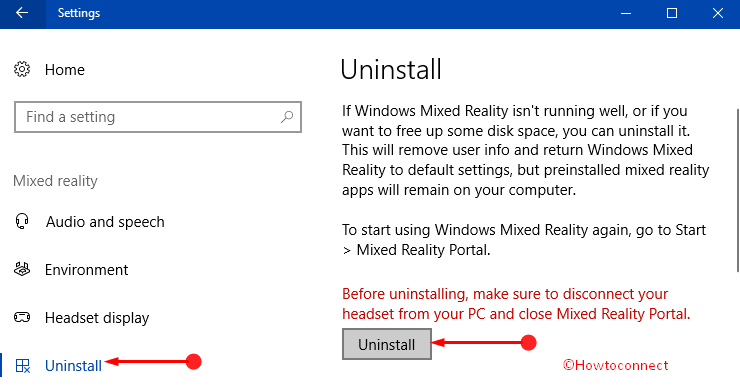
Step 7 – This prompts a dialog box with a message This will remove Windows Mixed Reality, click Next.
Step 8 – Lastly, Restart Now button to completely Delete Mixed Reality Portal App.
Method 2
After finishing the above steps, you will be able to delete Mixed Reality app from your computer functionally. But that will not delete Mixed Reality Portal app from Start Menu. Windows 10 will hide the application and store it for future use and Mixed Reality Portal will reinstall this feature again upon the first run.
The following solution is to delete Mixed Reality Portal app from the machine so that no one can reinstall it again.
You need to use the Folder Renaming method in this case. After you Rename the folder that contains Mixed Reality Portal (MixedRealityPortal.exe), the file will stop running and nobody can run it again from the shortcut.
Step 1 – Open File Explorer and navigate to C:\Windows\SystemApps. Alternatively, launch RUN and type SystemApps to open the folder.
Step 2 – Search for the folder namely Microsoft.Windows.HolographicFirstRun_cw5n1h2txyewy. Put a right click on the folder and click the option Rename. Instead, select the folder and then press “F2” button to rename it.
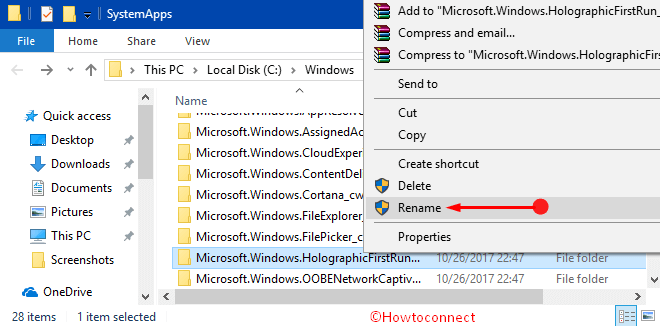
Step 3 – Do not change the full name of the folder. Use some letters with the existing name. For example, you can add BAK_ at the start of the file name.
Step 4 – This may evoke a dialog stating “You’ll need to provide administrator permission to rename this folder“.
Step 5 – Click the option Continue to proceed forward. You can see another wizard showing message “Do you want to allow this app to make changes to your device?”
Step 6 – Finally, click Yes to complete the deletion of the app from Start Menu.
Conclusion
If you opt method 2, then no one can reinstall the Mixed Reality feature of Windows 10 from your computer again. Give a shot to both the ways and see which one easily accomplishes your task for removing the app.
Mark Comer
says:It’s still in the start menu after registry change and folder rename…
Windows 10 Pro, Version 1803, Build 17134.1