You can download and use Greenshot, one of the most precious screenshot optimizers of this era. Features like taking a full snapshot, compatible with all Windows versions, capturing selected area and number of image formats have made it an extensive tool aiming to use for productive purposes.
What is Greenshot?
Greenshot is basically a screen-capturing utility that does not charge anything for Windows users and charges a certain amount for Mac users. Moreover, it is lightweight, easy to use, and equipped with a decent range of attractive features. It is termed as Greenshot since the selected area turns into green color when capturing. Besides, you can hear a shutter sound at the time of capturing and you can easily be confirmed about the shot. Salient features of Greenshot are as follows –
1. Creating a full screenshot or partial in the shortest time.
2. Easy access to interpret or highlight the captured screenshot.
3. Ease of access in sharing than any other tools. You can share the captured shot as a file or as an attachment to E-mail and print as well very easily.
4. Based on the advanced features and handy access, it has become the expert’s first choice.

Table of Contents
How to Download and Use Greenshot in Windows 10
Download Greenshot
To access the best features of Greenshot, the first thing is to download this freeware to your Windows 10 computer. This is not at all a tough task rather you can download it from internet very easily.
Step 1 – Open your browser and visit the website of Greenshot. You can notice two download button on the site, click the button for Windows OS.
Step 2 – When you Download Greenshot in Windows 10, you will get to see its setup file. Double-click the executable file Greenshot-INSTALLER-1.2.10.6-RELEASE.exe and when the Open File Security Warning comes into view, click on Run.
Step 3 – On, the Setup Wizard of Greenshot, follow the guidelines on the dialog to install and use Greenshot.
Step 5 – Finally, click Finish button to complete the installation process of Greenshot on your Windows 10 PC.
After successful installation of the software on your PC, it’s time to enjoy the best features of Greenshot and use it in your needs.
You can download Greenshot from here – http://getgreenshot.org/downloads/
Use Greenshot
Capturing screen happenings using Greenshot is very easy. Go through the given below series of steps to grab the happenings of the screen.
Step 1 – Open a webpage or anything that you want to capture.
If you often use Mozilla Firefox, you can read How to Turn On / Off Screenshot Tool in Firefox.
Step 2 – Follow the below instructions according to your need.
- Hit the key prtsc to capture the region.
- Use the key combination Shift + prtsc to grab the last captured area.
- Jointly press Alt + prtsc button for snapshotting an active window.
- Press Ctrl + prtsc keys altogether in order to snapshot the full screen.
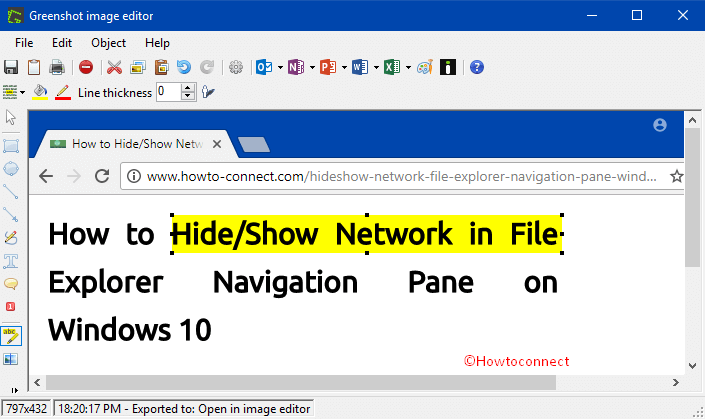
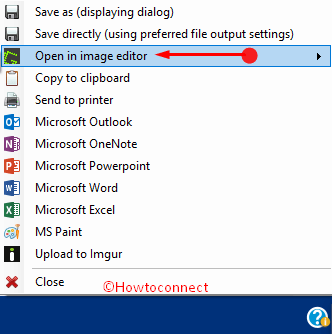
Step 3 – Once you capture the screen, several options come up near the notification area. To further edit the shot, select the option namely Open in image editor. Then you can draw boxes, put arrows, and different signs as per need.

Step 4 – After editing the image, you can choose to store it in a different location for another purpose. You can also change the program to send these directly to clipboard or print using a printer.
For reference, follow our guide on How to Paste Clipboard Content in Desired File Format.
Conclusion
A screenshot is a very necessary and effective tool now a day. You can share your activity with our partners easily. Greenshot has made the process lot easier and smooth by providing editing option in it. That is the reason this utility has become so much popular with technical writers, project managers of companies even software developers. Grab it now to be facilitated with its advanced features.