Previously, we have covered How to Fix Code: 0x80246013 Microsoft Store in Windows 10 but the same code also appears when a Windows update fails. The errors are nothing new and they keep frustrating quite frequently when you try to download and install a patch. The fatal code usually strikes when the system attempts to install the downloaded update file but this can occur during the downloading process too. What actually brings error 80246013 and obstructs the update is yet to be known, corrupted system files can be one of the probable culprits.
Microsoft didn’t deliver any official fix for error 80246013 in Windows 10 or 11 so far, therefore, you have to go through some workarounds manually. There are some probable causes that generally bring forth such issues on Windows and based on this, we have prepared a method list. The troubleshooting may seem time-consuming at first glance, but worth trying since the issue can be fixed by deploying these.
Windows Update Error 80246013
Here is how to fix Windows Update Error 80246013 –
Way-1: Restart update service
Windows Update is one of the most necessary components in the system as it allows to download the patches, builds, and versions and install them afterward. This is how Windows stays updated with the inclusive features and is also protected by security improvements. It’s unfortunate that Windows Update often gets into trouble only for the service issues because if the service doesn’t work properly, the downloading process won’t get started at all or get stuck.
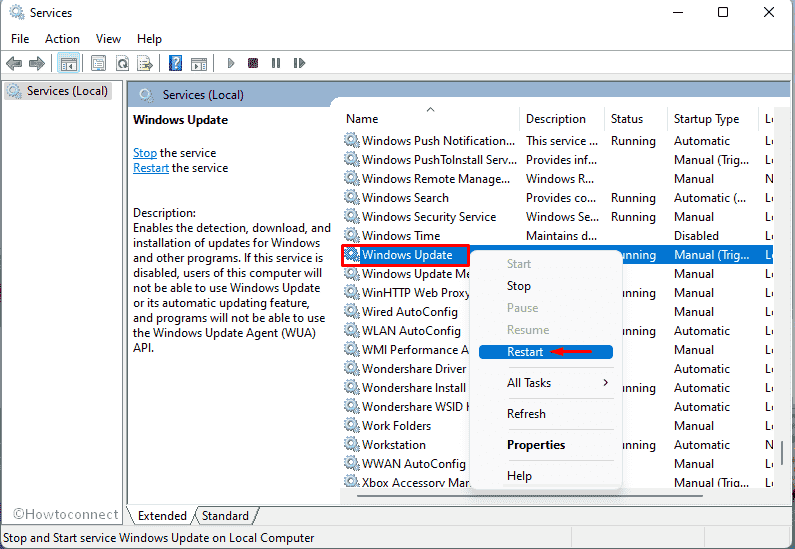
wuauserv aka Windows Update service comes pre-enabled in the system but the default settings can be overwritten by third-party programs or accidentally by the user. To fix Windows Update Error 80246013, check and restart the service if required –
- Press – Windows + R.
- In Run command, type – services.msc.
- Click – OK.
- From the appearing window, find – Windows Update.
- Right-click the same and choose – Restart.

- Reboot Windows.
Way-2: Repair corrupted system files
Windows runs smoothly and performs assigned tasks flawlessly as some crucial files constantly work for it. These are the system files and are treated as core components. However, these are very much sensitive, become an easy target of malicious invaders, and get corrupted. Some of these may also go missing when a software conflict or sudden power surge occurs.
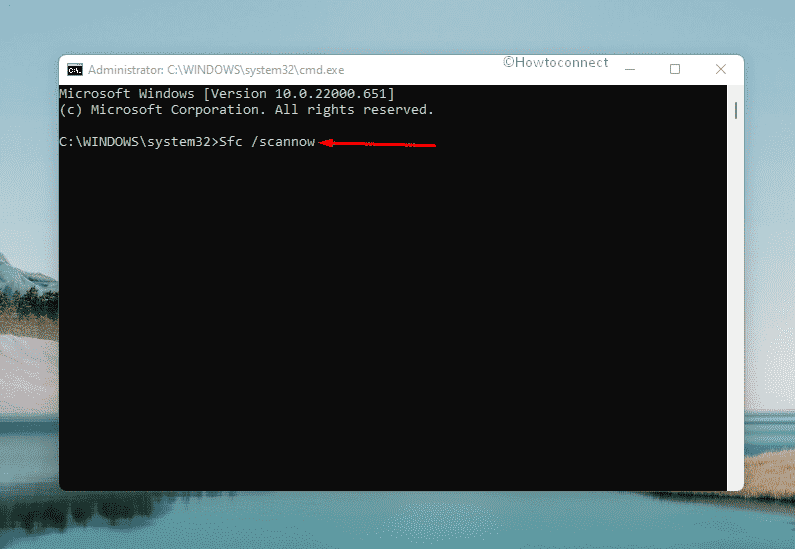
Missing and corrupted system files can trigger severe restrictions to the Windows Update process and you may face error code 80246013. SFC scan is a built-in utility that can repair these components and also recover missing files. To run the scanning, proceed with the below steps –
- Click – Start button.
- Type in – cmd.exe.
- Press – Ctrl+Shift+Enter.
- For appearing User Account Control, click – Yes.
- Type – Sfc /scannow

- Hit – Enter.
- Wait until the process reaches 100%.
- When the scanning process ends, reboot Windows.
- Retry updating after signing back in.
Way-3: Run Windows Update troubleshooter
Windows Update troubleshooter is a built-in Fixit tool to repair any problem coming across when you attempt to update the System. Errors and glitches are pretty connected with updating in Windows 10 or 11 as Microsoft is very keen to regularly distribute installer files. To adapt to the changes and enjoy inclusive privileges, Windows updating is the only way but a lot of people used to be deprived of it. In most cases, the glitches had no clue to resolve, and then Microsoft introduced this utility as a problem solver.
Windows 11
- Press – Windows + I.
- From the right pane of Settings, select – Troubleshoot.
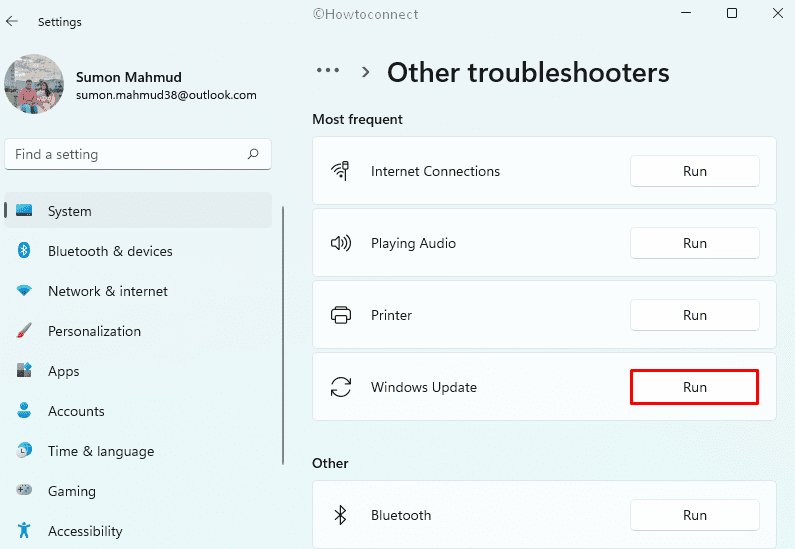
- Click – Other troubleshooters.
- Hit – Run button present by the side of Windows update.

- Now, the utility will start detecting abnormalities.
- If the utility offers a fix, click – Apply this fix. Or else, do what the tool suggests.
- Close troubleshooter and then reboot Windows.
Windows 10
- Open Windows Settings.
- Choose – Update & Security.
- Select – Troubleshoot.
- Shift to the right-hand side.
- Click – Additional troubleshooters.
- After shifting to the next page, select – Windows update.
- From the expanded tray, click – Run the troubleshooter.
- Comply with on-screen guidelines to complete the process.
Way-4: Reset update components
Windows Update is really very crucial in the system to keep it up to date and protected with improved security features. However, the process often runs into trouble and shows error codes when users attempt to carry out updating. Behind this problem, corrupted system components play a great role and the issue will persist until the components are fixed. Luckily, we can always reset Windows Update components and give the process the required momentum.
Once you perform this task, MSI installer, BITS, Cryptographic, and Windows Update services will be reset to default. Simultaneously, the system will rename two very important files namely SoftwareDistribution and Catroot2. At the time of Updating, the files temporarily store the update-related special components in them. To fix Windows Update Error 80246013, follow the underneath instructions and carry out the reset –
- Press – Windows + S.
- Type – cmd.
- Choose – Run as administrator.
- When User Account Control prompts, click – Yes.
- In the elevated Command Prompt, copy-paste the following lines one at a time and hit Enter after each –
net stop bit

net stop wuauserv

net stop appidsvc

net stop cryptsvc

Del "%ALLUSERSPROFILE%\Application Data\Microsoft\Network\Downloader\*.*"

rmdir %systemroot%\SoftwareDistribution /S /Q

rmdir %systemroot%\system32\catroot2 /S /Q

regsvr32.exe /s atl.dll

regsvr32.exe /s urlmon.dll

regsvr32.exe /s mshtml.dll

netsh winsock reset

netsh winsock reset proxy

net start bits

net start wuauserv

net start appidsvc

net start cryptsvc
- Close Command Prompt.
- Restart Windows PC.
Way-5: Disable Windows Defender Firewall
Windows Defender Firewall is a much-needed Microsoft application that filters the incoming data from the internet and significantly blocks the potentially harmful ones. For ensuring the utmost security of the system, there is no alternative to keeping the application enabled and running.
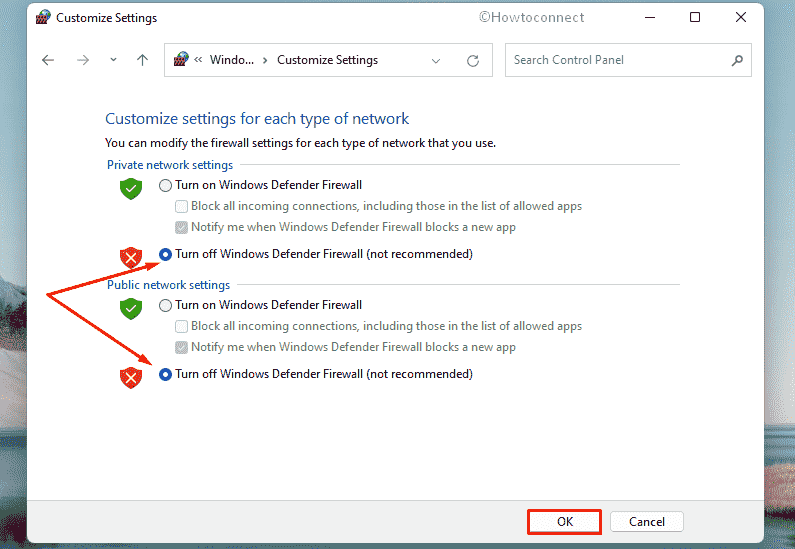
The program works so perfectly that, it may often treat the Windows installer files as suspicious and filters them too. Hence, the updating process ends in trouble and Windows Update Error 80246013 is generated. To rescue the problem, you can temporarily disable Windows Firewall and re-enable it once the updating is successful. To do this, follow the steps –
- Press – Windows + R.
- In the command box, insert – control firewall.cpl.
- Click – OK.
- Select – Turn Windows Defender Firewall on or off.
- Check the radio button present before Turn off Windows Defender Firewall for both Private and Public network settings.
- Finally, click – OK.

Way-6: Uninstall third-party antivirus
You cannot really think of leaving malware out of consideration nowadays as these bugs are always looking for a chance to fuse the security interface. From the internet, spyware, worms, rootkits and trojans can easily break the security system unless a powerful anti-virus is active 24/7. Windows security is a powerful tool for this purpose which is really the best of all times and it’s a default program.
Sometimes, users intend to install third-party antivirus programs for additional security and that doesn’t really help. Instead, they block installer files misinterpreting them as suspicious and Update Error 80246013 in Windows 10 and 11 occurs. Again, having similar programs in Windows, there is a possibility of dangerous software conflict as well. Hence, uninstall the third-party antivirus suits to resolve unexpected issue.
- Open Run Dialog.
- In the command box, type – appwiz.cpl.
- Click – OK.
- From the appearing window, look for the installed third-party antimalware program.
- Once found, right-click the same and choose – Uninstall.
- To delete the app completely, follow on-screen instructions properly.
- After deletion, reboot Windows to make the changes effective.
Way-7: Tweak registry
Some glitches in the Windows Update Download path can be another reason to have error 80246013 in Windows 10 or 11. To fix this, tweaking Windows Registry is required and you may have to delete some keys. Thus, the path will be cleaned up and no more issues will be coming in when proceeding for an update.
Tweaking Windows Registry is a professional task and any mistake can lead to permanent damage to the system. Therefore, make a proper backup of the necessary things before you proceed with this workaround, it is better to ask for help from professionals. Follow the below instructions properly to delete Registry keys –
- Press – Windows + S.
- In Windows search, type – regedit.
- Hit – Enter.
- For appearing User Account Control, click – Yes.
- When Registry Editor appears, navigate to the following directory –
HKEY_LOCAL_MACHINE\SOFTWARE\Policies\Microsoft\Windows\WindowsUpdate- Right-click WUServer DWORD key and choose – Delete.
- In the same way, delete WIStatusServer key too.
- After doing so, restart Windows.
Methods list:
Way-1: Restart update service
Way-2: Repair corrupted system files
Way-3: Run dedicated troubleshooter
Way-4: Reset update components
Way-5: Disable Windows Defender Firewall
Way-6: Uninstall third-party antivirus
Way-7: Tweak registry
That’s all!!!
