This article has some striking solutions to MSRPC_STATE_VIOLATION in Windows 10. The notorious BSOD results in irregular freezing of desktop along with a repeated automatic reboot of the affected device. Moreover, it occurs usually at the time of starting a program or running in real-time. With a bug check value of 0x00000112, it indicates the initialization of bug by Msrpc.sys.
MSRPC STATE VIOLATION mostly appears due to defective and outdated drivers. Furthermore, missing system resources and DLL files due to the collision of different programs, malware or virus attack, incorrect memory allocation, dreadful Windows image files are responsible as well. In addition, poor areas in RAM, Hard Disk running in low disk space or using an additional disk drive might be the culprit too. People found to be suffering a lot with this most talked error in Windows 10. Well, let’s not just look for causes, rather resolve it using necessary workarounds. The following section contains a few of the most effective resolutions owing to fix the issue. Explore the below-given list of resources and navigate to the respective methods quickly –
Now get at the methods in detail –
MSRPC_STATE_VIOLATION BSOD Error Windows 10 Solutions
Here is how to fix MSRPC_STATE_VIOLATION BSOD Error Windows 10 –
1] Never let the Windows to Reboot by itself
After getting MSRPC_STATE_VIOLATION error, Windows 10 goes into Automatic Restart. As a consequence, you can’t really work smoothly on the computer. So you need to stop the continuous rebooting first.
Step-1: Close the ongoing process and press Win+D to reach the Desktop area.
Step-2: Perform a right-click on This PC icon and choose Properties from the options list.
Step-3: System window will open up from the Control Panel immediately. Now, from this appearing window, choose Advanced system settings lying on the left pane.
Step-4: When System properties wizard opens, switch into the Advanced tab.
Step-5: Go to the Startup and Recovery segment and hit Settings.
Step-6: From the new popup, navigate to System failure area. Uncheck the box beside Automatically restart.
Step-7: Select Ok from the bottom of the window and save the changes into the system.
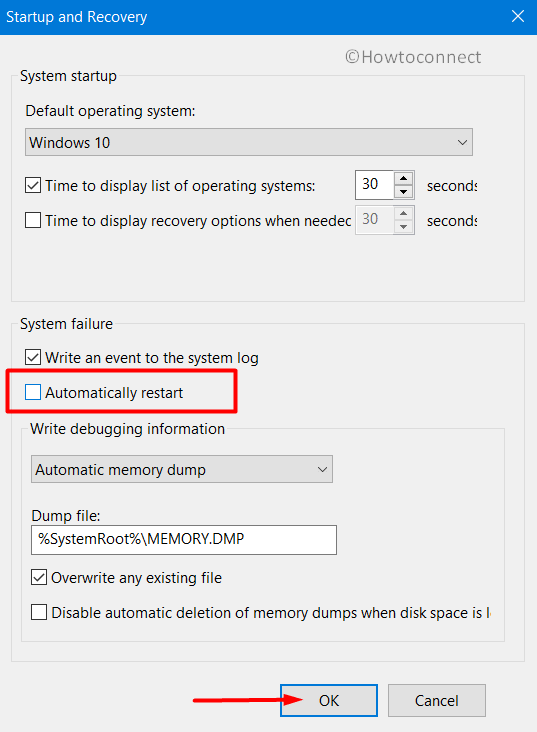
When all these modifications are saved, the Windows will not reboot anytime automatically. This means you can have time to sort out the problems and apply resolutions accordingly.
2] Safe Boot Windows 10 to fix MSRPC_STATE_VIOLATION
Performing a Safe Boot to the device means allowing it to start with loading only basic applications and services. In most cases, this action heals the most. The resolution is prevalent from a very long time in case of all critical issues. To perform the task, the below steps will be helpful –
- Invoke Run pressing Win+R keys together.
- When the dialog opens, type msconfig in the blank text area.
- Press the Enter key to let open the System Configuration window.
- When the wizard arrives on display, shift to its Boot tab. Straightway move down to the second half named as Boot options.
- Here, check the box before Safe boot to make grayed out options active.
- Select the radio button before Minimal to continue.
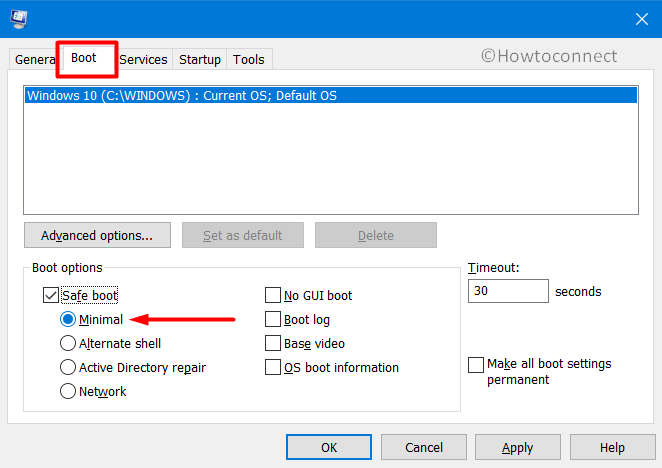
- Lastly, hit the Apply button first and then OK to save these modifications.
- Close the wizard and reboot the device.
- When it completes the cycle of the restart, the startup screen will appear.
- At the time when Windows is booting, keep pressing the F8 key until the succeeding page comes in.
- Now, choose the Safe Boot located in the “Advanced boot options” section.
- Enter into the Safe Mode afterward.
3] Execute Blue Screen Troubleshooter
We have noticed, Windows 10 is well renowned for its versatile operations. After BSOD issues start spreading all over, Microsoft introduced a fix in the Operating System. This is Windows Blue Screen Troubleshooter which can potentially resolve all Stop errors. This is a default tool and will only run in Windows 10 Fall Creators Update version and above. If you are using an updated version of this OS, follow the below guidelines to use this tool –
- Press the Windows key and open the Start menu first.
- Hit the gear icon and allow the opening of the built-in Settings app.
- Once the UI loads completely, move ahead to Update & Security and do a click on it.
- From this page, select Troubleshoot lying in the left-hand side.
- Switch to the other side, locate and select Blue Screen option.
- Hit Run the Troubleshooter button.
Now, this utility will start detecting for BSOD issues in the system and fix automatically. Once the process ends, there should not be any MSRPC_STATE_VIOLATION BSOD in the system.
4] Fix MSRPC_STATE_VIOLATION by installing new patches
There are major patches and releasing of cumulative updates quite regularly in Windows. The purpose is to introduce the latest features and addressing several bugs and problems. To enjoy these surprises, we need to install those patches once available. In the same way, you are also updating the OS. Since an outdated one might indulge in BSOD errors like MSRPC_STATE_VIOLATION, we need to update it. Move through below guidelines –
Important- Make sure the device is connected with an internet connection. Try to manage a faster network to lessen the time consumption. While using Mobile data for this purpose, disable the Metered Connection first.
- Open the Windows Settings app as we have done above.
- Once it arrives in the display, move directly to Update & Security tile and click it.
- When shifted to the next page, on the right, you can view the dialog “You’re up to date”. Don’t bother and directly hit on the button Check for updates.
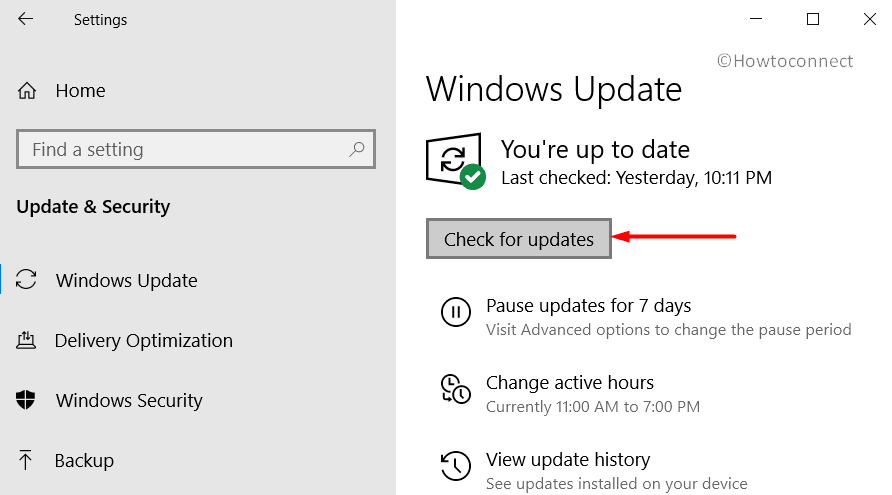
- Upon finishing the searching, the list of pending items will be available here.
- Do a click on Download button to grab the files.
- When the process ends, the installation will start automatically.
- You might be asked to reboot the device more than once. Do the task to update the Operating System and resolve MSRPC STATE VIOLATION BSOD.
5] Update Outdated Drivers
Every time we have come across any BSOD error, the main reason comes up is a faulty or outdated device driver. We often ignore them and as a result, MSRPC_STATE_VIOLATION BSOD shows up quite frequently in the system. Updating is not a big deal when you approach through the Device Manager. In the console, all the outdated drivers are shown in yellow indication. To complete the task, follow the below instructions-
- Press Windows and S hotkeys and invoke the Taskbar search on display.
- Write “device manager” in the given search box.
- Select it from appearing result and in the console, look for an exclamation mark on any device.
- If found, expand the same by doing a click on it.
- Upon expansion, perform a right click on its drivers one by one.
- Select the Update driver option.
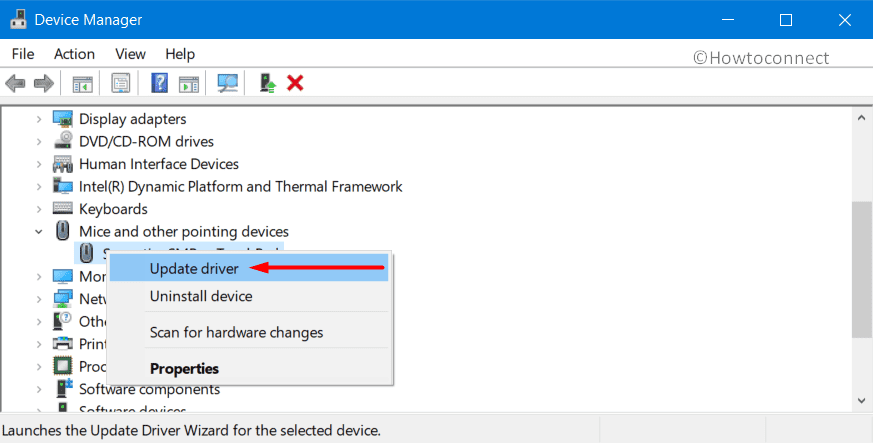
- In a moment, the process will begin. Follow the on-screen guidelines to accomplish the task completely.
6] Unplug the additional Hard Drive and reconnect when MSRPC_STATE_VIOLATION BSOD resolves
Some users have experienced the MSRPC_STATE_VIOLATION BSOD just after connecting an External Hard Disk. Well, the resolution is pretty simple as well. Only disconnecting will resolve the existing issue. Once the error resolves, you can reconnect the External HDD in the below process –
- Firstly, unplug the External Hard Drive from PC and place it in a safe location.
- Now, Restart Windows 10 PC.
- After performing the cycle of the restart, check for the BSOD error in your system.
- If it resolves, start connecting the external hard drive again.
- Upon finishing the task, do visit to its manufacturer’s website using the default browser.
- Download and install the up to date driver to use safely.
7] Recover DLL files and fix up Corrupted resources with the help of System File Checker
There are many reasons for which system resources might have corruption. Sometimes it might be virus infection or collision from similar programs. Whenever that happens, MSRPC_STATE_VIOLATION BSOD shows up. System File Checker utility can be much helpful to rectify those corruptions and recover including DLL files. The guidelines are as follows –
- Call up the Taskbar Search using the above instruction.
- When it opens, type cmd in the empty text area.
- Once Command Prompt arrives in the result, do a right click on it.
- Select “Run as Administrator: option once the menu appears.
- Choose Yes when UAC asks for permission.
- On the black window next, type
sfc /scannowcommand and Hit Enter key from the keyboard. - System File Checker once activated will detect the issues in files and also fix them automatically.
- This process may take little longer so wait patiently until finishes.
- Restart Windows when it is over and prior to signing back in, check if the error has resolved already.
8] Use Windows Security to dismiss malware
Day by day we are rushing toward a Tech developed world. The more we are developing ourselves, the security system is becoming vulnerable. The only reason behind this is the malware infection. We can be easy prey by visiting a suspicious website or clicking a link coming in spam. Well, Microsoft was kind enough to put Windows Security which is the best in the business. Here is the way to proceed –
- Go to the right most corner of the Taskbar area and do a click on Up arrow indicating Show hidden icons.
- When the options spread up, select the shield icon located here.
- Once the Windows Security app launches, select Virus & threat protection on the left pane.
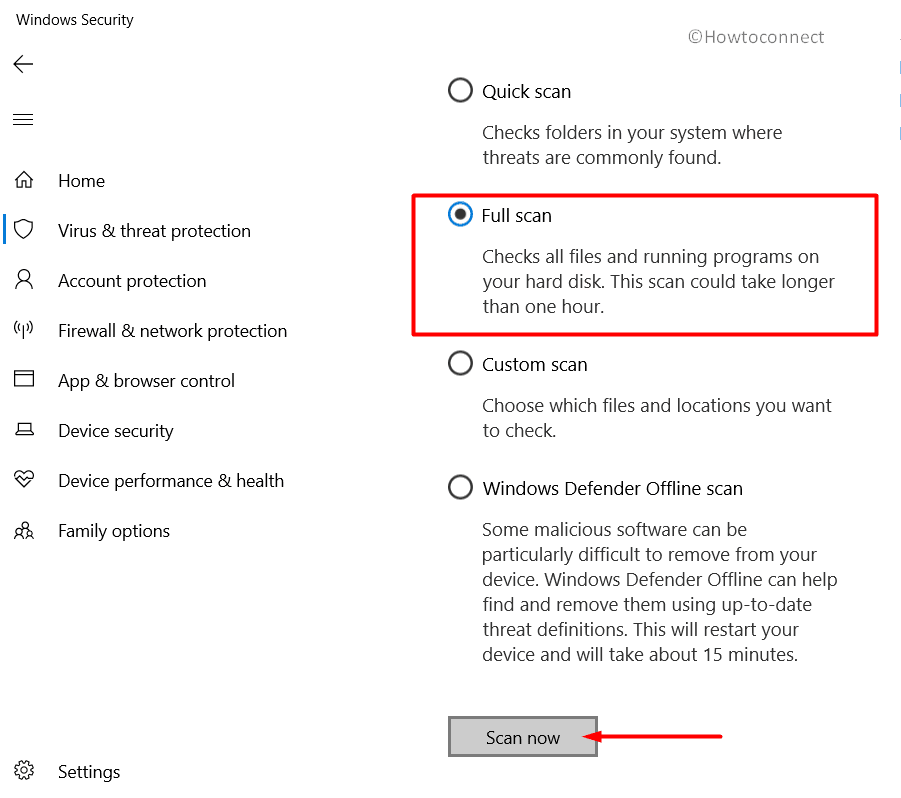
- Click on Scan options link on the right-hand side.
- When all the methods are displayed, hit the radio button before Full scan.
- Moving ahead, select Scan now button to start the detection process.
- After the detection gets over, results will be appearing in front. If you see any potential malware, click the Clean Threat option to get rid of it.
- When the succeeding page loads fully, there will be three options available for you.
- Hit on Remove first and then Start actions to allow app for killing these viruses.
9] Say bye to all the Memory Problems
Memory issues include incorrect allocation of it in the disk and evolution of problematic areas in the Random Access Memory. These actually make the system very much prone to get affected with MSRPC_STATE_VIOLATION BSOD. The one shot solution for these troubles is to take help of Windows Memory Diagnostic. To perform the diagnosis, you need to move with below proceedings –
For the initialization of task, let’s save and close if you have any ongoing processes first.
- Launch Taskbar Search by pressing Win+S keys together.
- Type “Memory” in the blank text field.
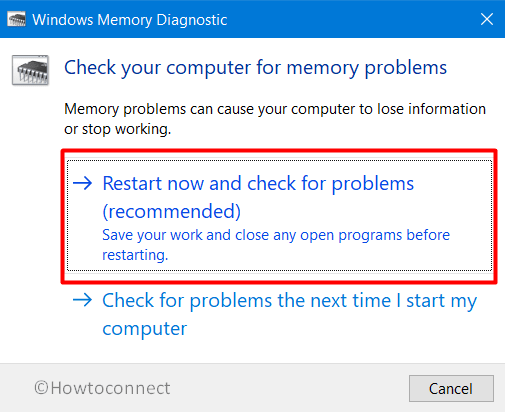
- When Windows Memory Diagnostic appears in the result, select the app to open.
- In a blink of time, a new popup will show up in the display.
- From the wizard, make a click on “Restart now and check for problems (recommended)” option (see snapshot).
- The device will initially reboot and when it returns to desktop, a blue screen will show up detecting memory problems.
- The machine will reboot automatically when the progress reaches 100%.
- Once sign next, you can see the result of the last diagnosis carried out in Notification area located in the system tray.
10] Return back to the previous state to resolve MSRPC_STATE_VIOLATION BSOD
Whenever you make some changes on the computer, this will tweak the Windows Registry. If something is done wrong while installing or uninstalling something, the registry will be little unstable. The result is MSRPC STATE VIOLATION BSOD in the system. The easiest way to get rid of the error is to revert all these changes and this is possible through System Restore.
We will definitely need a previously created restore point for carrying out this workaround. If you lack that, leave this here. Luckily if you have one, follow the below guidelines –
- Take the pointer to Start menu and make a right click on it.
- Select the Run option to allow opening the wizard.
- Type rstrui in the null text field of the dialog.
- Press Enter key now and System Restore will arrive in a second.
- Hit Next button from appearing wizard to move ahead.
- On the consequent page, choose option namely “Show more restore points to see all available points”.
- Select the latest created one and select the Next button.
- After the following window loads, choose Finish to Start the process.
11] Uninstall the similar Programs from System
Whenever we have some similar applications in the system, they often cause a collision in between. As a result, many necessary data are deleted from the system. As for missing resources, MSRPC_STATE_VIOLATION BSOD evolves. In no way, you can stop the consequence unless you remove one of these. To uninstall an app, follow the below proceedings-
- Launch the Windows Settings app first pressing Win+I hotkeys.
- Head to Apps section and eventually perform a click on the tile.
- When the succeeding page comes up, wait for the list of apps to load here.
- Reach out to the programs colliding with each other in the list.
- When moved to, perform a click on each.
- Click Uninstall button from the extended pane.
- If UAC prompts for consent, hit Yes to follow through.
- Follow on-screen guidelines appearing to completely remove it from the system.
- Reboot the device and after sign back in, perform a check for MSRPC STATE VIOLATION error in the system.
- If nothing comes ahead, proceed for downloading and install the applications again if required.
12] Uninstall abnormally terminated Windows Update Files
Cumulative update patches during installing through Windows Settings have a very thin possibility to terminate at midway. If such a thing happens, files will be corrupted and also call up MSRPC_STATE_VIOLATION BSOD immediately. To avoid the issue, we need to delete these files immediately. The simple way to do this task is as follows –
- Launch the Settings app and head to Update & Security from the app UI.
- By default, Windows Update settings page will come into view.
- Here, do a click on the View update history link.
- Upon opening the succeeding window, click Uninstall updates link.
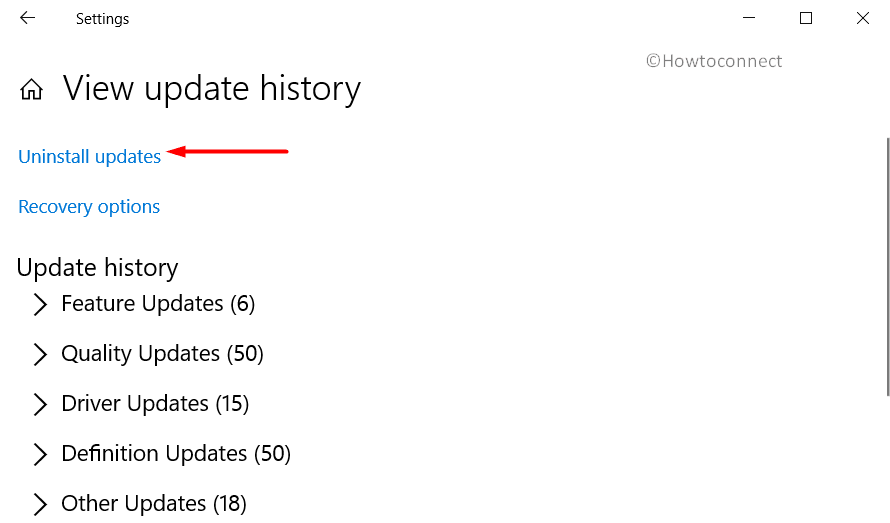
- This action will open up the Installed Updates page from Control Panel.
- In the recent window, reach out to the recently received update patch.
- Make a right click on it and select the Uninstall option.
- Follow the on-screen guidelines until you have completely removed that.
13] Delete all unnecessary Junk files to Fix MSRPC_STATE_VIOLATION
So many unnecessary files are produced every day while executing tasks in Windows. They are usually stored in the disk space. Therefore, when they keep on accumulating, occupy huge space in it. In the meantime, the Disk Space runs low which eventually leads into sluggish performance. There is a chance of causing MSRPC_STATE_VIOLATION BSOD also as a consequence. To delete these files, we can use the Disk Cleanup tool and can also recover some additional space out of a disk. To deploy the tool, instructions are as following –
- Launch Cortana and keep typing cleanmgr with the help of keyboard.
- When the Disk Cleanup desktop app arrives, select it straightaway.
- Immediately, a popup will unroll asking to select a preferable drive. Choose the one which has the OS loaded in it, for example, C: drive.
- The Disk Cleanup utility will start by calculating the amount of space it can recover from the chosen drive.
- In the appearing wizard, come down to the bottom and hit Clean up system files button.
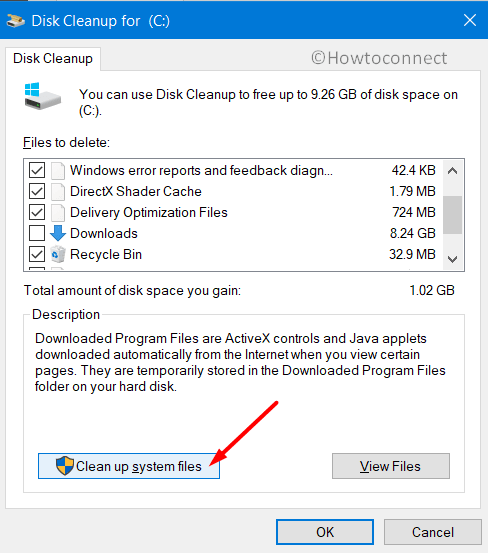
- The small popup will show up once again asking to select the drive. Select the same one.
- When the Disk Cleanup (for C:) opens after calculating space it can retrieve, reach out to Files to delete section and check all boxes except Downloads.
- Now, hit Ok and let the cleanup begin in the system.
Important – Do a check in the Recycle Bin before initiating the erasing process of the temporary files. This will be helpful to avoid losing necessary items unwillingly.
14] Repair defective areas in Hard Disk
Bad sectors in the Hard Disk can form due to using it for a long time. This, in the end, can evolve MSRPC_STATE_VIOLATION BSOD in the system. We can very well fix these areas using Disk Checking utility. To perform the task, move with the below steps –
Step#1: Make a combined press of Ctrl+ Alt+ Del keys to open up new startup page.
Step#2: Select Task Manager from there to launch the app.
Step#3: When in the app area, perform a click on File option located at the top left corner.
Step#4: Select Run a new task from the options.
Step#5: When a dialog shows up, type cmd in the given text box area.
Step#6: On proceeding, check the box against “Create this task with administrative privileges”.
Step#7: Press Enter key now and you will be guided to Elevated Command Prompt directly.
Step#8: Being in the black window, type the following command in below format –
chkdsk C: /f /r /x
Step#9: Now, hit Enter key and start the process.
This might take quite a long time and once finished checking, the worse segments will be automatically fixed.
15] Don’t keep a Third party Anti-virus program to stay-over in the system
We all know that Windows Security offers the best deal in malware issues. All the similar third applications are in a sense unnecessary. Furthermore, there is always a sharp chance of getting MSRPC_STATE_VIOLATION BSOD when you use them. Therefore, let’s uninstall them before it’s too late. Here is how to remove such an application –
- Invoke Run dialog by pressing “Win+R” keys.
- Type appwiz.cpl in the text box provided.
- When you hit the Enter key, Programs and Features will open by default from Control Panel.
- Move out to third-party antivirus program in the appearing list.
- Select the app first from there.
- Hit Uninstall option from the top ribbon.
- If User Account Control prompts, select Yes to give consent.
- Continue moving with the on-screen guidelines until the program uninstalls finally.
16] Run DISM Tool and resolve defective Windows Image Files
If we have the defective Windows image files somehow in the system, BSOD error will be also eminent. To rectify these files, “Deployment Image Servicing and Management” (DISM) tool comes handy. Let’s deploy the tool using the below procedure –
- Get access to Elevated Command Prompt using any of the guidelines discussed before.
- From the black window, type the command as below at the base of winking cursor-
DISM.exe /Online /Cleanup-image /Restorehealth
- Press Enter key and the tool will start taking actions against defective image files.
- The process is a lengthy one and consumes quite a long time. Wait patiently until the process finishes.
- When it ends normally, reboot Windows to make changes effective.
As you have come to this point, we hope that you have successfully resolved MSRPC_STATE_VIOLATION BSOD in Windows 10. It’s unfortunate and frustrating if you are failed to do so. In that case, we suggest you the last resolution we have. You can try performing a complete installation of Windows 10. Before moving to perform the task, consider most to save a backup for all the necessary files. In the case of being nervous, ask help from professionals. Thus there will not be much of a risk of problems evolving later on.
Methods:
1] Never let the Windows to Reboot by itself
2] Safe Boot Windows 10
3] Execute Blue Screen Troubleshooter
4] Install new patches
5] Update Outdated Drivers
6] Unplug the additional Hard Drive and reconnect
7] Fix up Corrupted resources with the help of System File Checker
8] Use Windows Security to dismiss malware
9] Say bye to all the Memory Problems
10] Return back to the previous state
11] Uninstall the similar Programs from System
12] Uninstall abnormally terminated Windows Update Files
13] Delete all unnecessary Junk files
14] Repair defective areas in Hard Disk
15] Don’t keep a Third party Anti-virus program to stay-over in the system
16] Run DISM Tool and resolve defective Windows Image Files
That’s all!!
