Do you know that Windows 10 OS offers you an option to Set Time to Turn off Screen after Slideshow has Played through Personalization category? Once all the photographs are played, you can choose the time to turn off the PC screen. The OS offers you four options to manage this behavior. You may also like to Set Backgrounds Wallpapers HD Images as Lock Screen in Windows 10.
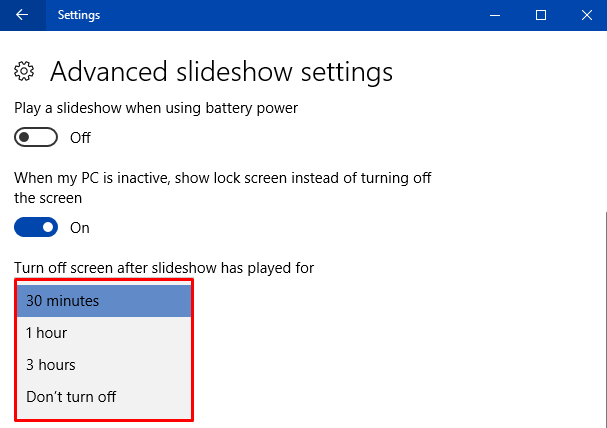
You can choose 30 minutes, 1 hour or 3 hours, depending upon your requirement. However, if you don’t prefer to turn off the screen after all the images are played, you can choose the fourth option Don’t turn off. Also, follow How to Show Slideshow Images from Camera Roll in Windows 10. There are two ways using which you can manage this specific screen and slideshow setting and let us explore them one by one.
Table of Contents
Set Time to Turn off Screen after Slideshow has Played in Windows 10
1. Through Settings Application
Step 1 – Open Settings application and to do so, press Windows-I keys jointly. In addition, you can also click Settings in the WinX menu.
Step 2 – Out of all the categories of the program, click Personalization.
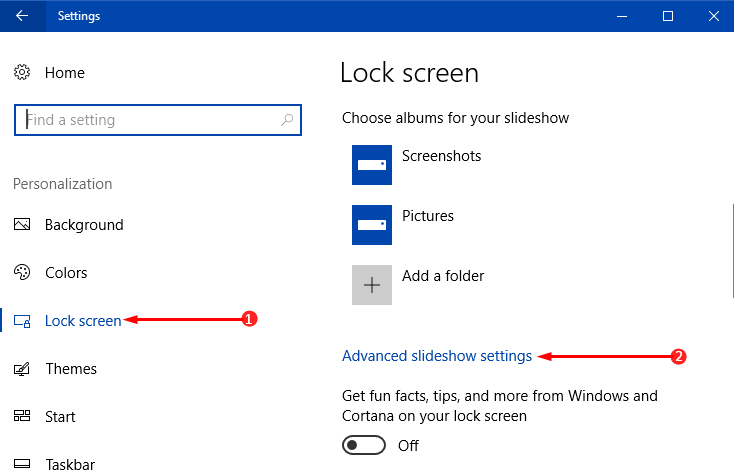
Step 3 – Select Lock Screen section on the left sidebar of the next page. Move to the other pane, then locate and click Advanced slideshow settings.

Noteworthy is to choose Slideshow for Lock Screen background to perform Step 3.
Step 4 – The above step opens up Advanced slideshow settings page. Moving on, locate the setting namely “Turn off screen after slideshow has played for“.

Step 5 – Click its drop down and it brings down 4 options to set time. So, choose the preferred time as per need. If you go ahead with Don’t turn off, then even after finishing the slideshow of all the pictures, the screen will remain intact and will not go off.
2. Registry Editor
Step 1 – First of all, launch Registry Editor and for this, type regedit on Cortana text field and click the same that shows up as the result.
Explore more ways to Access Registry Editor in Windows 10.
Step 2 – If computer screen notifies about UAC, select Yes to agree.
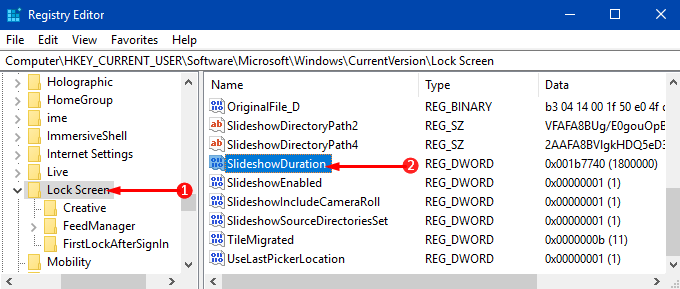
Step 3 – On the left sidebar of Registry window, navigate to the below-given path –
HKEY_CURRENT_USER => Software => Microsoft => Windows => CurrentVersion => Lock Screen
Step 4 – On the opposite panel of Lock Screen, locate and double-click the DWORD SlideshowDuration.

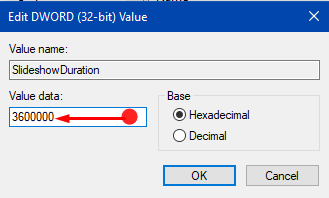
Step 5 – When its edit box comes into view, input any of the below Value data as per preference.
a. 1800000 = 30 minutes
b. 3600000 = 1 hour
c. 10800000 = 3 hours
d. 0 = Don’t turn off

Step 6 – Once you set Time to Turn off Screen after Slideshow has Played in the edit box, click OK.
Conclusion
Hence, using the above given two methods you can pretty much easily Set Time to Turn off Screen after Slideshow has Played in Windows 10 OS. However, the choice is all up to you depending on your need and work. If you are aware of more ways that can customize this specific slideshow timing, share with us.