Procedures to Unset / Set Hide and Read Only Attributes For File, Folder in Windows 10 with steps. – Windows 10 OS provides various security options that you can apply for your files and folders. You can hide the important items or can also assign Read-only option to the files you wish no one to change. When you hide the items, they will not be noticeable in the File Explorer. And when you set Read-only option, no alteration is allowed to the file. See a similar guide on How to Access Hidden Folders with Shell Command in Windows 10.
You will come across a sequence of procedures including steps to Unset / Set Hide and Read Only Attributes For File, Folder on Windows 10 ahead.
Unset / Set Hide and Read Only Attributes For File, Folder on Windows 10
1. Unset / Set Hide Attributes For File, Folder on Windows 10
This latest OS provides you a decent range of ways to manage attributes for files, folders on Windows 10. So, let us explore the methods one by one.
1. Using File Explorer Ribbon
1.1 Hide Files and Folders
Step 1 – Press the key combinations of Win&E altogether and let File Explorer come into view.
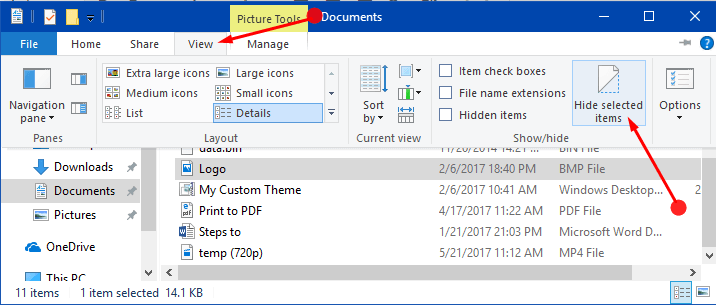
Step 2 – Click View tab on the top and proceed by selecting any file or folder of your choice. After selecting the item, click Hide selected items button that shows up on the File Explorer ribbon.

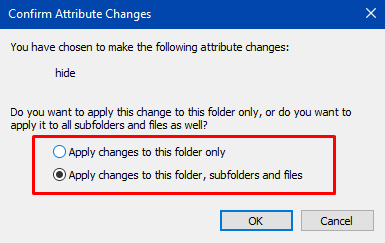
Step 3 – If you have selected a folder in the above step, a small dialog will appear with two options. So, select either of the options between Apply changes to this folder only or Apply changes to this folder, subfolders and files as per preference and finally click OK.
Read How to Customize Folder Options in Windows 10 File Explorer to learn more.

1.2 Unhide Files and Folders
Step 1 – Launch File Explorer by jointly pressing the Win+E keys.
Step 2 – Click View tab on the menu bar and select the checkbox with a name Hidden items. This will make the hidden items show up in the File Explorer as faded.
Step 3 – Moving ahead, choose the files or folders that you wish to display and moreover, click Hide selected items button.
Step 4 – In case you performed the above step for a folder, a pop-up box will provide you two options. The two options will read as Apply changes to this folder only or Apply changes to this folder, subfolders and files, so select the one as per need and click OK.
You may like to read How to Use Invert Selection in File Explorer Windows 10.
2. Via Properties
2.1 Hide Files and Folders
Step 1 – Open File Explorer by directly clicking its icon that exists on the taskbar. Alternatively, press its keyboard shortcut Win+E to launch the same.
Step 2 – Select the files or folders you prefer to hide, then execute a right-click on it and click Properties from the list that appears.
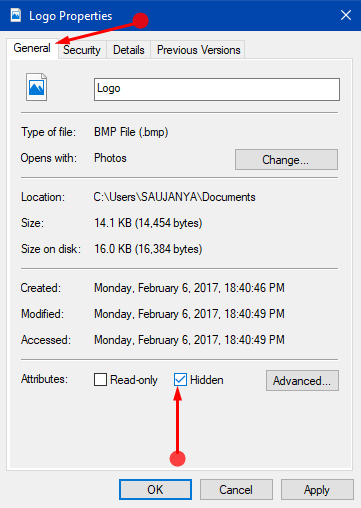
Step 3 – Stay on the General tab and underneath the Attributes section locate one option with a name Hidden. Just select the box against the Hidden option and click OK to make the changes effective.

Step 4 – For those who applied Step 3 for folders will receive a dialog. Pick up either Apply changes to this folder only or Apply changes to this folder, subfolders and files options as per requirement and lastly click OK.
2.2 Unhide Files and Folders
Step 1 – Press Win&E keys and make the File Explorer visible on the PC screen.
Step 2 – When File Explorer becomes noticeable, select the file or folder that you desire to unhide and then perform a right-click on it. This will show few options, click Properties, the last one.
Step 3 – Here also, be in the General tab and make sure to uncheck the option Hidden. You will find this option below the last section Attributes. Click OK after deselecting the Hidden option.
3. Through Command Prompt
3.1 Hide Files
Step 1 – Type cmd on the Cortana and click the result that appears on the topmost part. Moreover, if you have access permissions for the file, directly open an elevated Command Prompt.
Step 2 – Type in the given command and press Enter to execute it.
attrib +h “full path of file with extension”
Note – Replace “full path of file with extension” with the actual path of the file you wish to hide in the File Explorer. Also, ensure to use the path within the quotes.
For example – attrib +h “C:\Users\SAUJANYA\Documents\Logo.bmp”
For reference, read How to Copy Path of a File or Folder in Windows 10.
3.2 Unhide Files
Step 1 – Launch Command Prompt using any of your preferred methods. However, the easy way is to open it from Taskbar search.
Step 2 – Write in the below command and press Enter to implement the changes.
attrib -h “full path of file with extension”
Note – Here also, ensure to substitute the “full path of file with extension” with the original path of the file you are unhiding. Well, enter the path inside the quotes.
3.3 Hide Folders
Step 1 – Again launch Command Prompt to hide the preferred folder. If you have assign permissions to the folder, get access to Command Prompt with admin rights.
Step 2 – Now, type in the command listed below and press Enter to hide the folder.
attrib +h “full path of folder”
Note – Don’t forget to replace “full path of folder” with the original path of the folder you wish to hide. Also, put the path inside the quotes to execute the functionality.
3.4 Unhide Folders
Step 1 – Similarly as the above steps, again open Command Prompt and if access permission is assigned to the folder, launch Command Prompt with admin rights.
Step 2 – To unhide the folder, write in the following command and to implement the change press Enter.
attrib -h “full path of folder”
Note – Remember to replace the “full path of folder” with the actual path where the folder occurs.
4. Hide and Unhide Folders, Subfolders, and Files With Command Prompt
4.1 Hide Folders, Subfolders, and Files
Step 1 – To hide all the contents of the folder, write in the following command-line in the Command Prompt and press Enter to run it.
attrib +h “full path of folder\*” /s /d
Note – Kindly replace the full path of folder with the actual path of the folder whose contents you wish to hide.
4.2 Unhide Folders, Subfolders and Files
Step 1 – Write in the given command in the Command Prompt window and tap Enter to unhide the contents of the folder.
attrib -h “full path of folder\*” /s /d
Note – In this command also, make a point to replace the full path of folder with the original path of it.
2. Set / Unset Read-Only Attributes For File, Folder on Windows 10
1. Through Properties
Set Read-Only Attributes
Step 1 – Altogether press the key combinations of Win&E to open File Explorer.
Step 2 – Locate and choose the folder or file you wish to assign as read-only. Right-click on the selected item and click Properties from the various options that show up.
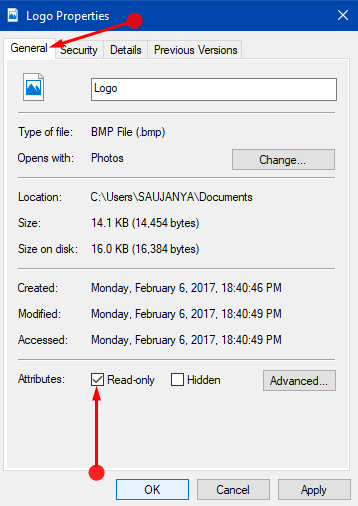
Step 3 – On the General tab of the following dialog, select the checkbox namely Read-only. This option is present in the last section Attributes. So, click OK after choosing Read-only to implement the change.
Pursue 4 Ways to Open File Properties in Windows 10.

Unset Read-Only Attributes
Step 1 – Press Win&E keys or click the File Explorer icon that occurs on the taskbar.
Step 2 – Select the file or folder and moving ahead do a right-click on it. When a menu opens up, click Properties.
Step 3 – On the General tab, deselect the option Read-only and finally, click OK to save the modification.
Also, pursue Search Items From Non indexed Locations in File Explorer Windows 10.
2. Using Command Prompt for Files
Set Read-Only Attributes for Files
Step 1 – Use any of your procedures and open Command Prompt.
Step 2 – Type the below mentioned line of command and press Enter to continue.
attrib +r “full path of file with extension”
Note – Make sure to replace “full path of file with extension” with the actual path of the file you desire to assign as read-only.
Unset Read-Only Attributes for Files
Step 1 – Use the below command line in the Command Prompt and press Enter to unset the Read-only attributes.
attrib -r “full path of file with extension”
Note – Remember to substitute the “full path of file with extension” with the actual one in the File Explorer.
3. All Files in Folder and Subfolders Via Command Prompt
3.1 Set Read-Only Attribute of All Files in Folder and Subfolders
Step 1 – For this also you have to launch Command Prompt and then copy-paste the below command and press Enter to proceed.
attrib +r “full path of folder\*” /s /d
Note – In the above command, ensure to replace full path of folder with the actual path of it.
3.2 Unset Read-Only Attribute of All Files in Folder and Subfolders
Step 1 – In the Command Prompt window, copy/paste the below line of command and to run it press Enter.
attrib -r “full path of folder\*” /s /d
Note – Please make sure to replace full path of folder with the actual one.
Conclusion
Completing either of the above procedures will help you to easily Unset / Set Hide and Read Only Attributes For File, Folder. When you hide or read-only the files, you restrict its usage to the users. If you have more methods for this topic, kindly write them to us.
