Driver updates for Windows 11, including several devices such as camera, Bluetooth, printer, sound, graphics cards, are automatically downloaded and installed via Windows Update. Furthermore, you can manually install drivers in many ways like from Device Manager, by downloading from OEM websites, using PC assistant apps, through cmd command line, and other. Anyway, in the coming part of this post, you will find all the methods to update Drivers in Windows 11.
In most cases, Windows update is the best medium for auto-update drivers in windows 10. Windows check for available updates at the interval of every 22 hours and download and install them silently and automatically. However, you can modify the time period using this post – How to Change Automatic Updates Detection Frequency in Windows 10. Even though manufacturers delay in submitting the updates, still this is one of the best options to update Drivers in Windows.
Update Drivers in Windows 11
Here is how to update Drivers in Windows 11 –
Way-1: Through Windows update
Downloading driver update through Windows update is a better option because the system receives only those packages that are compatible with your configuration. This way, there is minimum chance of occurring anything wrong after installing the driver release. Over the top, the packages you get via Windows update service are already tested, verified, and signed by Microsoft.
- Press – Windows + I.
- On Settings, select – Windows update.
- From the right-hand side pane, click – Check for updates.
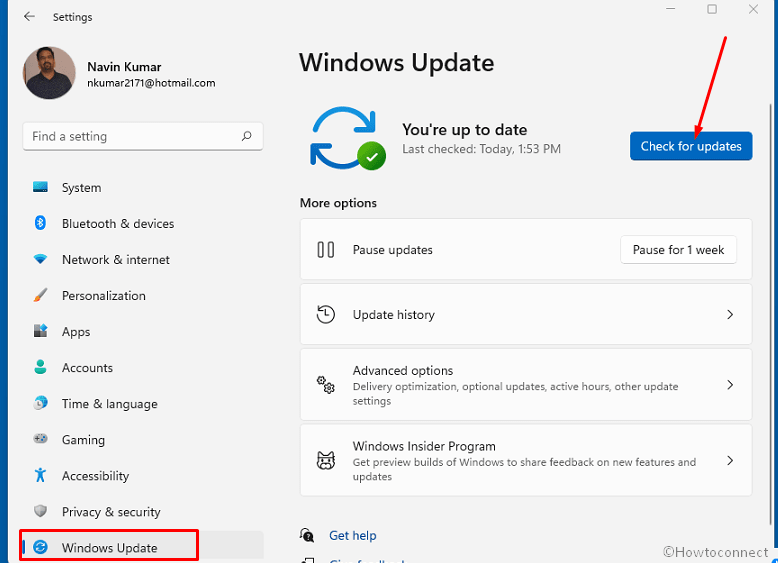
- Now the system will look for pending updates online right away.
- If available, it will be downloaded and installed.
- This will update all drivers windows 11 at a time.
Way-2: Using Device Manager
Like previous versions, the driver management utility aka Device Manager is available in Windows 11 too. This tool lets you manage almost any component’s driver moreover allows updating, uninstalling, as well as rolling back. You can see in this post – How to Uninstall, Disable, Roll Back, Update Device Drivers in Windows 10 / 8 / 7. To search updates over the internet, go through the steps described below:
- Right-click on Start.
- Select – Device Manager.
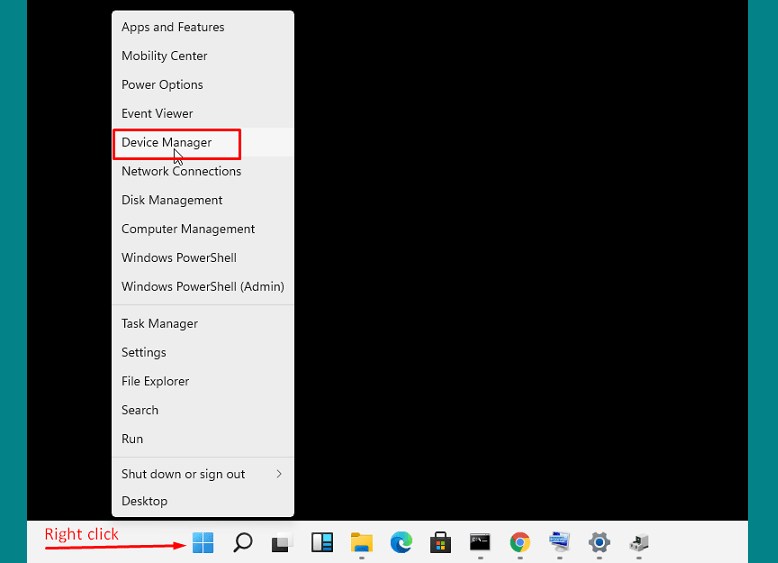
- Look for the device for which you want to update the driver.
- Double-click the device to expand its driver’s list.
- Right-click on the item and select – Update driver. See screenshot as an example –
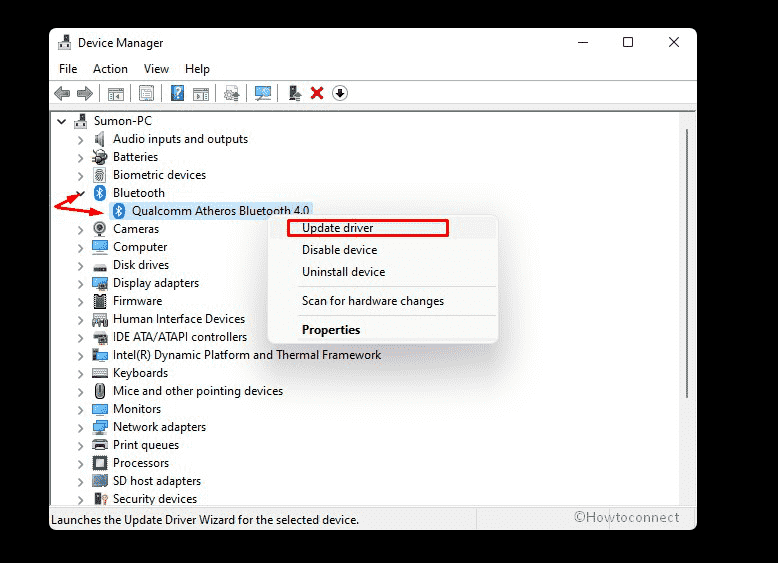
- Click – Search automatically for drivers.
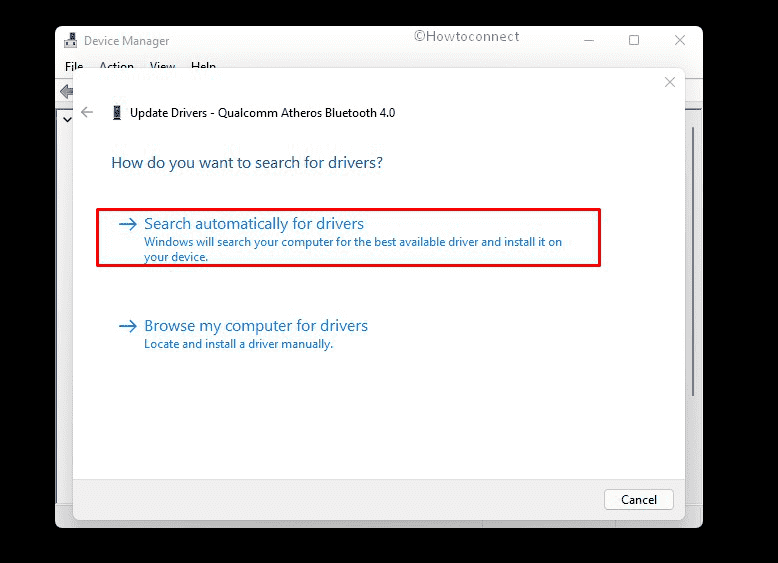
- Suppose the updated version of the driver is available, it’ll be installed automatically and you will receive a confirmation message for the same.
- In case the system shows the best-suited driver is already installed, you will have to try for manual update.
Way-3: Update Drivers in Windows 11 manually From computer
Using Device Manager, you are also able to install updates for a driver from your local disk storage.
- Click the Search icon from the taskbar.
- Type – devmgmt.msc.
- Hit – Enter.
- When Device Manager appears, double-click on the device for which you are going to update.
- Right-click the device and then select – Update driver.
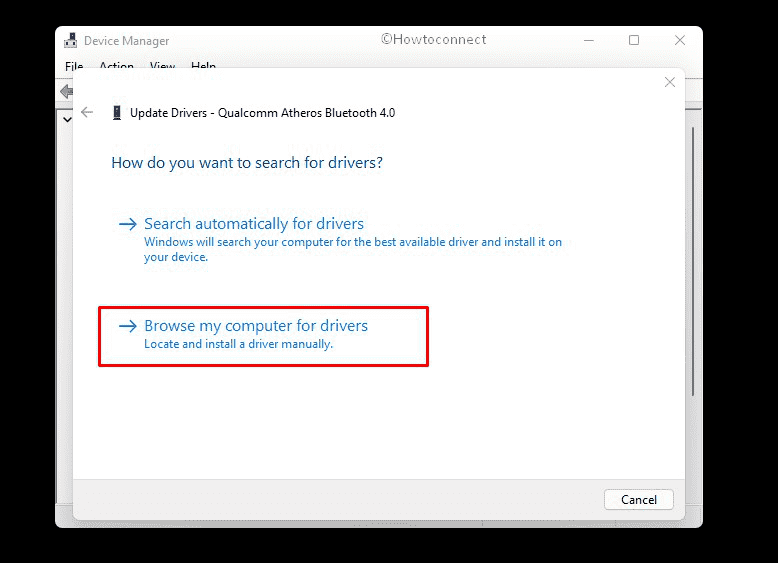
- Choose – Browse my computer for drivers.
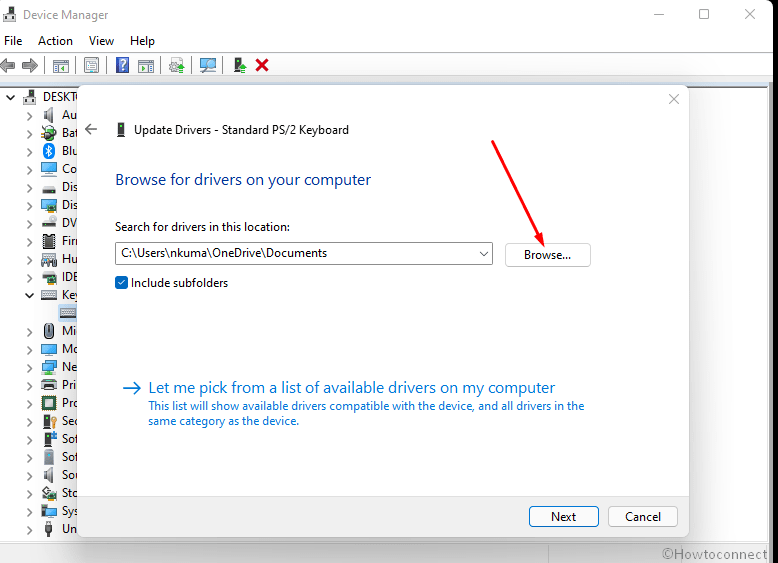
- From the next window, click – Browse.
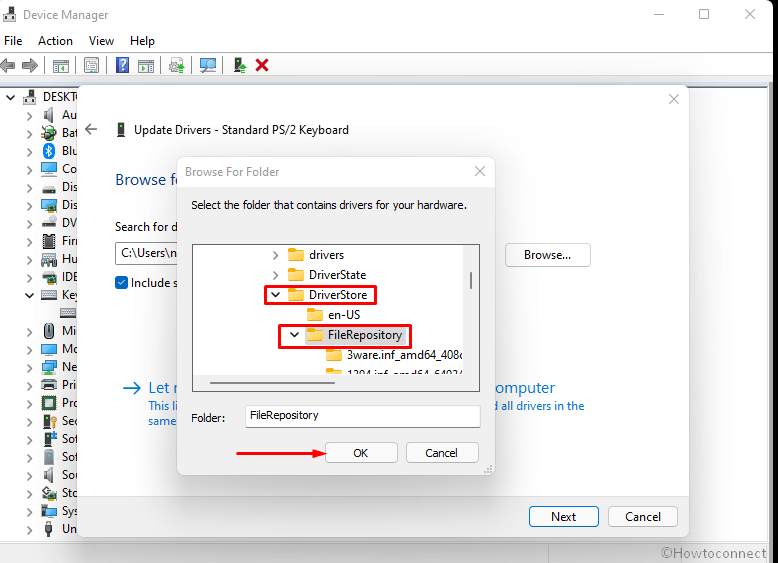
- Look for the folder that is having the necessary driver file. Note that all the drivers are located at Windows\System32\DriverStore\FileRepository in Windows 11. You can clean it through – How to Clean up DriverStore FileRepository in Windows 10.
- Select the same and click – OK.
- After ensuring the location, hit – Next from the bottom.
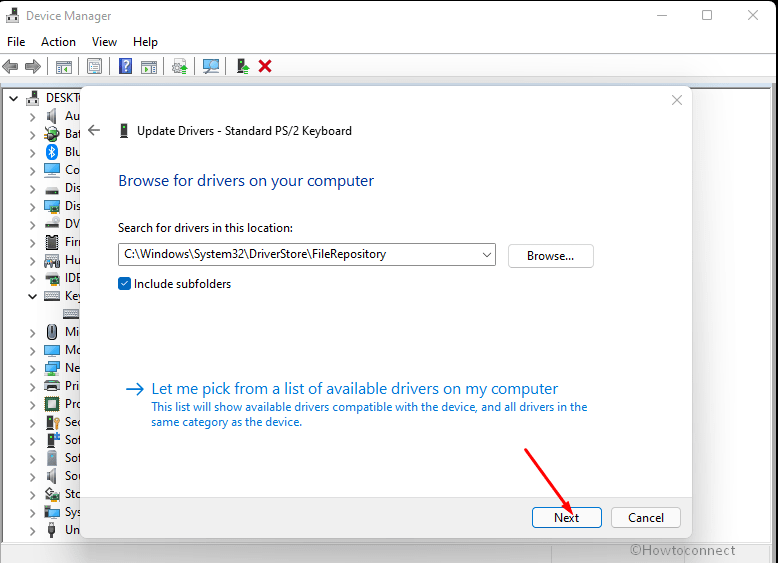
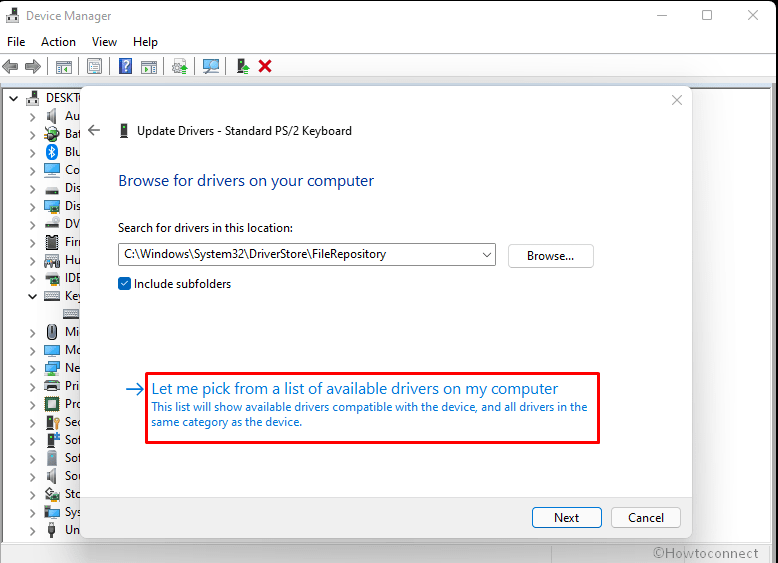
- Alternatively, you can also select – Let me pick from a list of available drivers on my computer. This option allows to manually install drivers in Windows 11.
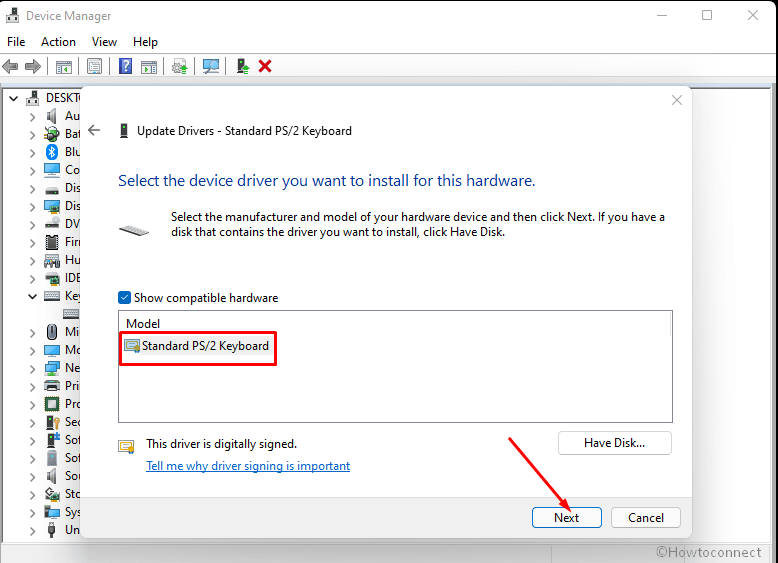
- On the next, window, check the box for – Show compatible hardware.
- Highlight the model by clicking it.
- Click Next.
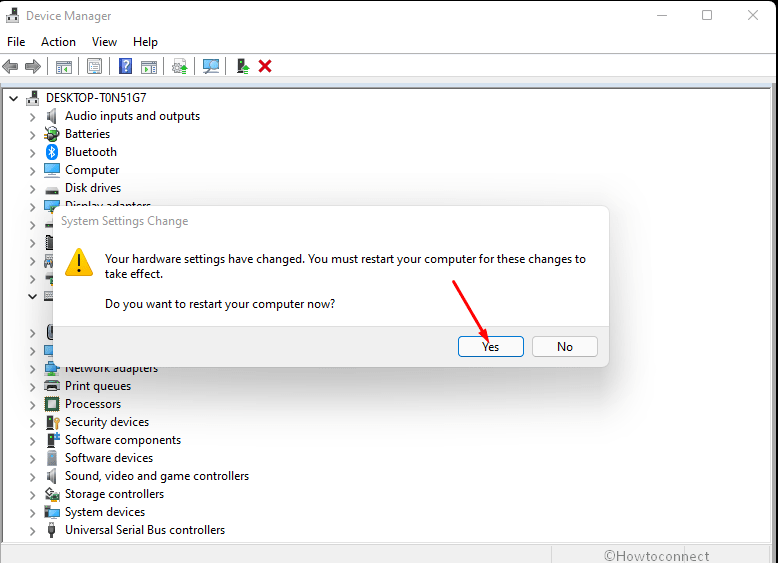
- You will be asked “Do you want to restart your computer now”; click – Yes.
- If you have the driver package using the installation disk then click on Have Disk…
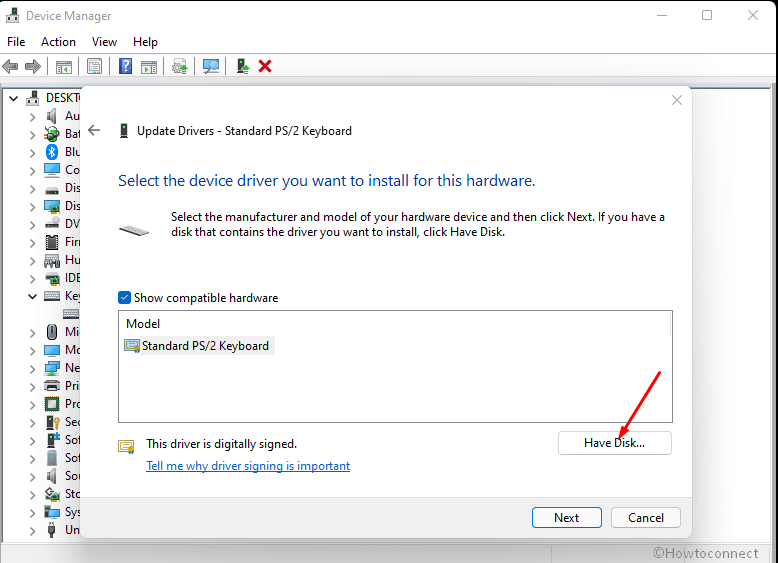
- Insert the disk into your laptop’s port and choose it by browsing.
- Click on – OK.
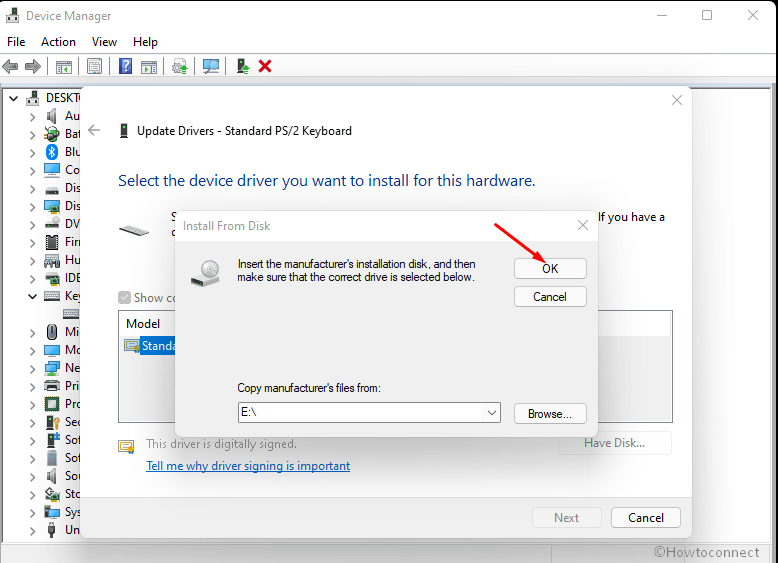
- Returning back to the previous window click – Next.
Way-4: Via OEM Website
First of all, let’s clear that OEM refers to Original Equipment Manufacturer that provides driver updates for a device. While searching for updates over the internet or in local storage, your system may fail to find some drivers that suit your system configuration. In such a case, navigate OEM drivers page and look for the one you want. We have listed all the manufactures’ webpage here, go through the one you need –
| HP | Lenovo | Asus | Dell | Acer |
| LG | Sony | Samsung | Microsoft Surface Support | MSI |
| IBM | Micro Center | Gigabyte | Maingear | Eluktronics |
| iBUYPOWER |
Once you are on the dedicated web page, you may need to enter the model number or product id to find the driver. Reach the most recent version of software relevant to your adapter by following the onscreen guidelines and download. After that, visit the directory where downloaded driver files are saved. Look for the executable file (.exe) and double-click the same to initiate the installing process and pursue the steps coming on the screen.
Way-5: Turn on automatic driver updates using Device Installation Settings
Windows 11 provides a setting that will allow the system to automatically download some of the specific drivers. When you enable this the system will automatically go through OEM drivers and install if there is any update. Follow the steps –
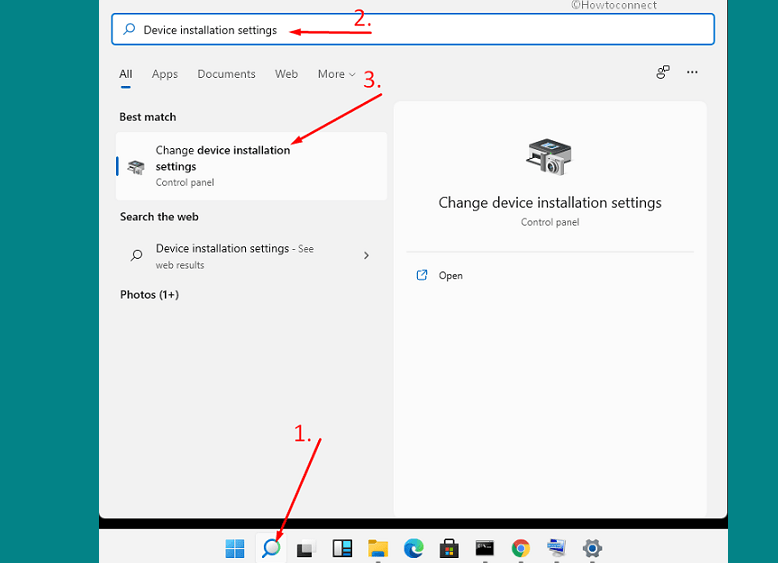
- Press – Windows + S.
- Type – Device installation settings.
- Press – Enter.
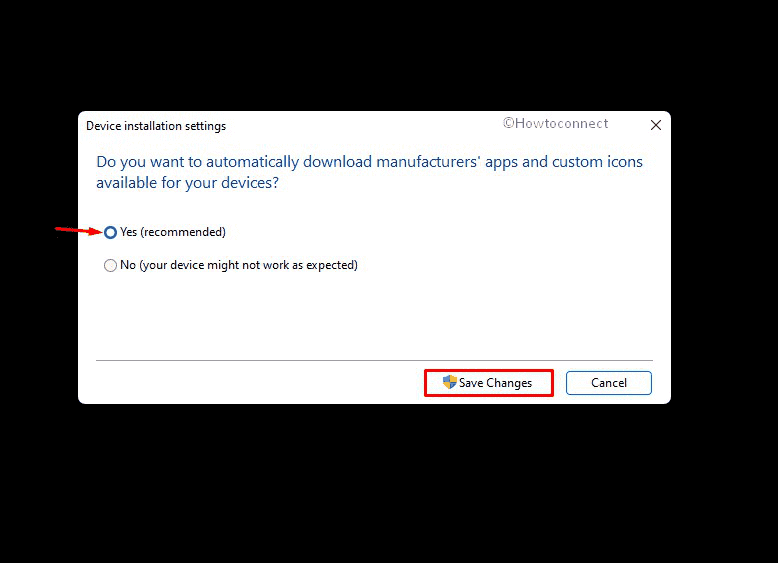
- When a wizard prompts, check the option – Yes (recommended).
- Click – Save Changes.
- Now, if you want to install the driver updates at this time then press Win+I.
- Select – Update & Security.
- Click – Check for updates.
- The system will scan for any pending updates including OEM drivers.
- Once found, they will be automatically downloaded and installed.
- And from now onwards, you will receive updates for drivers automatically.
6] Through Optional updates in Settings
Including monthly roll out, Windows also provides optional updates for hardware, peripheral devices, and adapters quite following a schedule. These are not mandatory for your Windows 11 but can help in resolving driver issues.
- Press – Windows + R.
- In the Run command, type – control update.
- Hit – Enter.
- Click – Advanced options.
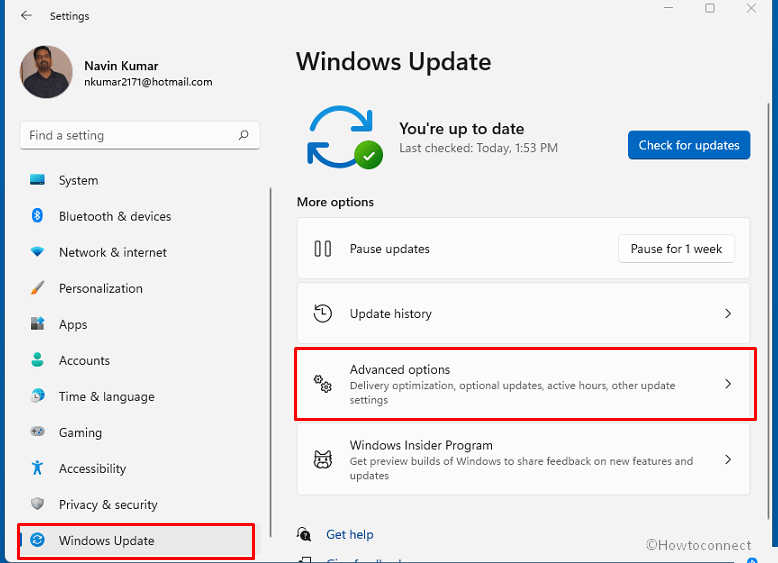
- On the next page, click Optional updates.
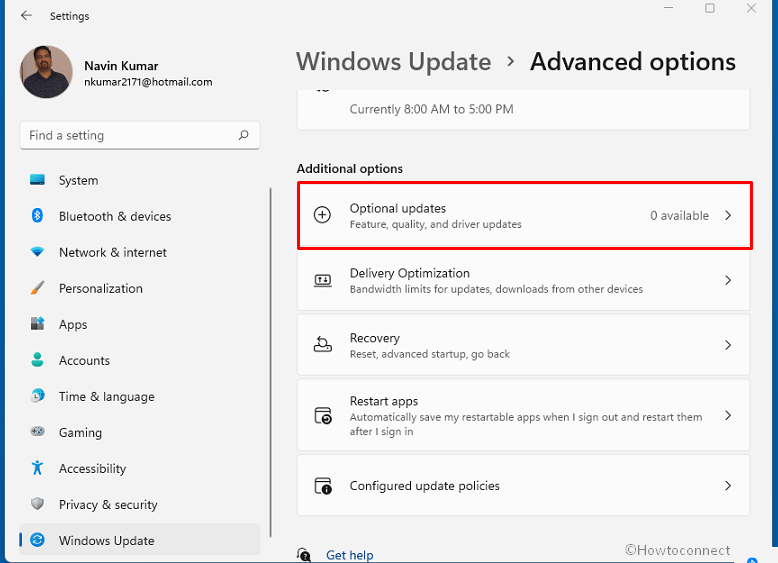
- Click the down arrow present before Driver updates.
- When a list expands, check the box of those devices you want to update.
- Click – Download and install.
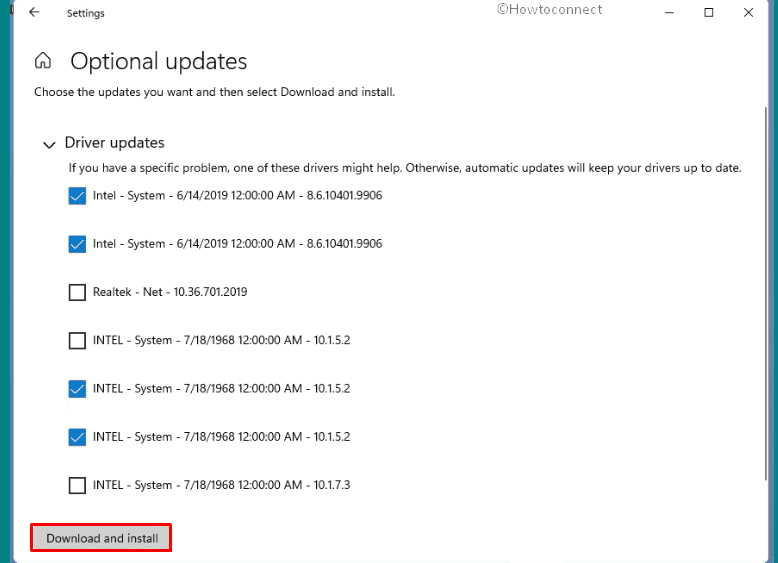
- Follow on-screen instructions to finish installing updates for selected drivers.
7] With OEM utilities
Most of the desktop and laptop manufacturers offer proprietary program that allows to automatically download and install updates for drivers. These apps can be found on the Start menu and are usually listed under the OEM name or the brand name of PC. The program will work as a PC assistant tool and keep track of the update released by the manufacturer for your device model. Some of these send you notification with recommendation to install the driver update.
You don’t need to worry about updating driver after installing the tools such as HP assistant, Lenovo System Update, and other (according to brand). So we will suggest you go to the manufacturer’s website and use these types of programs if they provide. But beware, don’t download any tool from a third-party website as its trustworthiness might be compromised.
When you will use the assistant program, this will update drivers automatically for BIOS, Printer, Camera, Network adapter, Bluetooth, keyboard, monitor, video cards, etc.
8] Using CMD Command line
The way you perform Windows updates through cmd, driver update can be executed similarly using different command lines. Windows 11 has a built-in utility PnPUtil.exe that lets users add a driver package, as well as install and update the same. But this command line doesn’t help in downloading updates over the internet. You will have to download the driver package from OEM website before running the PnPUtil.exe command.
- Press – Windows key.
- Type – cmd.exe. (Alternatively, follow the methods in – 13 Ways to open Command Prompt as administrator in Windows 11)
- Right-click on Command Prompt and choose – Run as administrator.
- Allow User Account Control by clicking – Yes.
- Minimize Command Prompt for a while.
- Press – Windows + E.
- Go to the directory where you have saved the downloaded driver package.
- Right-click on the driver folder and choose – Copy.
- Open a drive and paste the copied file there.
- Bring back Command Prompt.
- Insert the following command line in the black pane –
pnputil.exe -directoryofdriverpackage\drivername.inf
Note – Replace directoryofdriverpackage with the path where you have pasted the package of driver you want to install. Also, replace drivername with the name of the file that will be installed.
- Hit – Enter.
Methods list:
Way-1: Through Windows update
Way-2: Using Device Manager
Way-3: From computer
Way-4: Via OEM website
Way-5: Using Device Installation Settings
Way-6: Through Optional updates
Way-7: With OEM utilities
Way-8: Using CMD Command line
That’s all!!
