Windows 10 April Update 2018 is a storehouse of amazing features but at the same time, it also carries various bugs and problems. One such annoying issue that users are frequently fed up with is the Webcam not working on Windows 10 April 2018 Update.
Microsoft launched their second biggest update recently and decided to give users better control over the version 1803. However, some problems are making obstacle in their smooth experience and Webcam issue is one of them. To secure your privacy, Microsoft actually restricts third-party apps from accessing your webcam. But this limitation is not applicable for Microsoft Store apps. Lists of ways to slove Webcam not working on Windows 10 April 2018 Update 1803
Fix 1: Through Windows Settings
Fix 2: Recover the Previous Version
Fix-3: Tweak the registry
Webcam not working on Windows 10 April 2018 Update 1803 Solutions
This problem usually takes place when multiple programs try to access Webcam at one time. Previously only one program was allowed to do the same. The report says that those webcams which encode in MJPEG and H264 formats face the issue most.
We are going to discuss the tweaks that can resolve this issue. Here’s how to Fix: Webcam not working on Windows 10 April 2018 Update 1803 –
Fix-1: Through Windows Settings
Step-1: Make a joint press of Win+I to open Windows Settings, the built-in application. Once it shows on the display make a click on Privacy category.
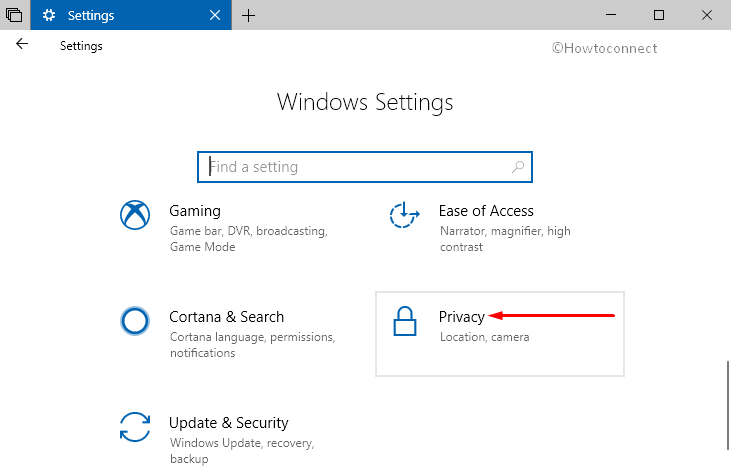
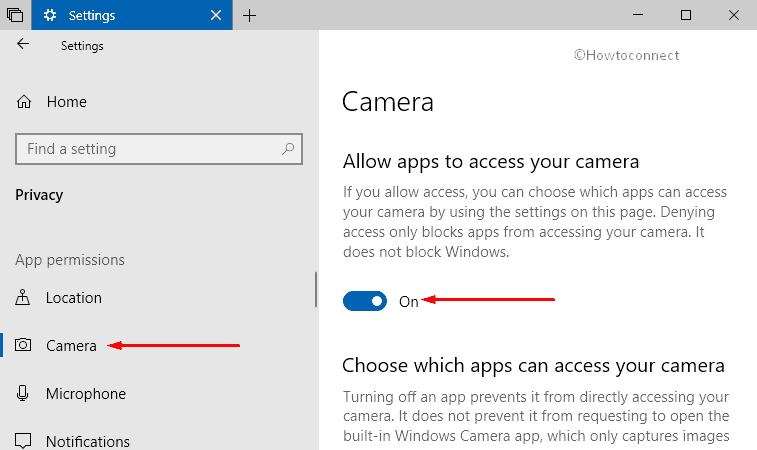
Step-2: Now Select Camera from the left column and shift to the right side.
Step-3: Thereafter Turn ON the toggle located under Allow apps to access your camera.
Step-4: In the bottom, you will notice an option to Choose which apps can access your camera. Switch ON the toggle for those you want to give permission.
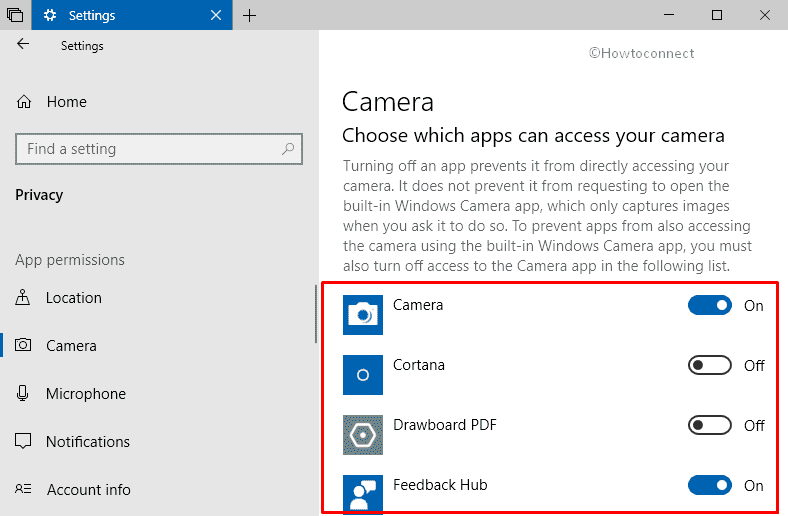
Step-5: In the end, Restart the apps. This time you will be able to use the webcam with your desired apps.
In order to cancel the access, you just need to turn off those applications in the same way.
Fix-2: Recover the Previous Version
Users encountered the problem after installing the latest Windows 10 update. So, it will be a wise decision to roll back to the previous version. Here how –
• Before starting, keep in mind that you can only apply this tweak within first 10 days of updating. If you are not sure about the date, check it anyway.
• Open Start Menu by clicking the Windows icon on the taskbar. From the bottom left corner, perform a click on the Settings cog.
• Once the Settings app shows up on the PC screen, do a hit on the category namely Update & Security.
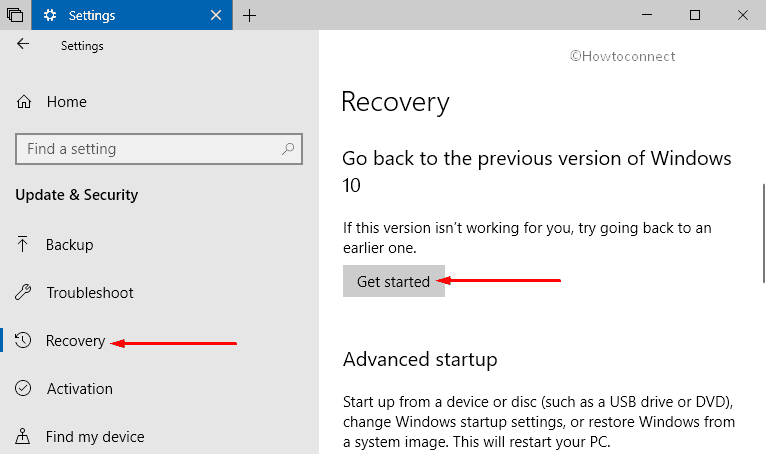
• From the left column select Recovery and shift to the right side.
• At last, make a hit on the “Get Started” button located under Go back to the previous version of Windows 10. Now, follow the guidelines as it rolls out into the screen. If “We’re sorry, but you can’t go back” message appears, that means you are too late to go back.
Fix-3: Tweak the registry
First and foremost, press Win+R jointly to open Run dialog box. Type in regedit in the void space and hit Enter.
See How to Access Registry Editor in Windows 10 – 5 Simple Tips.
Reach out to the following path from the left column of the Registry Editor –
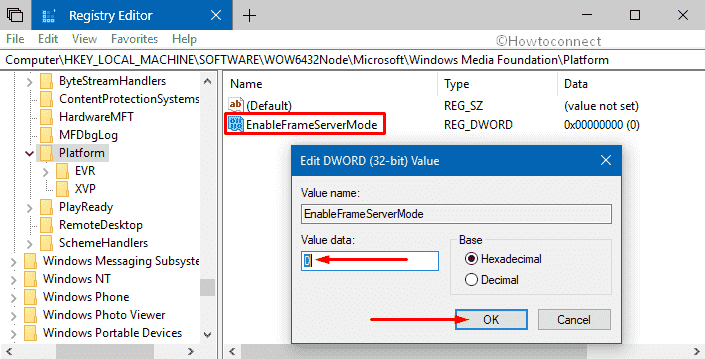
HKEY_LOCAL_MACHINE\SOFTWARE\WOW6432Node\Microsoft\Windows Media Foundation\Platform
Shift to the right side of Platform key. Now make a right click on an empty place and hover the mouse on New. From the list of options, select DWORD (32-bit) Value.
Give it a name as EnableFrameServerMode.
In the end, make a double-click on the newly made DWORD and set the value to 0. Click OK to implement the modifications.
Finally, restart Windows 10 PC to see the change.
That’s all. Hope these will work for you.
