Move Screenshot Location in Windows 10 – Capturing a moment from video or important happenings of the screen is the best method that we all do which we call as screenshots and it really makes the work easier. And the screenshot is the oldest feature of capturing the happenings on the screen. When you capture a screenshot, Windows 10 by default saves them into the Screenshots folder of Pictures library. In most of the situations, these locations work perfectly in the sense the user is comfortable with the default location. But there are certain users who wish to move the default screenshots folder location in Windows 10.
Table of Contents
How and Where to Find your Screenshots Location in Windows 10
The screenshots that you capture without any help of the third party are stored in the Screenshots folder of the Pictures library. You won’t be able to see the Screenshots folder under Pictures library until and unless you capture the first screenshot. The accurate path of your screenshot location is “C:\Users\Your Username\Pictures\Screenshots”.
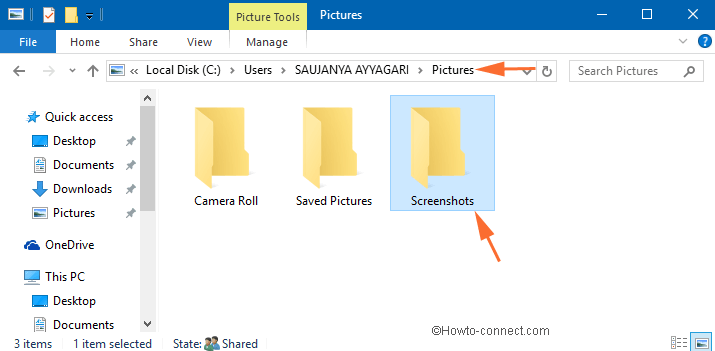
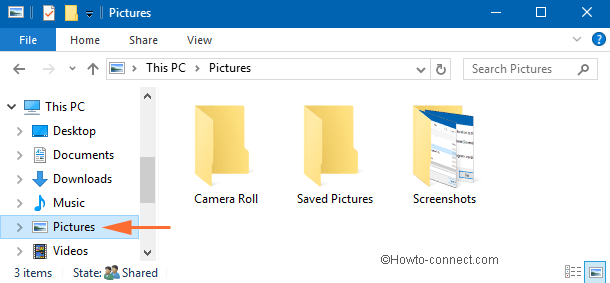
To open the Screenshots folder, you can navigate the above-mentioned path or even click on the Pictures folder of the Navigation Pane.
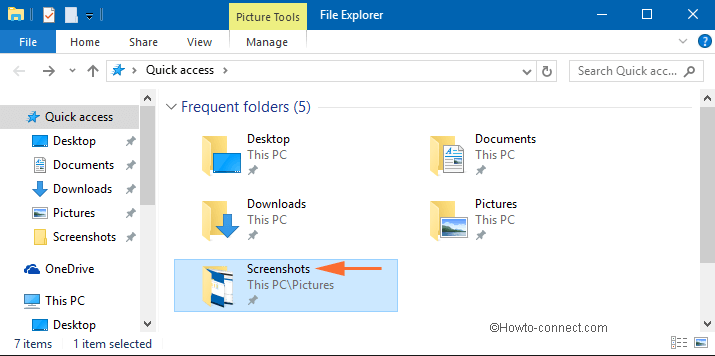
Another quick way to find it is the File Explorer icon on Windows 10 Taskbar. Click on the icon and the File Explorer will open the Quick access location where you will find the Screenshots folder.
How to Move Screenshot Location in Windows 10
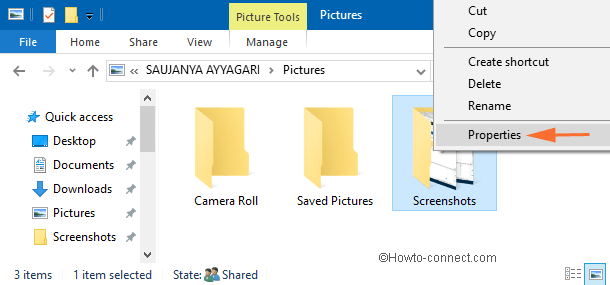
The first step for you is to go to the Screenshots folder. Make a right click on the folder and choose its Properties option.
The Properties window will thus appear now. To change the location, you have to be on the Location tab. You can see the current path of the Screenshots folder here.
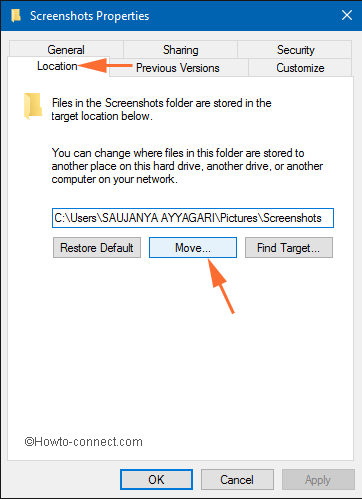
Now click on Move button.
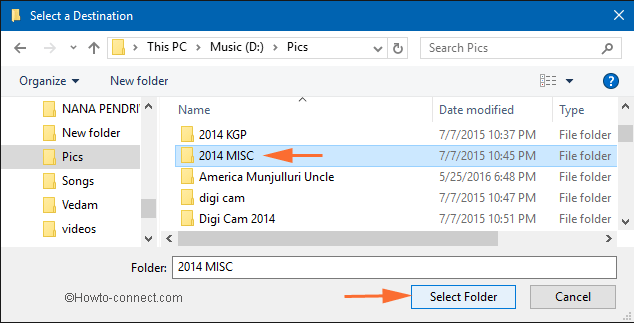
Then Select a Destination window will arrive where you will now browse the appropriate folder which you wish to set as a default location for the screenshots. Once you have the desired folder, click on Select Folder button.
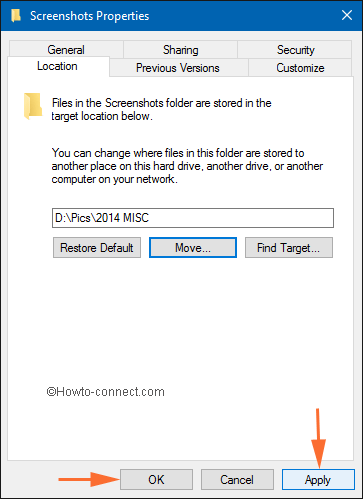
Again get back to the Screenshots Properties window and you will notice the new path of your Screenshots folder that you had set for default. To save and apply the new default location, click on Apply and Ok buttons.
A small window Move Folder will prompt asking your permission to move all the old screenshots from the old location to the new location. We recommend you to click Yes so that all the screenshots stored in the old location will be moved to the new one. If you click No, then only the screenshots captured after the change of location will be saved in the new location. The old ones will be left in the old location only.
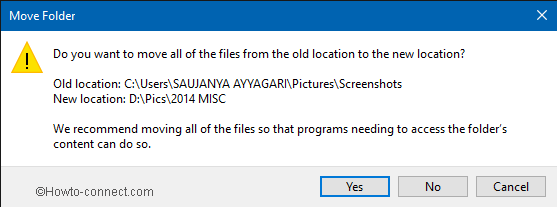
The time of the moving process depends on the number of screenshots you have in your old location.
Note: The location of the Screenshots folder will get changed to the particular account in which you are logged in. This is not applicable to other users of the system. To change the location of other users, the same steps are applicable.
How to Restore the Default Location for your Screenshots Folder in Windows 10
In future, if you wish to restore the default location for your Screenshots folder, go to that location and right click on your new Screenshots folder. Click on its Properties option.
Again, go to the Location tab of Screenshots Properties window and click on Restore Default button. The OS will ask if you wish to create a folder because it might happen that the original Screenshots folder does not exist. Click Yes button.
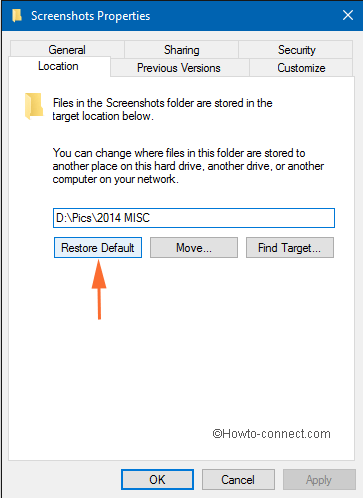
Here also the system will ask if you wish to move the screenshots to the default Screenshots folder, click Yes. And in the Screenshots Properties window click Ok to save the changed one.
Conclusion
Isn’t it so easy to Move Screenshot Location in Windows 10? Follow a few steps and you will be able to move Screenshots location on Windows 10. We are looking forward to your responses in the comments field below.
Shaun
says:I accidentally re-routed my screenshots folder to the pictures folder rather than a sub folder, is there any way to revert this? I can’t find anything on google. Thanks.
Sandra
says:I just need to take the screenshot and then put in a file just next to it.
JP
says:Sunita – Thank you so much! My ‘Screenshots’ folder was missing on my new laptop (with Win10 Home). I made three tech support calls (one to hp and two to microsoft); the final recommendation was that I needed to upgrade to Win 10 Pro to get the auto-save to Screenshots folder feature. ha! Your blog was exactly what I needed to get this corrected. Again, thank you.
sunita
says:Thanks for your suggestions. I will certainly consider on the measures.
Lula
says:Dude, a few suggestions for your site… I don’t intend you to post this as comment:
1. you need a contact tab
2. or suggestions tab b/c posting here feels like I should be commenting on this article only
3. you should put your “like” buttons at end of articles, as of yet it seems all I can do is like your site, which I do very much. I appreciate the way you address topics – it’s different from most. Can’t quite explain what that means specifically yet, just keep doing what you’re doing. If it comes to me I’ll make a more appropriate comment for you to post. Else, feel free to edit this one as you see fit.