Instructions here will be helpful to fix DFS_FILE_SYSTEM BSOD in Windows 10. You commonly experience this error at the time of starting a third party program or running this in real-time. Having bug check value 0x00000082, this Blue Screen mainly occurs because of corrupted data structure, virus attack, low disk space, memory problems, and more. Because of the problem the desktop might freeze and hang multiple times making it inaccessible to work along. Similar to others, this BSOD issue surprisingly crashes your Windows 10 with a blue screen and random flashing. After some times, the PC restarts automatically just to prevent itself from any kind of internal damage.
Other possible reasons for DFS_FILE_SYSTEM could be missing system resources, DLL files, etc. Furthermore, either system changes or faulty update installation could also be equally responsible for this. In the below section, we have discussed some effective workarounds which can surely resolve the issue. See the list of resources first –
DFS_FILE_SY,STEM in Windows 10 Solutions
Here is how to fix DFS_FILE_SYSTEM BSOD Error in Windows 10 –
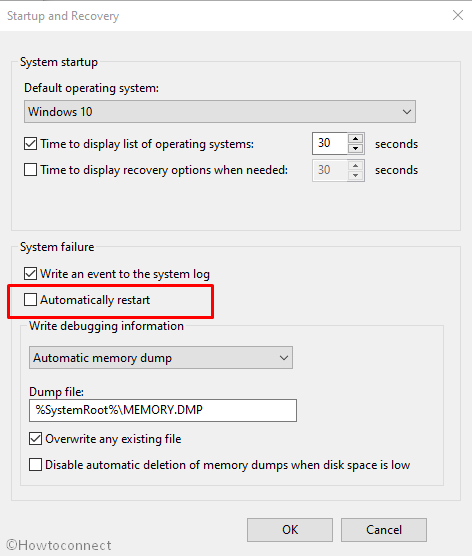
1] Disable Automatic Restart
Users often experience the repetitive automatic shutdown which is not a big deal. But if it starts happening a majority of times, you need to understand that your machine has run into some critical system failures like DFS_FILE_SYSTEM. If you have been experiencing this situation too often, here is a solution for you. Follow the below steps to simply stop the automatic shutdown feature –
Step-1: Press Win+S hotkey to invoke Windows search bar.
Step-2: In the search bar, type control and press the Enter key.
Step-3: Make the view of control panel either into a small or large icon, locate System and do a click on it.
Step-4: From the left column, click on Advanced system settings.
Step-5: When a wizard appears on the screen, go to the Advanced tab.
Step-6: Select Settings located under the Startup and Recovery section.
Step-7: Go to the System failure and uncheck the box of Automatically restart option.
Step-8: Click on the OK button to process ahead.
2] Run Blue Screen Troubleshooter to fix DFS_FILE_SYSTEM
On Windows 10, Blue Screen Troubleshooter is well known for its built-in utility that can possibly settle any critical stop error on your machine. Therefore, it can easily detect the problems associated with DFS_FILE_SYSTEM and fix it up. Here is the process to use the tool –
- Right-click on the Start button and select Settings icon.
- On the following page, click on Update & Security section.
- From the left pane, select Troubleshoot and then switch to the corresponding right.
- Scroll and locate Blue Screen option.
- Once you find, click on it and select Run the troubleshooter.
Upon executing the tool properly, Windows 10 will fix Bsod error code DFS_FILE_SYSTEM automatically.
3] Boot Windows 10 to Safe Mode
For dealing with many of the issues that your Windows 10 come across, one of the simple and effective solutions would be to Boot the device in Safe Mode. This is basically a special Startup mode where Windows load only root (or basic) applications. If the issue generates from the advance settings or additional apps, DFS_FILE_SYSTEM BSOD might disappear while running your OS in a Safe Mode. Follow the below guidelines to use this tool –
- Press the Win+I hotkeys and let Windows Settings comes out.
- Click on Update & Security section.
- Select Recovery and move along to right side.
- Underneath Advanced startup, click Restart now.
- As your Windows restarts, it will ask you to choose the next step. Choose Troubleshoot from Startup Screen.
- In the Troubleshoot menu click Advanced Options and subsequently on Startup Settings.
- At this time, you will be informed that your machine can be restarted with the use of additional settings which is Enable Safe Mode. Press Restart.
- Subsequent to this, choose Enable Safe Mode by pressing F4.
Now, the Operating System will be launched with default apps and services. In case the issue appears again, it is quite sure that any third-party application or Hardware problem is the real culprit.
4] Eradicate the faulty Windows update files
The company releases Windows updates after a certain period which includes the updated features and bug fixes. Microsoft team asks its users to download them using the Settings application. In fact, they do not indulge into troubles in the midway but if the installation process terminates abnormally, you will have DFS_FILE_SYSTEM BSOD error in the Computer. All these problematic files need immediate removal in this respect. follow these below steps to do so –
- Press Win+I hotkey and let the Windows Settings appear.
- Click on Update & Security section.
- This will by default open Windows Update page.
- Move to the adjacent right and Select View update history link.
- Click on Uninstall updates in order to remove the faulty files.
5] Reconnect the External Hardware Devices
Often DFS_FILE_SYSTEM BSOD error comes in after connecting an additional hard drive with the device. In that case, you have to remove the accessory and reconnect it again following correct procedures. The guidelines are as follows –
- Detach all the plugged accessories from the device and Restart it.
- When the operating system boots successfully, attach the accessories again with your PC successively and check which one is causing DFS_FILE_SYSTEM.
- Thereafter, Download the updated drivers for that specific hardware from the manufacturer website and then install them.
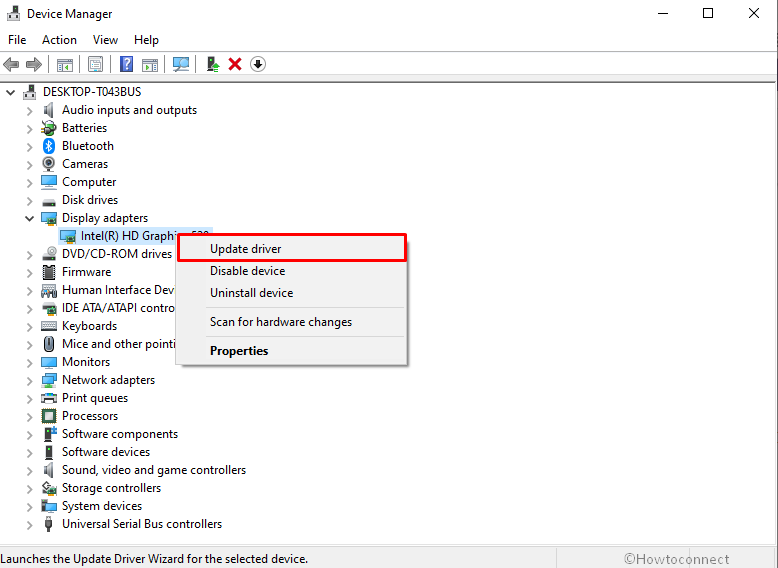
6] Update corrupted Drivers with Device Manager
Every time you came across any BSOD error, the main reason comes up is a faulty or outdated device driver which creates plenty of problems. Therefore, it is required to take proper steps to update them using Device Manager. Moreover, as we already mentioned earlier faulty drivers are one of the main causes of DFS_FILE_SYSTEM BSOD. Now, in order to check and fix any such situations follow the steps provided below –
- Right click on the Start button and choose Device Manager from the upper part of the list.
- Find out the devices having exclamation mark beside them in the console.
- Once you find, expand them by double-clicking.
- Upon expansion, right-click on each of them and select Update driver option to initiate the process successively.
- Now the system will preview two options; Choose Search automatically for updated driver software.
- Restart the Windows to make the changes effective.
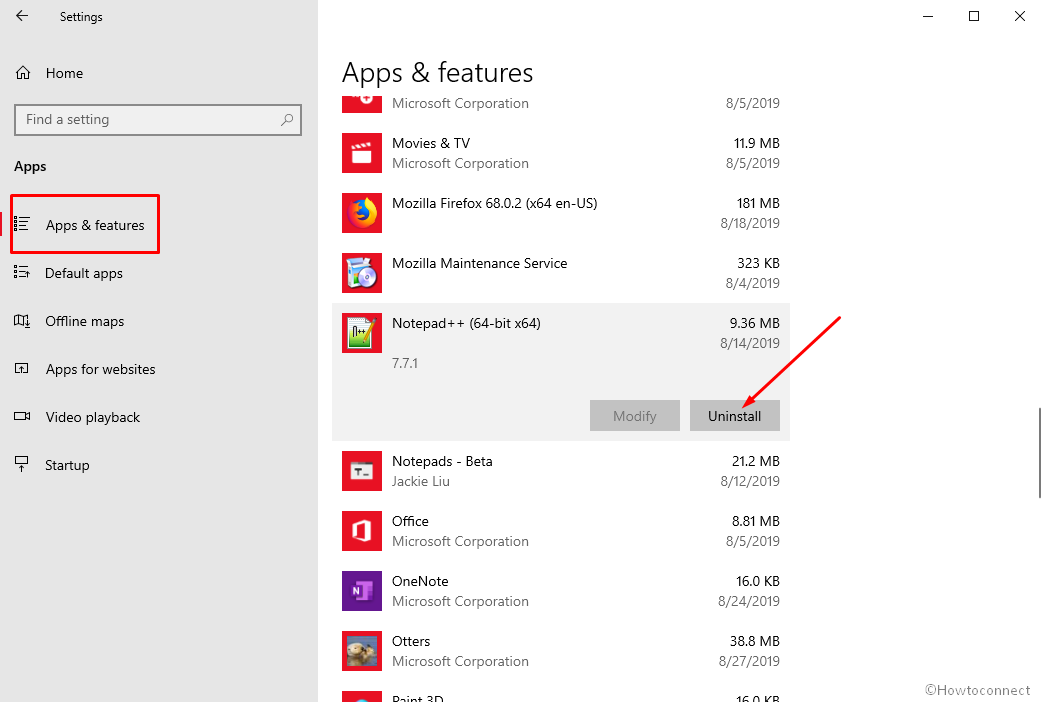
7] Uninstall Program causing DFS_FILE_SYSTEM
In a few cases having multiple applications that do the same job can create some conflicts which cause DFS_FILE_SYSTEM BSOD error in the PC. This creates collisions in the system leading to a malfunctioning computer. However, you are able to prevent this by uninstalling such extra apps. This is how you do it –
Step#1: Press Win+I keys altogether to open Windows Settings apps.
Step#2: Click on Apps category.
Step#3: On the next page, move alongside right from the left pane.
Step#4: Locate the program may cause issues DFS_FILE_SYSTEM or you have recently installed.
Step#5: Once found, make a click on it and select the Uninstall option from the extended pane.
Step#6: When a small pop-up appears, again click on Uninstall to confirm the process.
Step#7: Now, go to the official manufacturer website to Download and reinstall them again in PC.
8] Scan your full system in Windows Security
Each day, we are moving towards a Tech advanced world but the more we are developing ourselves, the security system is becoming more vulnerable. The prominent reason behind this is threats and malware infections. We can be easy prey by visiting a suspicious website or clicking a link coming in spam such as DFS_FILE_SYSTEM BSOD error. Performing a Windows Defender Full Scan may be a perfect solution in this concern. You can easily accomplish the task using “Windows Security”, a default program of Windows 10. Following instructions will help you to maze out from this –
- Click on the Action Center icon from the extreme right of the Taskbar and select Expand => All Settings.
- Once the application opens up, click the Update & Security icon.
- Select Windows Security from the left column.
- Move to the corresponding right pane and choose Virus & threat protection option.
- On the following window, select Scan options link.
- Select the radio button of Full scan and then click Scan now option to initiate the process.

9] Remove Third-Party Antivirus Program
Windows Security is a built-in application and also a complete package to deal with malware issues. On the other hand, third-party antivirus programs are not trusted every time and quite often they create issues. Sometimes, DFS_FILE_SYSTEM BSOD error in Windows 10 is also a result of using them. Here is the standard way to uninstall Avast Antivirus from your computer –
- Press Win+R at a time to launch the Run dialog box.
- In the stipulated bar, type appwiz.cpl and select the OK button.
- On the following page, locate Avast Free Antivirus from the appearing list and do a click on the same.
- Hit the Uninstall button from the top menu.
- On subsequent window, select the Uninstall tab at the bottom and then click on Next.
- At this time, a UAC prompts, give your consent by choosing the Yes option.
- Wait for a while, a confirmation message will appear entitled Uninstall finished.
- Upon completion, select the Restart button and then click on Finish.
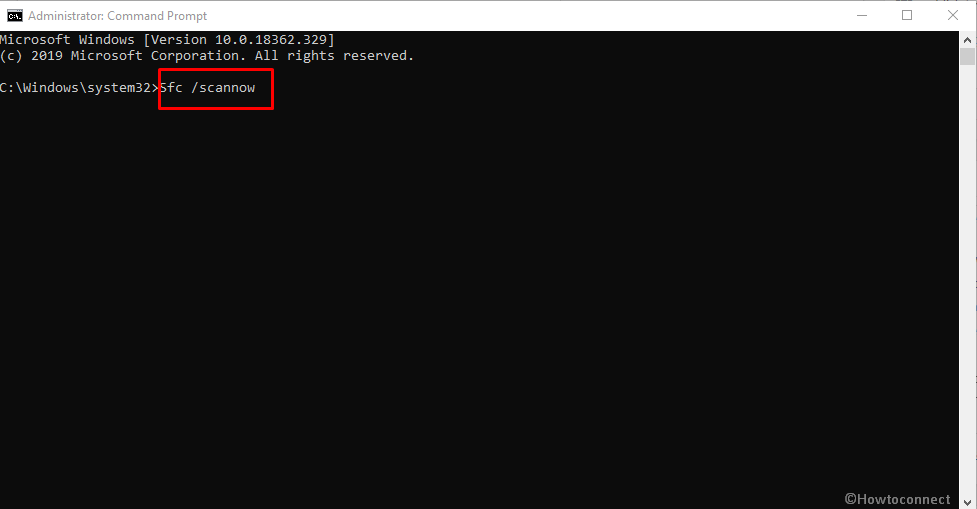
10] Run Windows System File Checker (“SFC /Scannow”).
There are many reasons for which system resources might have corruption. Sometimes it might be virus infection or collision from similar programs. Whenever that happens, MSRPC_STATE_VIOLATION BSOD shows up. System File Checker utility can be much helpful to rectify those corruptions and recover including DLL files. The guidelines are as follows –
- Call up the Taskbar Search using the above instruction.
- When it opens, type cmd in the empty text area.
- Once Command Prompt arrives in the result, do a right-click on it.
- From the context menu, select Run as administrator.
- Choose Yes when UAC asks for permission.
- On the next, type
sfc /scannowcommand and Hit Enter key. - System File Checker once activated will detect the issues in files and also fix them automatically.
- This repairing process may take a little longer hence, wait for it until it gets finished.
- Restart Windows when it is over and prior to signing back in, check if the error has resolved already.
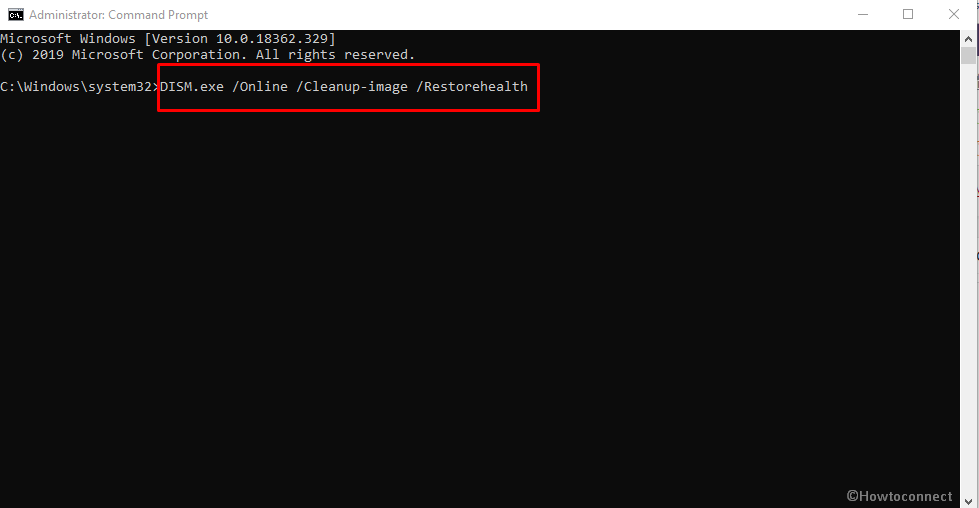
11] Use Deployment Image Servicing and Management (DISM) tool
Deployment Image Servicing and Management tool become beneficial in case of terrible windows image files. Because of those files might cause DFS_FILE_SYSTEM BSOD, therefore, here you need to execute the utility immediately. The only platform where it executes is Elevated Command Prompt.
- Press Win+S hotkey and let Taskbar search appear.
- Type cmd in the given bar.
- When the result flashes, right-click on it and then select Run as administrator from the context menu.
- If a UAC prompts up, click on Yes to give consent.
- Type the given code and hit Enter –
DISM.exe /Online /Cleanup-image /Restorehealth
Note – Usually the process gets stuck at 20%. If this happens with you too, don’t get stress as it normal phenomena.
- When the process gets over, Reboot your PC to make the changes effective.
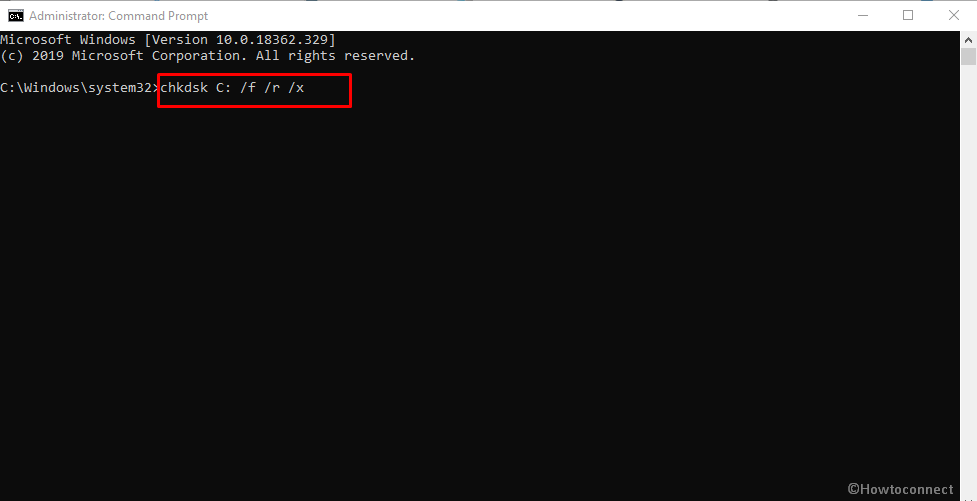
12] Run CHKDSK Utility to solve DFS_FILE_SYSTEM
When a Hard disk is in use for a long time, bad areas grow in it. This is somewhat uncontrollable and can evolve DFS_FILE_SYSTEM BSOD in the system but we can actually fix. Disk Checking utility is the right tool to settle down these type of affected areas. To access the tool, we need to launch an Elevated Command Prompt first. Here is the way to move on –
- Click on the Start button and type cmd.
- When Command Prompt appears in the result, do a right-click on it.
- From the context menu, select Run as administrator.
- Once UAC prompts for permission, click on the Yes button.
- Type the following command similar to the shown format- chkdsk [Drive:] [parameters]
- With the command ‘CHKDSK’, System will only show the disk status but will not fix any issues present.
- Therefore, we need to specify the command in the following way- /f /r /x.
Here,
“f” will force the utility to fix up found issues from the volume.
Letter “r” will detect the poor sectors in the Hard Disk.
Symbol “x” will make the whole volume to dismount before initiating the process. Ultimately, the command will look like – chkdsk C: /f /r /x
Note – C: is the drive letter where the OS is installed. If you have used other drivers to do the same task, replace the letter with D:, E: and so on.
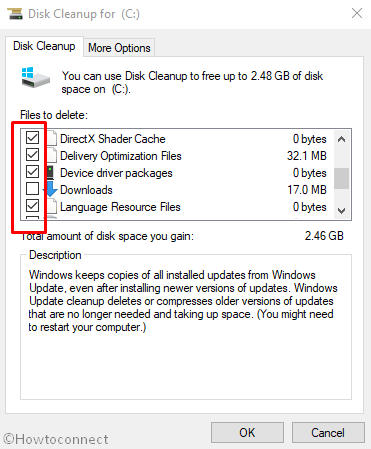
13] Clean Junk from the system using Disk Cleanup utility
Your machine keeps on creating junk files for the execution of tasks which gets accumulated as usual in the disk storage. Being unnecessary, we cannot allow these temporary files to make space. On the contrary, when they turn big in amount, take up large space in the drive. As a result, Hard disk runs in low space and affects the performance of the device which eventually causes DFS_FILE_SYSTEM Error BSOD error. However, we are able to delete them altogether with the help of Disk Cleanup tool. Have a look at the instructions given below –
- Right-click on the Start button and select Run.
- When it opens, type cleanmgr in the text field and hit the Enter key.
- Now, click on the dropdown menu and select Drive letter C: followed by pressing the OK button.
- Disk Cleanup tool will prompt and start analyzing the amount of space it can recover.
- Select the Clean up system files from the bottom of the appearing wizard.
- Choose the same drive letter and allow the Disk Cleanup for (C:).
- Before proceeding this method, ensure you have restored all the important items from Recycle Bin if present.
- Check all the options except Downloads.
- Finally, hit the OK button.
14] Install all possible Windows Updates
Updates are available after every definite period of time and they always have bug fixes inside. Obsolete Windows Operating System is more likely to cause DFS_FILE_SYSTEM BSOD error in Windows 10. Therefore, download the available updates using the below instructions –
- Press Win+I altogether and let Windows Settings appear.
- Click on Update & Security section.
- On the following screen, move along the right side of the Windows Update.
- Here, you may see ‘You’re up to date’ dialog. But, click on the Check for updates button.
- At this time, the system will look for available updates for your windows.
- After finishing the searching process, you will see the updates on the screen. Choose Download option under updates are ready to download.
15] Resolve the issues associated with RAM
An unreliable memory, defective Random Access Memory, the wrong allocation may call up DFS_FILE_SYSTEM BSOD in Windows 10. Therefore, a perfect solution is mandatory to rectify these issues. Since, scanning the stick is a bit complicated, Memory Diagnostic tool. In this way, your problematic sectors will be identified and you can resolve it later. Move through the following steps –
- First of all, make sure that you have saved and closed all the in-progress apps on the device before proceeding.
- Press Win+S and allow Taskbar Search to appear.
- Type Windows Memory Diagnostic and select it from the prompting list.
- Click on Restart now and check for problems (recommended) from the Pop-up menu.
- When the system starts, it will detect the memory issues.
- After the process reaches 100%, Windows will restart by itself.
- Once it starts up again, you can see the results in the notification area of the taskbar.
- Alternatively, if you find the above process nonfunctional, just navigate to the following path – Do a right-click on Start Menu => Event Viewer => Windows Log => System.
16] Use Previous System Restore Point
Whenever you make some changes on the computer, this will tweak the Windows Registry. If something happens wrong while installing or uninstalling, the registry will be little unstable and may result in DFS_FILE_SYSTEM BSOD in the system. The easiest way to get rid of the error is to revert all these changes and this is possible through System Restore. We will definitely need a previously created restore point for carrying out this workaround. If you lack that, leave this here. Luckily if you have one, follow the below guidelines –
- Press Win+R keys and invoke Run dialog box.
- Type ‘rstrui’ and hit the Enter key.
- This action will call in System Restore wizard on the screen. Click on the Next option allowing the device to generate your PC’s Restore points.
- To see more of the restore points, hit the boxes Show more restore points option.
- Select the last Restore Point you have created on the device.
- Click on the Next option.
- From the following window, hit the Finish button to initiate the full process.
17] Perform a clean install
It will be really pathetic and also frustrating if you could not fix error DFS_FILE_SYSTEM using any of the above workarounds. However, we believe that no problems come without a solution. Yet we have one more resolution to apply for fixing error code 0x00000082 which can also be called as the complete installation of Windows 10. The final remedy with utmost perfection will potentially remove all the bugs and at last, there will be no issue would arise.
Furthermore, it would be wiser to save all the necessary files and data in a safe place as Backup. Since this is a professional Workaround, you might seek help from skilled people to accomplish.
Methods:
1] Disable Automatic Restart
2] Run Blue Screen Troubleshooter
3] Boot the operating system to Safe Mode
4] Eradicate the faulty Windows update files
5] Reconnect the External Hardware Devices
6] Update corrupted Drivers with Device Manager
7] Uninstall Program causing DFS_FILE_SYSTEM
8] Scan your full system in Windows Security
9] Remove Third-Party Antivirus Program
10] Run Windows System File Checker (“SFC /Scannow”)
11] Run Deployment Image Servicing and Management (DISM) tool
12] Run CHKDSK Utility
13] Cleaning Junk from the system using Disk Cleanup utility
14] Install all possible Windows Updates
15] Resolve the issues associated with RAM
16] Use Previous System Restore Point
17] Perform a clean install
That’s all!!