Windows 11, as well as 10, is no doubt a feature-rich version of the OS but issues and bugs have close kinships with it at the same time. 0x8007000d is such an error code that appears when trying to download a cumulative update or build. When the problem occurs Windows update stuck and ails you with the error message.
Although 0x8007000d error could arise due to a number of reasons often the primary cause of this nagging issue is Windows update Component. This puts a sort of restriction over your system and prevents it from downloading or installing any new patch on your PC. However, it may be hard to resolve these errors here are some methods that will certainly help you.
Windows 11 and 10 update Error 0x8007000d
Here is how to fix Windows 11/10 Update Error 0x8007000d –
1] Purge the Windows update components
In order to resolve this issue, the first thing that you can try is purging your windows update components. Resetting will recalibrate the entire update installation module which churns out the faulty bug that may be causing the error.
- Press Windows+S keys and type in – cmd.
- Hit the – Ctrl+Shift+Enter.
- Select – Yes to approve the User account control.
- On the Command Prompt screen type in the below lines and hit enter after each and don’t forget to enter –
net stop wuauserv
net stop cryptSvc
net stop bits
net stop msiserver

- Now enter the following command to rename the SoftwareDistribution folder –
ren C:\Windows\SoftwareDistribution SoftwareDistribution.old
ren C:\Windows\System32\Catroot2 Catroot2.old
- Now run the following commands to re-enable the windows update related services –
net start wauserv
net start cryptSvc
net start bits
net start msiserver
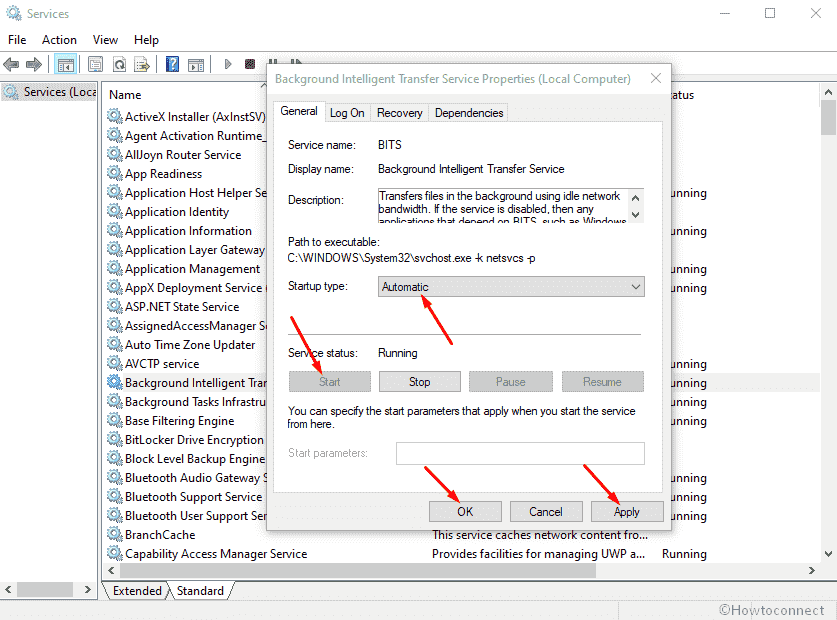
2] Make sure that BITS is running
BITS is an essential service of Windows that helps the system to download files from the Microsoft server. Furthermore, it also assists the OS and application during foreground or background downloads or uploads. BITS also allows the system to exchange files between the device and the remote server that too without impacting the network experience.
If for some reason this service stops, windows update would mostly fail and reflect the error 0x8007000d. Hence it is quite important that BITS is always in automatic startup type and running status. You can do that by following these few simple steps:
- Press Windows+S and type in the – service.msc.
- Hit Enter to open the services console.
- Find “Background Intelligence Transfer Service” in the Name column.
- Now Right-click on this one and select the – Properties.
- Here, set the startup type to – Automatic.
- Click the Start under service status and wait for a while.
- Make sure to click Apply and then OK to save the changes.
3] Rename the CBS log files to fix 0x8007000d Error code
CBS log sometimes might be the reason for the error 0x8007000d appear during updates. This Component-based servicing keeps a detailed record and information regarding all the updates that have been installed in a component over a period of time. These logs could get corrupted and cause trouble in the process of updating your system.
Sometimes deleting these logs easily resolves the issue but if you don’t feel it’s safe renaming the file could also do the trick. Follow the guidelines –
- Hit the – Windows+Q.
- Now type in the following and hit Enter –
%systemroot%\Logs\CBS
- Now change the CBS.log file name to anything else such as error.log.
- If the system doesn’t allow you to alter the name, do the following
- Open Services console as you did in the above mentioned process.
- Next, scroll down and look for the – Windows modules installer.
- Double click on it to open.
- Set the startup type to manual and click on Apply then OK to save the changes.
- Reboot your system and go to the logs directory – C:\Windows\Logs\ and rename cbs.log.
- Restart your pc again and open the services console
- Set the startup type of windows modules installer back to automatic again.
4] Use Windows Updates troubleshooter
Windows built-in troubleshooter has proven it’s worth many times. The utility is quite handy and user friendly and you don’t need to go through any of those lengthy time-consuming processes to resolve simple and basic errors. Just a few clicks on the utility and the troubleshooter would scan your device to ascertain the cause of error 0x8007000d to come up and would render you some easy one-step solution to get rid of it.
Let’s see how you can do that –
- Press Win+S and then type – troubleshoot.
- Hit the – Enter.
- Once on the Troubleshoot Settings page, click the – Additional troubleshooters.
- Click the – Windows update.
- Select the – Run the Troubleshooter.
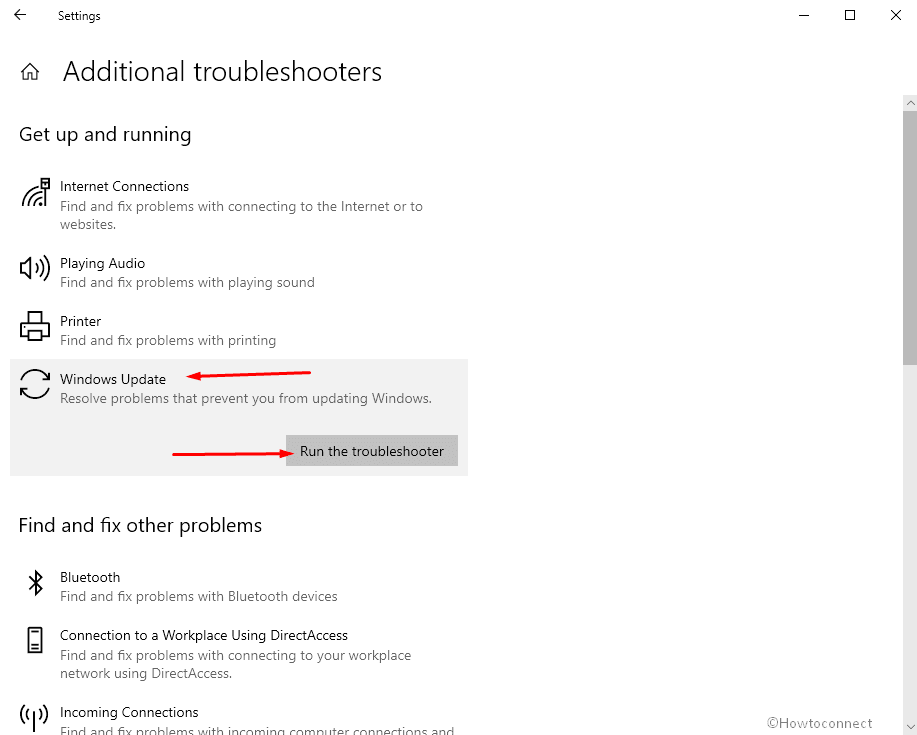
- The troubleshooter might prompt you to apply some fixes, follow them accordingly.
If you are using Windows 11, open Settings => Select Troubleshoot from right pane => click Other troubleshooters. Finally, hit Run button located alongside Windows update.
5] Try going for Manual Update
Windows update has been designed in a way that it would run discretely in your background without even giving you a hint, provided that you are on an unlimited data usage network. But sometimes these autonomous and discreet procedures may fail to run due to extremely low internet speed or interference in the network. In such cases, you may need to ensure that your Windows updates are accomplished without any glitches.
So try to receive the update manually as of now using the following instructions –
- Click taskbar search, type update, and press – Enter.
- From right pane, click – Check for Updates.
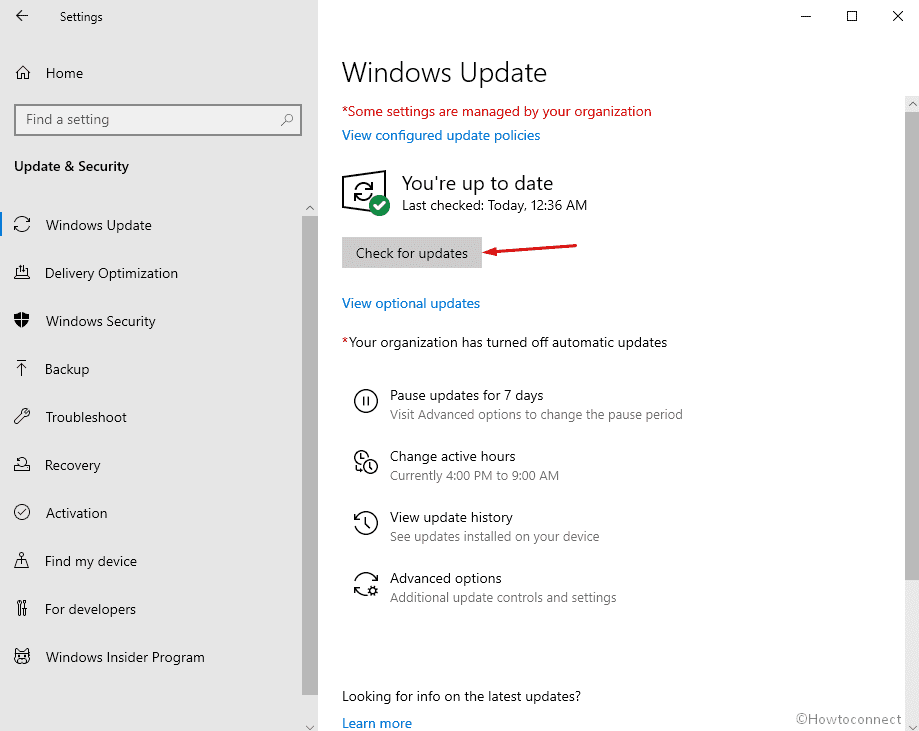
- Wait until the completion of downloading and lastly, click the – Install now.
6] Remove Windows Update download path to solve Error 0x8007000d
In order to make sure all your windows components are running smoothly you must ensure that all the Registry keys are intact. A single letter error with any of its strings may result in an unexpected error. It could be in the case of windows update as well, if any associated string value gets corrupted it could reflect error 0x8007000d. In such an eventuality what you must do is modify or remove that key what is necessary in order to get rid of the disturbing issue.
Note – Be very careful while changing the registry, as an invalid registry could adversely affect your PC and OS, you end up losing data as well.
- Press Windows & S keys together and type in – “regedit”
- Hit the – Enter
- Click the – Yes when a User account control box appears.
- In the Registry Editor console, type in the following string
HKEY_LOCAL_MACHINE\SOFTWARE\Policies\Microsoft\Windows\WindowsUpdate
- Right-click on WUserver and choose Delete.
- Then right-click on the – WIStatusServer and delete it as well.
- Now close the Registry Editor console and Reboot your system
7] Uninstall or put your Antivirus software on Stand-by status
We have often seen people buying an antivirus kit along with their first laptop and we can’t blame them for it. Everyone is apprehensive of data loss and won’t bother spending a bit extra for it. But these third-party applications sometimes can’t differentiate between a virus and a Microsoft update. Hence in order to deal with it what you must do is disable your antivirus for a period of time and manually start the update and check if the error still comes up.
- Click the up arrow present on the right-hand side of the taskbar to open the hidden icons on the system tray.
- Right click on the Antivirus icon and choose – Disable.
- The Antivirus program would ask you for the period of time after which the program is re-enabled automatically. Select as per your choice.
- Now go to the – Settings
- Click the – Update and Security.
- Here, select the – Check for Updates.
Suppose the update isn’t installed then you must uninstall your antivirus program immediately.
Here’s is how you can do that
- Press the Windows logo key, type in appwiz.cpl, and hit enter
- Here, from the list of programs on your system, select the antivirus and click Uninstall from the top bar.
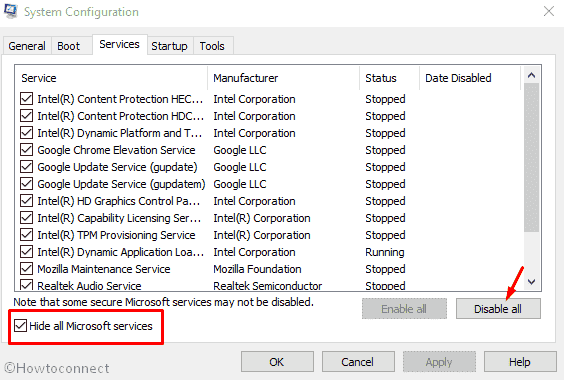
8] Clean boot to fix Windows Update Error 0x8007000d
Often the reason for update failed error 0x8007000d is the malicious third party applications that change the windows update components. So you must perform a clean boot of the windows which would start up our system with the least of the drivers, programs, or services.
- Hit the Win+S, type in msconfig, and press – Enter.
- Click on radio button alongside the – Selective Startup.
- Uncheck the box set for – Load Startup items.
- Click the – Services tab.
- Click and select the box for the – Hide all Microsoft services
- Next, click the – Disable all.
- Switch to the – Startup tab.
- Select the – Open Task Manager.
- Right-click on the enabled program and choose the Disable one by one.
- Repeat the same for all enabled programs.
- Now close the –Task Manager.
- Go back to the – system configuration.
- Click on Apply and then Ok.
9] Wipe out the Temporary Files
Temporary files are created to facilitate a smooth and seamless transition while working on Windows. These are records of your activities and provide an easy and quick recovery of data in case of an unintentional shutdown or power outage. Unfortunately, these are redundant data keep sitting on your system, making it slower and slower by each day. Furthermore, disk space might runs short leading to error: 0x8007000d. So, delete all the files of these kinds using the following guidelines –
- Press the – Windows+R.
- Type in Temp and hit the – Enter.
- Once you are inside the temp folder, press Ctrl+A to select all items.
- Hit the – Delete.
- Once again open the run box and type in %temp%.
- Select all items similarly and wipe out them.
10] Set Microsoft Edge as your Default Browser
Sometimes 0x8007000d might occur due to the add-ons that you install on your browser. Setting Microsoft Edge as your Default Browser could resolve the issue and do the trick. Also, reset the Internet Explorer Settings using the following instructions –
- Open Control panel.
- Put the View by status either of Large or Small icons.
- Click the – Internet options.
- Select the – Advanced tab.
- Next, click the – Reset.
- A dialogue box will appear, select the – Delete personal settings.
- And finally, click the – Reset.
11] Uninstall any previously existing updates
More often, it has been noticed that the existing update would raise a conflict with the new patch and cause an obstruction in downloading and installing the latest one on the system. It could even be the case of a bug being carried on the latest installed update patch. You can easily resolve this issue by removing all of the previously existing updates.
- Press Windows + I keys together to open “Settings”
- Go to the – “Update and Security”
Windows 11 users, open Settings app => choose Windows update from left pane to get same settings page.
- From right hand side, click – “View Update history” or Update history.
- Move down and Choose – “Uninstall updates”
- Scroll down to reach Microsoft Windows section.
- Select the recent update you received and click Uninstall.
- Comply with all the prompts in order to complete the uninstallation process.
- When the process ends, kindly reboot your system
12] Get rid of any kind of existing corruption on your PC
System elements could go missing or in worse case scenarios, go corrupt, if our PC suffers any kind of malware attack, software collisions, or anything similar to that sort. This could be a prominent reason for error 0x8007000d to come up. In order to recover the missing system elements or resolve this corruption, we must execute these few simple steps –
- Press Windows+S key together and type in – “cmd”
- Now press the – ‘Ctrl+Shift+Enter’.
- When the User Account Control box appears, click the – Yes.
- In the elevated Command Prompt window, type in the following syntax exactly it is and hit enter.
DISM.exe /Online /Cleanup-image /Restorehealth
- Once you have executed the command Reboot your system.
- This should have fixed 0x8007000d error when you sign back in.
- However, if the issue still persists, open command prompt again as administrator.
- Type in the following command and hit enter –
Sfc /scannow
- Wait patiently till the procedure completes without any kind of interruption.
- When the process ends, reboot your windows PC.
13] Ensure that the Windows defender is working effectively
Windows Defender Firewall protects your system from any kind of potentially harmful and malicious programs that your system may encounter. Error 0x8007000d may come up if this system is turned off. The reason why it happens is not clear yet but turning it back on has often resolved the issue. So let’s see how you can do that in a few simple steps –
- Click the Taskbar Search and type in – control.
- Hit Enter and open the Control panel.
- Set the View by option to Large icons.
- Click the – Windows Defender Firewall
- On the next page, check carefully and make sure that each option is green, and in case if you find any option red, turn it manually.
- To do that, click the – Turn Windows Firewall On or Off.
- Click on the radio button alongside – Turn on Windows Firewall
- Make sure you choose the same option for both Private Network Settings and Public Network Settings
- Finally, click on OK to save the settings.
14] Free up essential Disk Space
Sometimes windows update packs require a significant amount of space In order to download and install them in a smooth and consolidated process.
If your system is running out of storage and you don’t have enough space for the updates, this could interfere the update process and result in error 0x8007000d. Hence you must clean up the junk files and allocate more space in order to resolve the issue by following the instructions –
- Press Windows+Q keys and type in – cleanmgr.
- Hit Enter to open Disk Cleanup console
- After assessing how much space the system utility can evacuate, Disk Cleanup for ( C: ) will open.
- Click the – Clean up system files.
- Simply click Ok on the next prompt.
- On the next screen, Disk Cleanup for ( C: ) will appear.
- Click the checkboxes available under Files to delete
- Then hit the – OK
- Finally, select the – Delete files.
15] Restore your PC
Error 0x8007000d might appear after you made some modifications in Registry or Settings, or installed a third-party shady program. Then it’s highly probable that your recent ministrations have adversely affected the system and you might need to restore your PC.
- Press the Windows logo and type in – rstrui
- Hit enter to open System Restore.
- When “system restore” opens click on Next.
- Click and Check the checkbox alongside – Show more restore points
- Choose the most recent date and time of restore available here and click – Next
- On the next step click – Finish.
- Click Yes on the final confirmation prompt.
- The system will reboot itself once the restoration process completes.
- Once the system restarts, the new update patch would most certainly be installed without any kind of error 0x8007000d appearing.
16] Do clean install of Windows
Suppose everything fails to fix 0x8007000d error then the clean install is the last solution. This allows you to start afresh without any shred of previous install residues, no cache data, or any damaged files residues whatsoever.
Follow the instructions in this post – How to Install Windows 10 2009 October 2020 update.
Methods list
1] Purge the Windows update components
2] Make sure that BITS is running
3] Rename the CBS log files
4] Use Windows Updates troubleshooter
5] Try going for Manual Update
6] Remove Windows Update download path
7] Uninstall or put your Antivirus software on Stand-by status
8] Clean boot Windows
9] Wipe out the Temporary Files
10] Set Microsoft Edge as your Default Browser
11] Uninstall any previously existing updates
12] Get rid of any kind of existing corruption on your PC
13] Ensure that the windows defender is working effectively
14] Free up essential Disk Space
15] Restore your PC
16] Do a clean install of Windows
That’s all!!
Thanks. That’s a very useful collection of things to try out. I tried most of them. Unfortunately for me, it did not work. Then I found a way that fixed my problem, which you might want to add to your list:
I noted that this PC has Windows version 20H2 and my other computers have 21H1 and for the update that keeps failing it says it is for 20H2 but on my other PCs it says it is for 21H1. Anyway, this made me look for a way to manually update the Windows version. I found it here:
Scroll down to “Windows Update Assistant” then click the link, follow the instructions, and download the .exe file from Microsoft. It took around 1 hour to reach “90% complete” and about one more hour to reach 100% (!) with a couple of reboots. After that, it works. It even found some more updates and installed them. After that, it said I have the latest updates.