In this article, you will read How to Make Account Picture Settings Shortcut in Windows 10 and set a desired icon on the desktop to apply photo of your preference as account picture in Windows 10.
Each of us knows that we can use or set up many accounts in Windows 10. And as you are using Windows 10, you are familiar with Windows 10 allowing its users to set up an account picture for their respective accounts. The account picture you set is seen in the Start Menu and also while logging into Windows 10. You can choose to use any of your best pictures or take help of camera app to get mind blowing pictures for you or to go crazier, you can even edit the pictures you like and set it up as your account picture. Wait! You have one more option left. You can capture your favorite pose from the webcam and use it as your account picture. It is not only for you to set the account picture with your account, but also change it whenever you feel like.
Changing the account picture is always a fun thing. But always navigating to the location from where you can change the account picture is a bit upsetting. So, here in this article, we represent you the steps to create a shortcut of the Account Picture on your desktop. By creating this, anytime you can click on the shortcut and directly get into the location to carry out the further process. You will be directly taken to the Settings of your account where you can set another picture for your account.
Come and walk with us through this article to Make Account Picture Settings Shortcut in Windows 10 and explore yourself new things.
How to Make Account Picture Settings Shortcut in Windows 10
The process is done manually. No downloaded files or any other third party tool is required. See the below steps and follow them.
Step 1
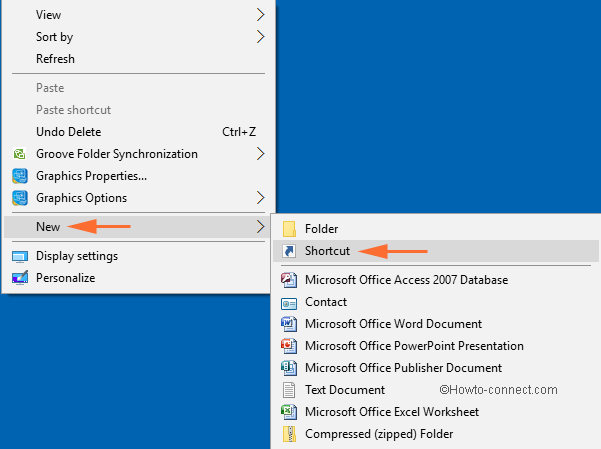
Go to a vacant area on your desktop and on making a right click there choose New followed by Shortcut.

Step 2
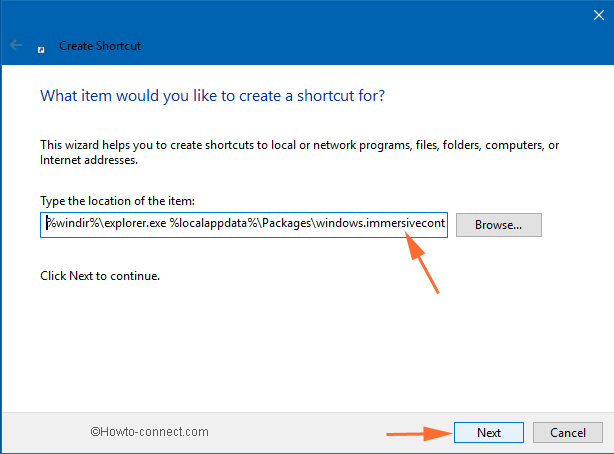
This opens up the Create Shortcut window on your display screen.
Now, you need to copy and paste the location in the Type the location of the item field –
%windir%\explorer.exe %localappdata%\Packages\windows.immersivecontrolpanel_cw5n1h2txyewy\LocalState\Indexed\Settings\en-US\AAA_SettingsPageAccountsPicture.settingcontent-ms

Note: If the US English is not installed on your Windows 10, then in the above command you need to alter the en-US folder name with the language that is installed on your computer.
Step 3
Click Next to proceed.
Step 4
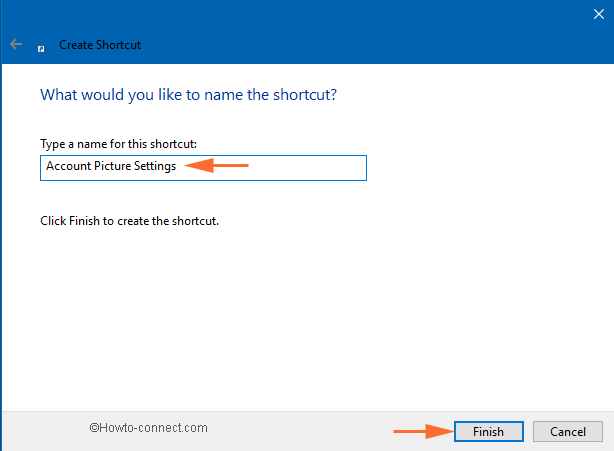
Give a name to your Account Picture Settings Shortcut in Windows 10. You can provide any name as per your preference. Type the name and click on the Finish button.

Step 5
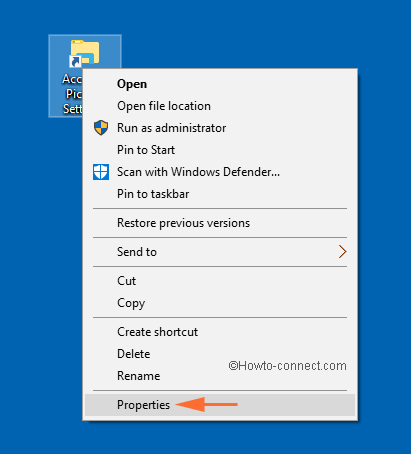
You can see the shortcut been created on your desktop. Right-click picture icon and choose to open its Properties at the bottom of the context menu.

Step 6
The Account Picture Properties window pops up where you need to get into the Shortcut tab.
![]()
Step 7
Click on the Change Icon button.
Step 8
Copy and paste the location in the Look for icons in this file box and hit Enter key.
%SystemRoot%\system32\imageres.dll
![]()
Step 9
Pick up the account picture icon from the newly arrived Change Icon window. Though, you can decide any one of your choices.
![]()
Step 10
Click Ok and then again click Ok on the properties window to save your changes.
The End
You just need to follow a few basic steps and you can make Account Picture Settings Shortcut in Windows 10. Carefully replace the language folder name with the one you are using to make all this happen. As you have learned Make Account Picture Settings Shortcut in Windows 10, you can now pin it to the Taskbar, Pin to Start, or Quick Launch it. When you click on the shortcut, it will take you to Your account section in the Settings from where you can change your account picture. You can read more of our articles related to this topic. Create a shortcut and see how easy it makes your work. Share your experience with us.
