Irrespective of users being treated as music lovers, so many people are now using external speaker peripheral for better sound quality, clear voice, and entertainment purposes. However, external speakers not working in Windows 11 problem has made life difficult. This is absolutely bizarre but the Operating System has rendered similar issues in the past as well. Windows 11 is ruling out all over and you can expect some issues will be incorporated with it though pretty unusual.
External speakers not working in Windows 11 can occur mostly because of the Audio drivers issues. But things are not as complex as it seems oftentimes, it can be a very simple mistake for which you will be getting the hiccup. Again, many users have encountered similar trouble just because they have upgraded to the latest operating system. However, we will be discussing the suitable workarounds to fix this issue in this write-up. Previously we have covered solutions to Bluetooth not working in Windows 11 Problem; you can see if needed.
External Speakers not Working in Windows 11
Here is how to fix External Speakers not Working in Windows 11 –
Way-1: Check the Audio volume
The most common factor for which you usually encounter external speakers issues is, the sound slider is dragged to 0 or is muted accidentally. It might happen due to unintentional press on a wrong key or use of invalid keyboard shortcuts. The troubleshoot is much simple,
- Click the Volume icon from the taskbar.
- just check the volume slider in the system tray or a mute sign on the volume icon.
- Play a video or audio file from the computer to check the sound level in the player.
- Adjust if necessary from there as well, and this will be helpful to see the speaker is working properly or not.
- Try tapping the button on the keyboard if there is a mute key identified.
- You can also have a multimedia style keyboard, check the playback control buttons on top.
- There are dedicated button or volume controlling knobs in the external speaker as well. Rotate it clockwise or anticlockwise to adjust, increasing the volume will inhibit the mute in all sorts of external speakers.
Way-2: Ensure correct playback device
If there are multiple audio devices connected to your machine, there is a possibility that output sound is going somewhere else. Therefore it is very much essential to ensure the correct output device in order to fix the external speakers is not working in Windows 11. To ensure the correct audio device, follow the guidelines –
- Press – Windows + I.
- When Settings app appears with System windows opened, move to its right pane.
- Click – Sound.
- Locate Speakers present under Output arena and select the same.
- On the next page, you will see the selected audio device.
- If that’s not the one you opt to choose, select the correct one from the available list.
Way-3: Check the connection
An external speaker comes with a built-in wired connection or Bluetooth which may cause trouble. Sometimes, the wired connection needs to be set in a headphone jack or USB port. Checking connection is also very effective troubleshoot to fix any external Speakers issues in Windows 11. A traditional 3.5 mm jack may tear up easily and the audio out socket may be faulty as well. Try checking the connection by attaching the external speaker to another machine. In the same way, check the USB connections as well by exchanging the ports.
The desktop coming with sound cards is not always integrated with the motherboard. In that case, make sure the device is perfectly seated. Simply open the case and identify the sound card. You can find this usually in PCI or PCI-e slots. Check the LED light with the laptop powering up, it will be lit up if the card is properly attached. In case of using the front audio jack in the computer case, make sure this is internally connected with the sound card.
Way-4: Make sure to select HDMI Audio
Some of the High Definition displays don’t allow audio via HDMI cable although the connection is well supported. The situation may arise as such that, the video is running with no audio. In that case, try connecting an audio cable from the computer to its display. Make sure that, audio jack is properly connected to audio-in port of the display.
Ensure the HDMI audio is selected in Windows as well to get proper output from the external speaker. For that, follow the below steps –
- Press – Win+I.
- Select – Accessibility on the left.
- Choose – Audio from the right.
- Click – Sounds present beneath Related settings area.
- Move down to Advanced arena and hit – More sound settings.
- Doing so will bring a new window with Playback tab opened.
- If a HDMI cable is connected to the computer, you must see Digital Output Device (HDMI) in there.
- Select this from the bottom and click – Set Default button.
The Audio must play via HDMI now.
Way-5: Update Audio Drivers in Windows 11
In most cases, only driver incompatibility is solely responsible for causing trouble with hardware peripheral like speaker. If external speakers not Working in Windows 11 occurs, the prime suspect must be an outdated audio driver. Primarily, the drivers are components for maintaining the communication between software and hardware devices. They control the data flow and the nature of the operation once in the service. Outdated drivers cannot perform as they should be and that’s the reason, hardware devices run in trouble.
Windows 11 has been adorned with Device Manager with which, you can easily troubleshoot a specific driver. Updating it automatically from the manufacturer’s web page or installing a current driver manually is next to hand. Follow the below guidelines to update the Audio driver –
- Press – Windows + X.
- From Power user menu, choose – Device Manager.
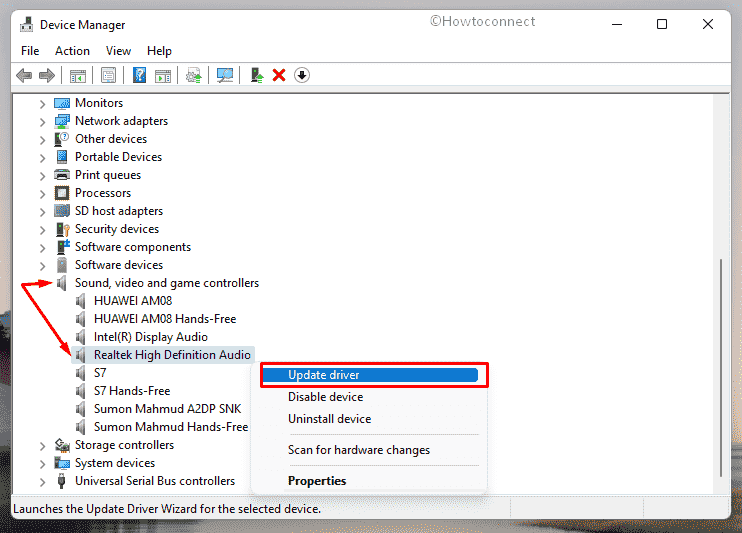
- Locate – Sound, video, and game controllers.
- Double-click on it to expand the same.
- Right-click the audio driver of your computer.
- Select – Update driver.
- Click – Search automatically for drivers.
- Follow on-screen instructions if any.
- When the system finds an update available, it will be downloaded and installed automatically.
- Do this for all the audio devices individually.
- In case, external speakers not showing in playback devices, click View > Show hidden devices.
- After updating the driver successfully, restart your PC, and you may no longer face the issue.
Way-6: Reinstall Audio drivers
In most cases, outdated drivers play the most notorious role to bring hardware incompatibilities to a machine. However, we carry out an automatic updating of the selective driver and the issue is fixed easily. Not always, this thing will go so smoothly if the system is not facing more critical trouble. After getting a faulty update or installing a partially corrupted file, the system encounters massive issues. The reason is incomplete update files uploaded by software vendors on their official web page for security reasons and copyright issues. Once you select updating the drivers automatically, Windows will install those available ones.
If you couldn’t fix the external speakers not working in Windows 11 after updating the drivers, you have to uninstall the defective ones. You can simply roll back the update and get back to the previous state as well. All these options are available in the Device Manager app. Follow the below guidelines to re-install the driver or roll back the update –
- Right-click on Start button and select – Device Manager.
- Being moved to the dedicated window, look for – Sound, video, and game controllers.
- Double-click to expand the driver list.
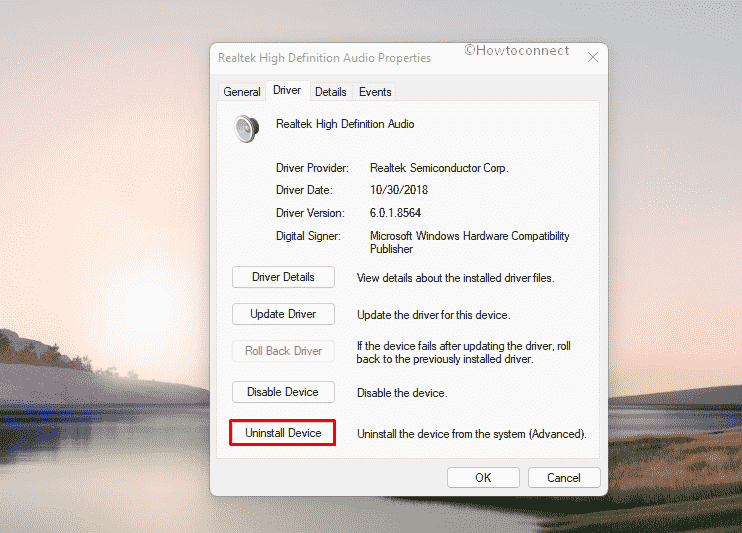
- Right-click your audio driver from the list.
- Select – Properties option.
- On the following popup window, enter into the – Driver tab.
- Click – Roll Back Driver option to bring back the former version.
- Restart Windows 11 and check if the external speaker is working perfectly.
If the issue still persists, uninstall the driver to check whether it helps. Steps are as followed –
- Imitate step 1-6 as described just above.
- From the Driver tab, click – Uninstall Device.
- If a pop-up appears for asking final consent, again hit – ‘Uninstall’.
- Restart the device.
- When the system powers up, default version of uninstalled driver will get installed automatically.
Way-7: Update Windows 11
Outdated Windows operating system lacks so many necessary functionalities which might be controlling the smooth operation. This is the reason, Microsoft delivers cumulative update patches, insider builds, firmware updates, security patches. All these files are compact sources of the most recent tools, UI modifications, and fixes of bugs.
On the contrary, an outdated operating system can easily encounter unexpected troubles. Many users have come up with a solution that, external speakers not working on laptop is fixed by installing a patch of the OS. You can easily install this update from Settings ensuring a stable internet connection with the machine. Having done that, follow the guidelines –
- Press Windows key and click – Settings.
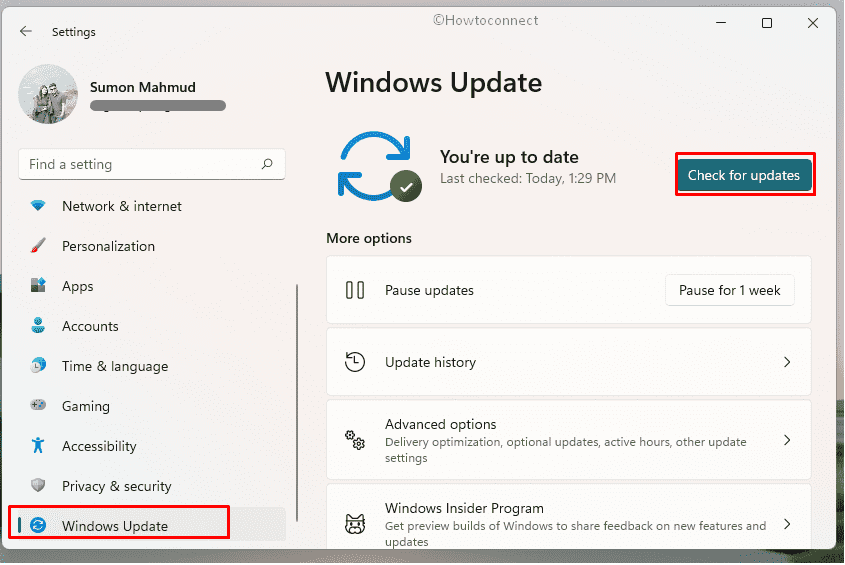
- Select – Windows Update.
- Move to the right-hand side.
- Click – Check for Updates.
- If there is a stable internet connection, Windows will start looking if any pending patch is available.
- Downloading followed by Installation will take place automatically.
- To make the installation complete, restart the PC when asked.
Way-8: Disable Audio enhancements
Oftentimes, people encounter external speakers not working in Windows 11 issues if they have audio enhancements enabled in the system. To get rid of that, disable the audio enhancements once sensing trouble. Follow the way –
- Click the search icon from taskbar.
- Type – control panel.
- Hit – Enter.
- Click View by on Control panel and set to Small icons.
- Next, click – Sound.
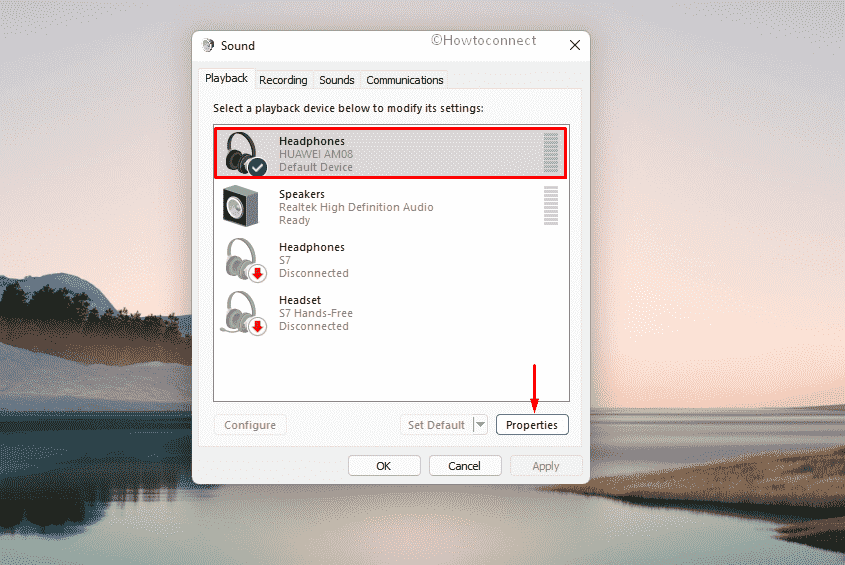
- When the popup opens, be in the Playback tab.
- Select the default speaker and click – Properties.
- Move to the Enhancements tab.
- Check the box set before Disable all enhancements.
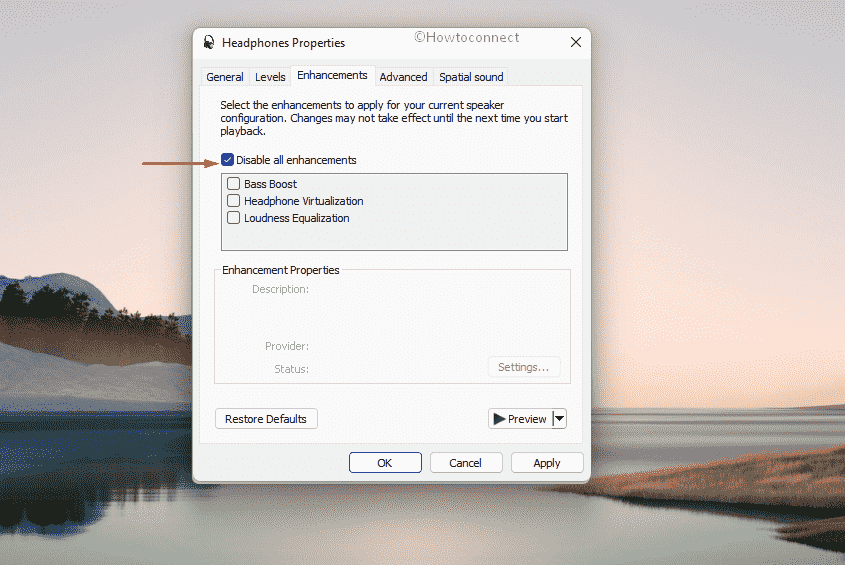
- Click Apply and then OK button to make the changes effective.
Sometimes you could not find your device, in this case, see – Fix Input and Output audio devices missing in Sound settings.
Way-9: Uninstall the last installed patch
A lot of people have come across external speakers problem after they have installed a patch in the Operating System. One thing is pretty clear from here that is, the rollout is having contradiction with specific drivers. In the end, hardware peripherals are getting trouble like connectivity issues or speaker not working.
If you are having the same issue after installing an update file, uninstall that specific one. You might be afraid of uninstalling an update but, Windows 11 has a smooth way of removing a patch without making slightest changes to the system.
- Press – Windows + R.
- In the Run dialog box, type – appwiz.cpl.
- Click –OK.
- Select – View installed updates.
- Once in the Microsoft Windows section, select the most recent patch you received.
- Click – Uninstall present on the top ribbon.
- Follow the on-screen guidelines to complete uninstalling this update.
- Restart Windows once the removal process is done.
- Check if the external speaker is working normally now.
Way-10: Run the Windows Audio troubleshooter
Troubleshooters in Windows have opened a new era of fixing the evolved issues in the Operating System using default resources. With the new patches coming in, a good deal of them is getting added. If you are having external speaker issue in Windows 11, simply run the default Audio troubleshooter. The tool after being activated, will automatically detect the trouble and fix them immediately. Follow the below guidelines to run this utility –
- Press the Windows + I.
- Click – Troubleshoot from the right pane.
- Once found, select the same.
- Next, click – Other troubleshooters.
- Select – Run located next to Playing Audio option.
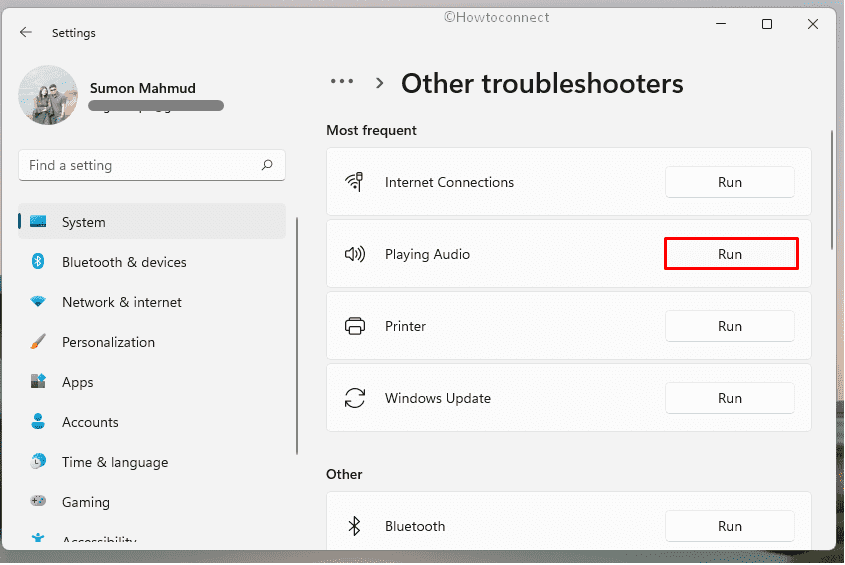
- This will run the audio troubleshooter. It will detect any problem with the audio device or driver and fix it for you.
- Meanwhile, follow on-screen instructions if any.
On many occasions, you may get a weird issue Sound Slowed down and Audio Distorted. Read this and follow the fixes there to resolve.
Way-11: Re-start Windows Audio service
Windows Audio service controls the audio input and output activities in the operating system. After running continuously, the service can be stopped automatically or end up getting issues. However, restarting the specific service will be a great relief if external speakers not working in Windows 11 problem happens.
- Press – Windows + S.
- Type in – services.
- Hit – Enter.
- In the services, search for Windows Audio.
- Right-click the same and then click – Restart.
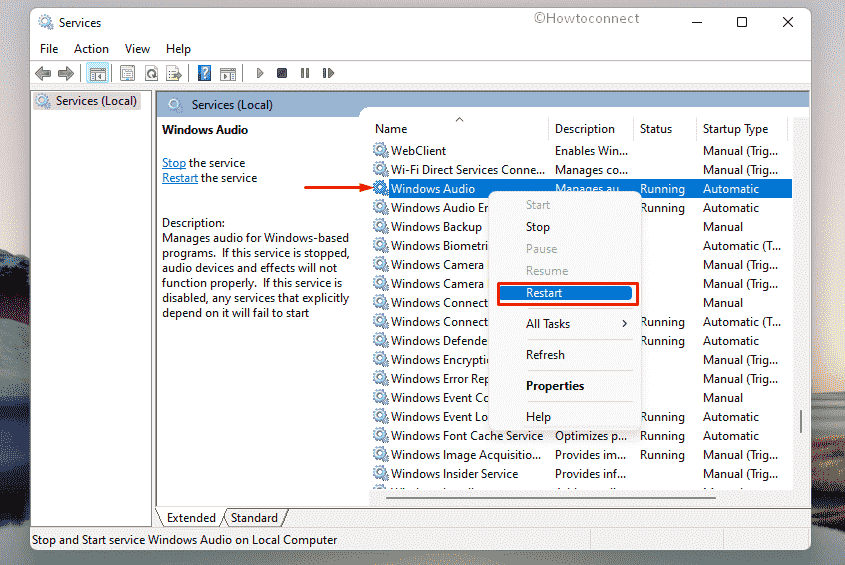
- After doing so, restart the Windows Audio Endpoint Builder and Remote Procedure Call in the same way.
Way-12: Uninstall third party antivirus suits
Some users report that Logitech speakers not working in Windows 11. All the fixes here are applicable also in that case. Malware is always in a hunt to breach the security of a system and cause damage to it. These are strongly coded programs that can sneak through the security layer and stay in the system under veil. Users cannot identify them and later on the bugs damages the system components. Spyware and adware from internet can steal your sensitive information and cause severe harm.
Using an antivirus solution with the device is a dire need now a days to strengthen the security system. Windows 11 comes with a built-in security system which is by far the best one. However, some people want to have secondary protection and install third-party anti-virus suits. These programs can often inhibit few services that affect the hardware peripherals. If you are using a third-party anti-malware program and encountering external speakers not working in Windows 11, uninstall that straightway.
- Press – Windows key.
- Type in – appwiz.cpl.
- Hit – Enter.
- Look for the third-party antimalware program installed on your PC.
- Right-click the same and choose – Uninstall.
- Comply with further instructions to complete removing process.
- Reboot the PC and check for the issue.
Way-13: Perform System Restore
Oftentimes Windows operating system indulges in critical trouble and the issue can not be fixed easily. At times it seems that no specific troubleshooting is actually helpful to resolve the error. However, there is yet one simple trick that can bring relief. Talking about performing System Restore which leads the system to a previous point where the device was stable.
It can easily head back to such a state of the OS where there was no error. This is how you can also fix external speakers not working in Windows 11. Here is how to perform the system restore –
- Press – Windows key and R together.
- In the Run dialog box, type – rstrui.
- Click – OK to proceed on.
- When System restore wizard turns up, click the option – Choose a different restore point.
- Select – Next.
- Click the checkbox present before – Show more restore points.
- Choose the most recent one and then click – “Next”.
- To start the restoring process, click – Finish.
Methods list:
Way-1: Check the Audio volume
Way-2: Ensure correct playback device
Way-3: Check the connection
Way-4: Make sure to select HDMI Audio
Way-5: Update Audio drivers in Windows 11
Way-6: Reinstall Audio drivers
Way-7: Update Windows 11
Way-8: Disable Audio enhancements
Way-9: Uninstall the last installed patch
Way-10: Run the Windows Audio troubleshooter
Way-11: Re-start Windows Audio service
Way-12: Uninstall third party antivirus suits
Way-13: Perform System Restore
That’s all!!
