When you try to activate the system after installing Windows, error code 0x80072f8f may evolve. This issue usually arises when the computer fails to connect to the online activation service. The error indicates that the settings in your computer were found to have been invalid during the verification. According to Microsoft, such scenarios occur because of security issues. In addition, unstable internet connections, high traffic in dedicated servers, and ingenuine product keys can cause the same. If so, the fatal code will go away automatically after some time or a performing a system reboot.
Unfortunately, Windows activation error code 0x80072f8f often keeps triggering time and again no matter how many times you reboot the system or retry the process. When the error code appears you may come across a message, “a problem occurred when windows tried to activate 0x80072f8f”. The prime reason behind this security error could be incorrect time and date settings, as well as the timezone settings. When the time set on your Windows machine does not match the time on the activation servers, they block your access moreover come up with unexpected error codes. However, there might be other reasons too that trigger error 0x80072f8f such as corrupted DLL files, invalid proxy settings, SSL certificate error, and misjudging of Windows Firewall.
Windows activation error code 0x80072f8f
Here is how to fix Windows activation error code 0x80072f8f –
Way-1: Correct Date and Time settings
Majority of cases are evident that error 0x80072f8f occurs when the Date and Time settings are incorrect. Such a thing happens when you would change the time zone for the sake of traveling. Another reason can be the device is switched off for a long time due to the battery being fully drained out.
Before attempting to carry out Windows 10 activation, checking Date and Time is necessary to opt out errors and issues coming in the way. If it is found incorrect or the time zone has been changed, follow the below instructions and adjust the settings –
- Press – Windows + R.
- In the command box, type – control.
- Hit – Enter.
- Make sure the View by option of Control Panel is set to Category.
- Click – Clock and Region.
- From the right pane, select – Date and Time.
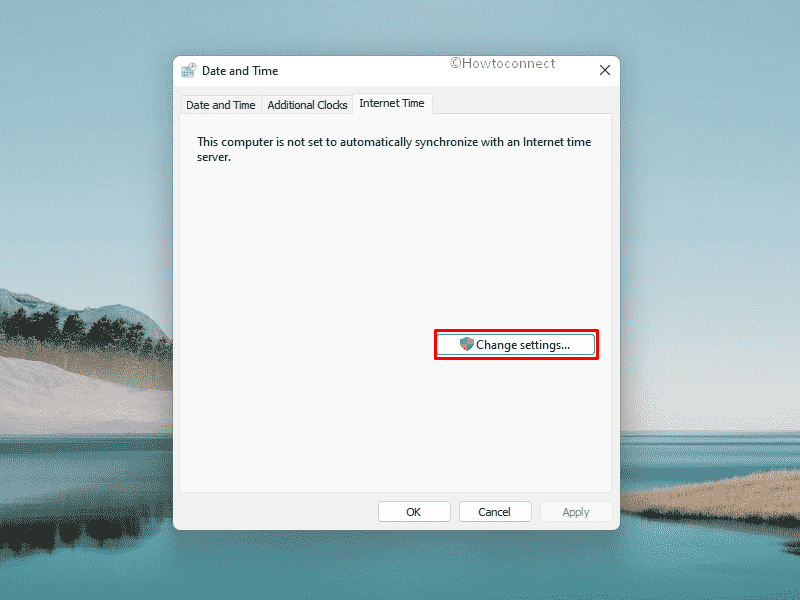
- After shifting to the new wizard, shift to Internet Time tab.
- Click – Change settings.
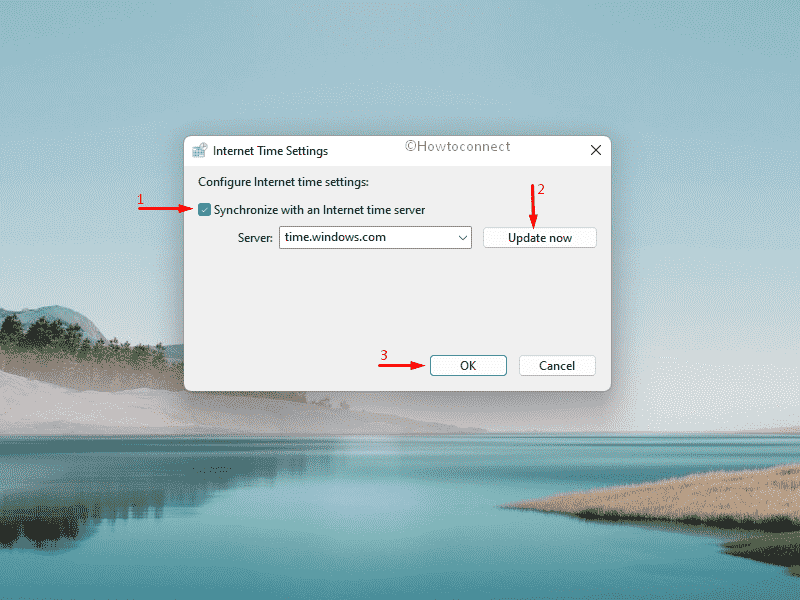
- Select the checkbox set by the side of Synchronize with an Internet time server.
- Click – Update now.
- Finally, hit – OK to save the changes.
Way-2: Change Date and Time Settings for Windows RT
While working with Windows RT, you may also encounter Windows activation error code 0x80072f8f due to incorrect Date and Time Settings. If you have changed the Time zone, the device often fails to adjust those settings automatically and errors occur. However, follow the below steps to correct Date and Time Settings for Windows RT –
- Open Run Dialog box.
- In the command box, insert – timedate.cpl.
- Hit – Enter.
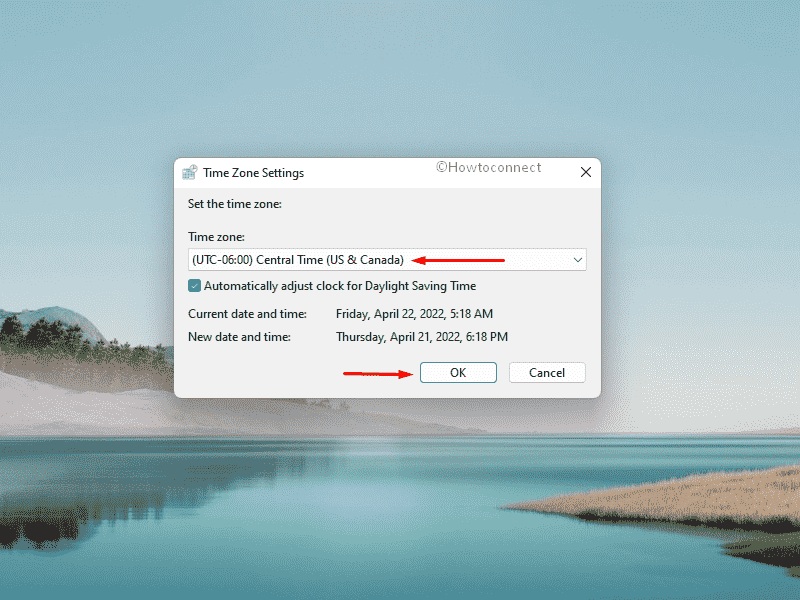
- From the newly appeared wizard, click – Change time zone.
- Set the Time zone to Central Time (US & Canada).
- To save the change, click – OK.
- After getting back into the Date and Time wizard, hit Apply button followed by OK.
Way-3: Reset your TCP/IP Stack
- Press – Windows + S.
- Type – cmd.exe.
- From the appearing flyout, choose – Run as administrator.
- When User Account Control shows up, click – Yes.
- In the elevated Command Prompt, inset the below lines one by one and hit Enter after each –
ipconfig /flushdns

nbtstat -R

nbtstat -RR

netsh int reset all

netsh int ip reset

netsh winsock reset
Way-4: Disable Windows Firewall temporarily
Windows Firewall is a built-in program in the system which is intended to filter all the incoming data coming from the internet. In the meantime, the application will block the potentially harmful and suspicious threats coming to the device. This is a much-needed utility in Windows as the same would keep the system safe, and protected from various malicious invaders.
Due to the safety of the device, the application is a pre-enabled feature in Windows computers. Oftentimes it works so precisely that, even installer files seem suspicious to the program and eventually are blocked. As a result, you may come across error code 0x80072f8f while trying to activate the Windows. Therefore, disable Windows Firewall temporarily and see if it helps. Once done, make sure the Windows Firewall is enabled again to ensure the safety of the OS.
- Press – Win+R.
- In the Run command, insert – control firewall.cpl.
- Click – OK.
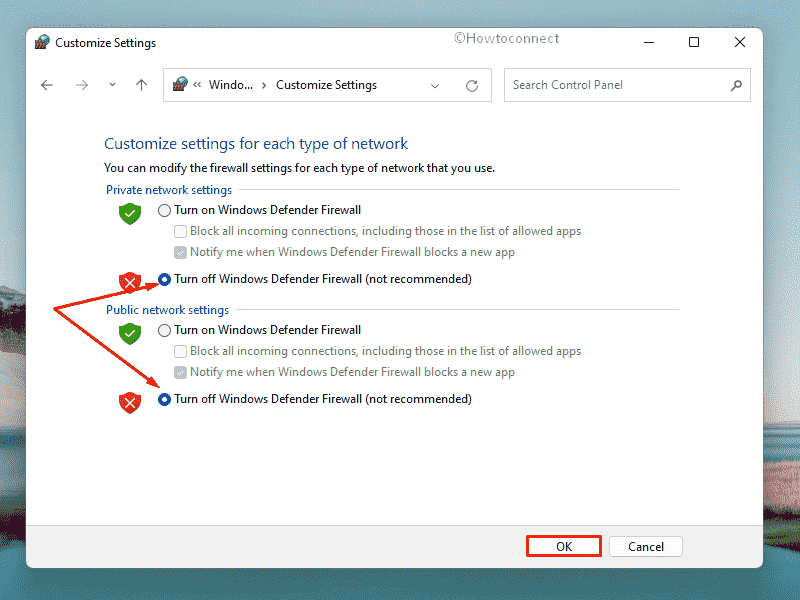
- Select – Turn Windows Defender Firewall on or off.
- Check the radio button present before Turn off Windows Defender Firewall for both Private and Public network settings.
- Finally, click – OK.
Way-5: Re-register DLL files
Dynamic Link Library (.DLL) files in Windows helps in boosting code modularization, efficient memory usage, code refuse, and reduction of disk space. As a result of these components, the system loads faster, perform effectively, and occupy low space in the disk. However, when the DLL files are corrupted, Windows may act abnormally especially while activating the system. Therefore, re-register the DLL files if having Windows activation error code 0x80072f8f. To do so, follow the way –
- Click search icon from taskbar.
- Type – cmd.
- Press – Ctrl+Shift+Enter.
- Execute the below commands one after another –
regsvr32 softpub.dll /s

regsvr32 wintrust.dll /s

regsvr32 initpki.dll /s

regsvr32 mssip32.dll /s
Way-6: Tweak MediaBootInstall registry key
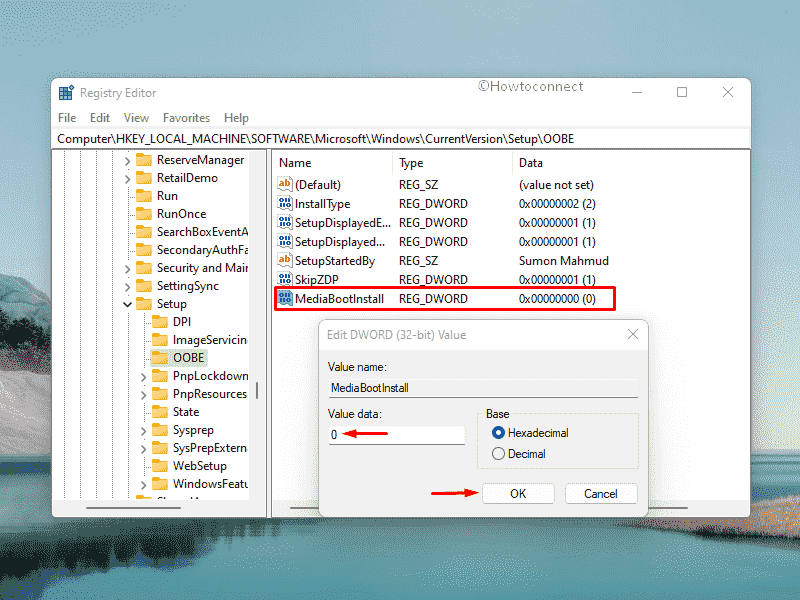
Tweaking Windows Registry can bring relief when you are having trouble with Windows activation error code 0x80072f8f. Simply changing the value of MediaBootInstall registry key 1 to 0 will fix the issue.
Tweaking Windows Registry is a critical task and needs the expertise to accomplish without making additional trouble. Therefore, it’s a dire necessity to create a backup of important data so that you can recover if something goes wrong. Having done so, follow the below guidelines to tweak the registry key –
- Right-click on Start button.
- Choose – Run.
- In the command box, type – regedit.
- Hit – Enter.
- For appearing User Account Control, click – Yes.
- Once on the Registry Editor, navigate to the following directory –
HKEY_LOCAL_MACHINE/Software/Microsoft/Windows/CurrentVersion/Setup/OOBE
- From the right pane, double-click – MediaBootInstall DWORD key.
- Put 0 in the Value data box.
- Click – OK.
- Close Registry Editor.
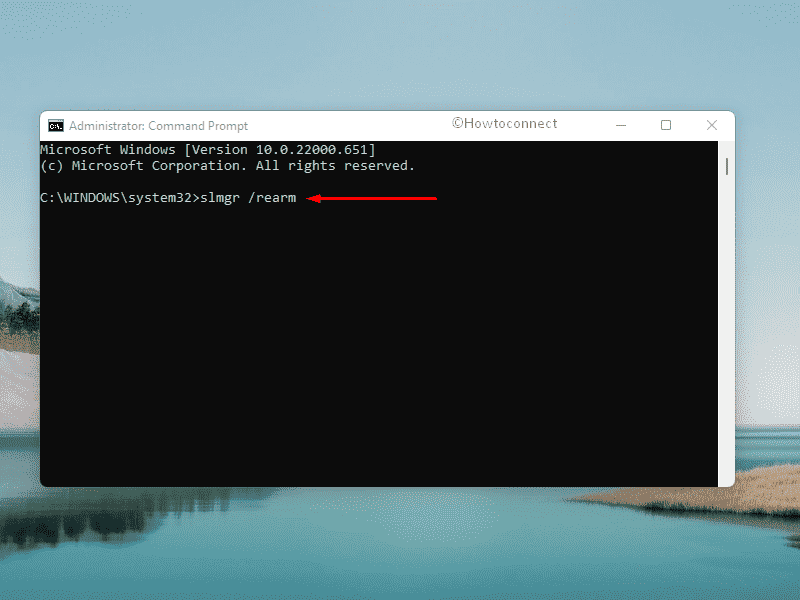
- Now, open Command Prompt as administrator.
- In the appearing window, insert – slmgr /rearm and then press – Enter.
- Click – OK when the pop-up appears saying successful execution.
- After that, reboot Windows.
Way-7: Install Root Certificate Update
If you are failed to activate Windows due to repeated occurrence of error code 0x80072f8f, installing Root Certificate might be helpful. This is basically a program provided by Microsoft that enables the trusted Root certificate and is automatically distributed to all Windows systems. Here is how to Install Root Certificate Update –
- Visit the official webpage of Microsoft Update Catalog.
- Click its search bar.
- Type in – Root certificate Update.
- Hit – Enter.
- When the result page appears, look for the compatible version.
- Click – Download present next to the one that matches your PC configuration.
- Once downloaded, double-click the setup file to initiate installation.
- Comply with on-screen instructions to complete the process.
Way-8: Activate Windows using Phone
Once the new installation of Windows is carried out or users upgrade the same to a new build, the system will prompt you to activate the system with a valid license key. After entering the key, the system sends the same to the server over the internet for validating it. There is a hiccup when the server bounces back the key instead of verifying it and Windows activation error code 0x80072f8f occurs.
If you are having a valid license key from a legitimate source, you can validate it alternatively in a pretty easy way. Using phone to activate Windows sounds amazing and you can do it using the below guidelines –
- Press – Win+R.
- In the command box, insert –Slui 4.
- Click – OK.
- From the next pop-up, select your country and then hit – Next.
- Call the toll-free number present on the screen.
- The automated phone system will give you a confirmation ID.
- Type the ID into the opened wizard and click – Activate.
See – 3 Proven Ways to Activate Windows 10.
Methods list:
Way-1: Correct Date and Time settings
Way-2: Change Date and Time Settings for Windows RT
Way-3: Reset your TCP/IP Stack
Way-4: Disable Windows Firewall temporarily
Way-5: Re-register DLL files
Way-6: Tweak MediaBootInstall registry key
Way-7: Install Root Certificate Update
Way-8: Activate Windows using Phone
That’s all!!
