Along with new features, quality improvements and bug fixes, Windows 10 21H1 might come with unwanted errors. Though Microsoft provides fixes for such problems in the following cumulative updates, you might not want to wait that long. To get rid of any issue caused by the recent update, you can downgrade, rollback, or uninstall Windows 10 21H1 right away.
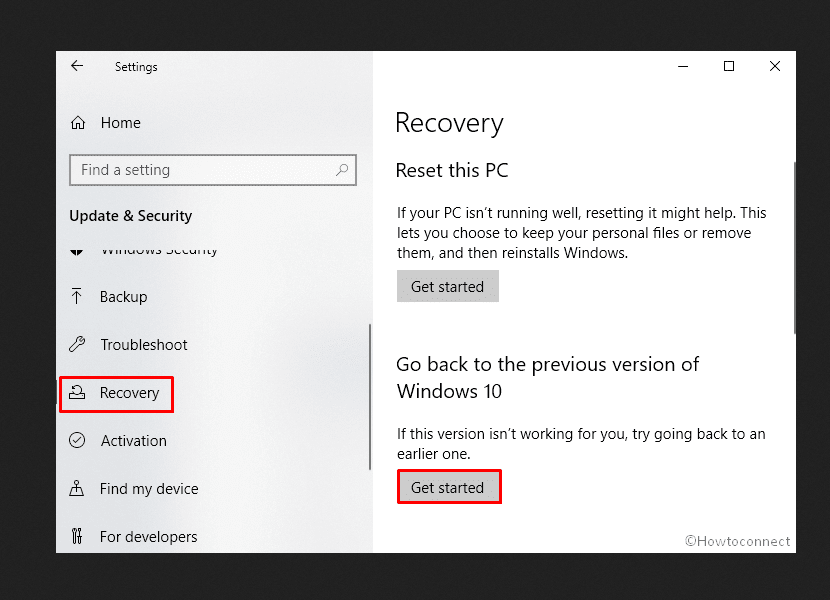
Windows 10 has a built-in setting named Recovery that lets a user roll back to the previous version within a certain period of time since installation. By default, you can restore earlier build within 10 days after installing the new update but it can be extended to 60 days. Once the time exceeds, the OS automatically removes Windows.old folder as well as the option to downgrade the current version. In such a case, you will have to uninstall the KB version manually.
Uninstall Windows 10 21H1
Here is how to Rollback or uninstall Windows 10 21H1 –
1] Uninstall latest Windows update from Program and features
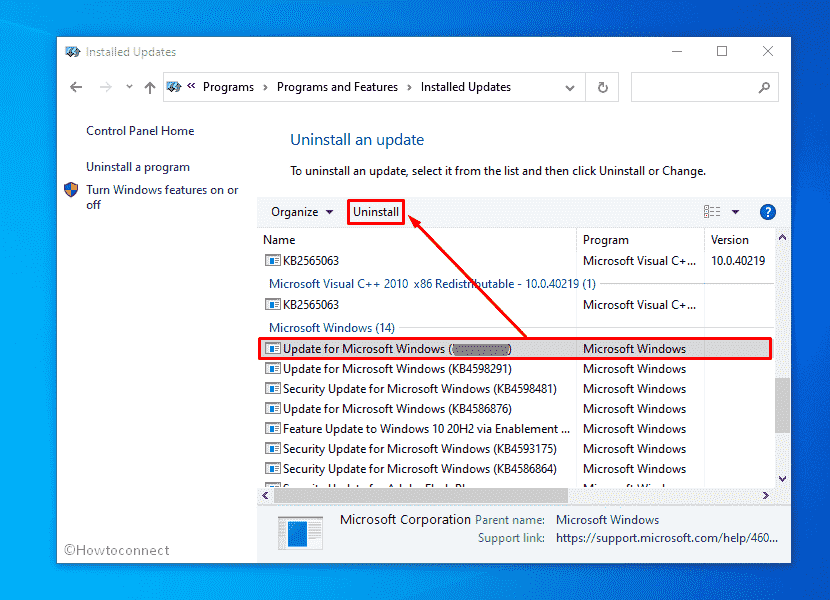
Every once in a while, you get a bad Windows update that is faulty and causes several issues in the system. Thankfully, you can restore the previous version and uninstall recent Windows 10 updates quite easily that too without any restrictions. The quickest way to do so is using the Program and Features hub. Process is as followed –
- Press – Windows+S.
- In the search bar, type – appwiz.cpl.
- Hit – Enter.
- From the left sidebar of Programs and Features window, click – View installed updates.
- Scroll down to reach – Microsoft Windows section.
- Select the KB version your system has received for Windows 10 21H1.
- From the top ribbon, click – Uninstall.

- Comply with on-screen instructions to finish the procedure.
2] Rollback Windows 10 21H1 using Recovery option
Even after installing a new Windows build, the system keeps antecedent update files in a folder as backup. As we said earlier, the system removes these items after a certain time period in order to free up space. Also, these files get wiped out when you use Disk cleanup tool to remove unnecessary files.
No matter how, if the system finds old Windows update files missing, the button that lets the system go back to the previous version will be grayed out. In such a case, you won’t be able to downgrade using the Recovery option. Let’s check if you are still eligible to go back to the previous version –
- Press – Windows+I on keyboard.
- Click – Update & Security.
- From the left column, select – Recovery.
- Click Get started present under Go back to the previous version of Windows 10 segment.

- Provide a reason for the rollback and click – Next.
- Keep clicking Next until restoring process starts.
3] Use cmd Command prompt to downgrade Windows 10 21H1
Another convenient way to uninstall Windows 10 21H1 is using Command Prompt. The process is super easy if you follow the below steps precisely.
- Click the search icon from the taskbar.
- Type in – cmd.
- Press – Ctrl+Shift+Enter.
- To approve User Account Control, click – Yes.
- In the Command Prompt, insert the following –
wmic qfe list brief /format:table
- Hit – Enter.
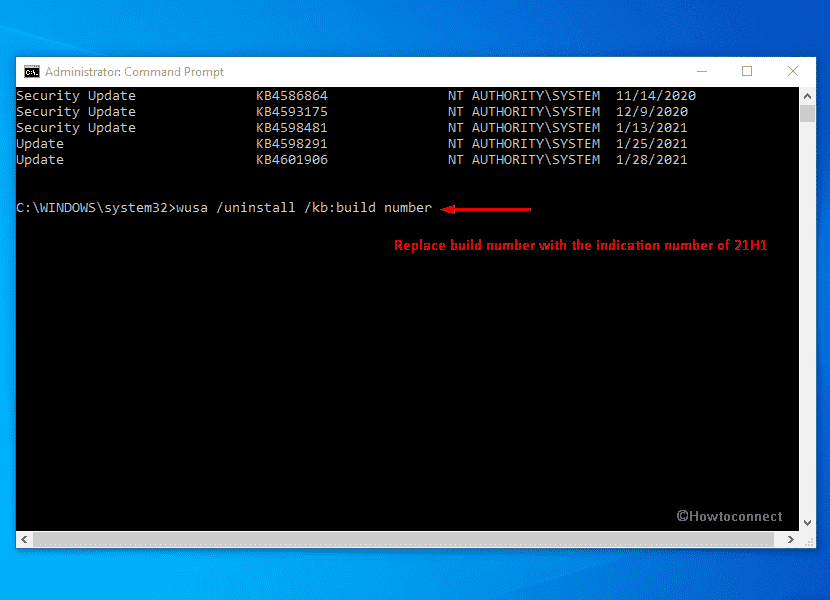
- When the list of all installed Windows update shows up, note down the build number of Windows 10 21H1.
- Now, execute the below command line in the same console –
wusa /uninstall /kb:build number

Note – Replace build number with the identification number you noted down earlier.
- To give final consent, press – Y key.
Methods list
1] Uninstall latest Windows update from Program and features
2] Roll back or uninstall Windows 10 21H1 using Recovery option
3] Make use of Command prompt to delete recent build
That’s all!!
