Black Screen of Death, previously known as Blue screen of Death, is the error on Windows 11 that occurs with system crash. The issue makes the system unable to restart or process a request which might be trapped in reboot loop further. Desktop freeze and hang are the most common symptoms of BSOD. Horror in the category of errors, the Windows 11 black screen error is a must to fix at the earliest possible.
The problem is a hard-to-solve that commonly appears due to outdated drivers, buggy updates, malware, and corrupt or missing system files like exe and dll. Well, you may wonder if the Windows 11 black screen error is one nagging issue but there are multiple solutions that you can try easily. However, sometimes the black screen of death can be easily fixed through a restart, SFC or DISM, clearing cache, driver update, and more.
Windows 11 Black Screen Error
Here is how to fix Windows 11 Black Screen of Death Error –
Way-1: Restart The computer
Restarting the system is one of the most common and prominent solutions to the majority of computer issues. There are chances when you start the system and some of the files or functions are not properly started causing the lagging or BSOD error. When you restart the computer it may give a fresh start to the app which was the main reason for the black screen in Windows 11.
If the computer is not booting to desktop then press the power button of your PC and hold for a few seconds. This will shut down the machine. Now power on by pressing the same hardware button.
But when the PC is booting to desktop then press Ctrl+Shift+Enter. Go to the lower right corner and click on the power icon. Select – Restart.
Way-2: Disconnect Unwanted Devices
Black Screen of Death Windows 11 error can be caused by having many peripheral devices connected to the PC. The devices may increase the load or its drivers may undergo conflicting with the system files or other programs to cause the problem. Therefore, if you get issues linked to system crashing with black screen, the best option to start with is to remove all additional devices and restart the computer. It will include external hard drives, USB devices, printers, copiers, scanners, additional monitors, and phones.
Once every peripheral is disconnected from the ports, reboot and check if your system loads normally. If you see that all is fine then find the specific device that was causing the black screen by connecting successively them and restarting your computer. Once spotted, update the device’s driver. You can follow the method from – How to update drivers in Windows 11.
Way-3: Uninstall Recent Updates
Windows 11 receives frequent updates, and when these are not completely prepared, errors occur. Incomplete updates can interfere with the system performance and cause lagging too. And if you are facing the Windows 11 black screen error, this might be one of the reasons. The steps that are required to be followed to uninstall the recent updates are as follows –
- Click Windows+I to open Settings.
- Click on – Windows Update.
- Select the – Update history.
- All the recent updates will be displayed in lists; move down and check them.
- Note the KB number of the update that has caused the issue.
- Uninstall updates is under Related Settings; click on it.
- On an additional window that appears, right click on the update (in the form of KB…)
- Select – Uninstall.
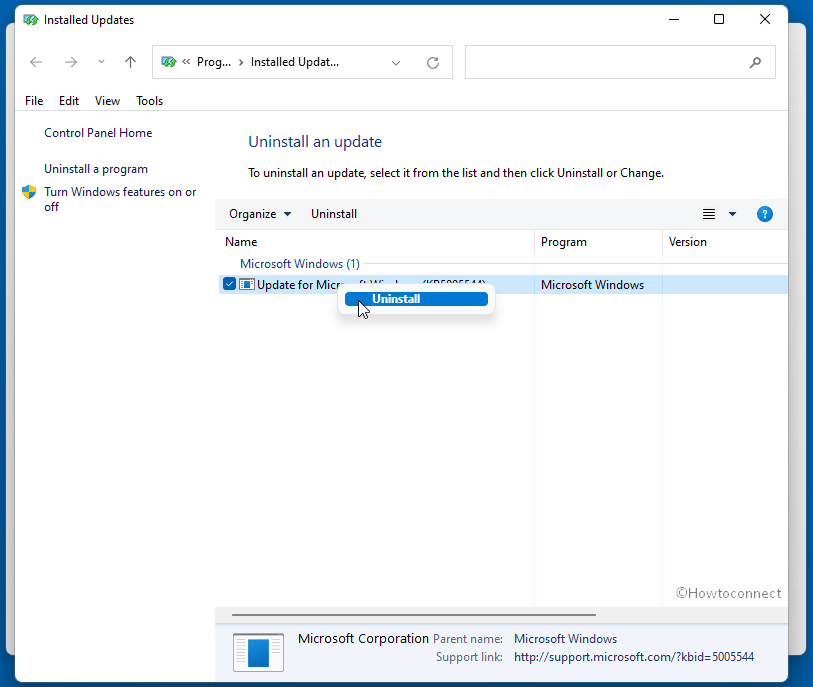
- Confirm if asked and follow the instructions.
- Reboot and check if the black screen (BSOD) is fixed.
Way-4: Update Device Drivers
Obsolete or bad device driver updates may also be a reason for Windows 11 “back screen of death” (BSOD) error. Furthermore, having an old driver incompatible with the system is bound to cause a system crash. So check all the software through Device Manager carefully and update them if needed. Keep in mind that the Display adapter is often a cause of this issue so update its driver on first priority.
- Right-click on Start.
- Select – Device Manager.
- It will display a list.
- Double click on the devices there to expand them.
- Check for drivers with Yellow marks.
- Right-click on one by one.
- Click – on Update drivers.
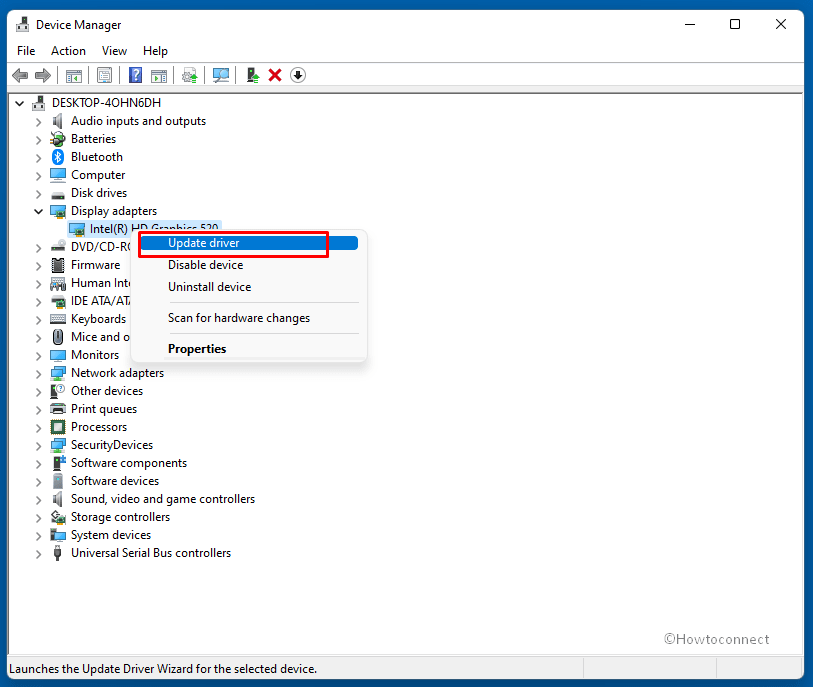
- Next, click on – Search automatically for drivers.
- Once done, restart the system.
Way-5: Rollback, Disable, Or Uninstall Device Drivers
Like the incomplete driver update, incompatible drivers installed via third parties sources can also lead to the Windows 11 black screen error. In such a situation, you would be required to roll back or disable the device driver to get rid of the bugcheck. Follow the steps below for completing the Rollback process –
- Press – Win+R.
- Type – devmgmt.msc.
- Once the Device Manager appears, double click on the device that is affecting your system.
- Right-click on the driver.
- Select – Properties.
- Click on the Driver tab.
- Select Roll Back Driver.
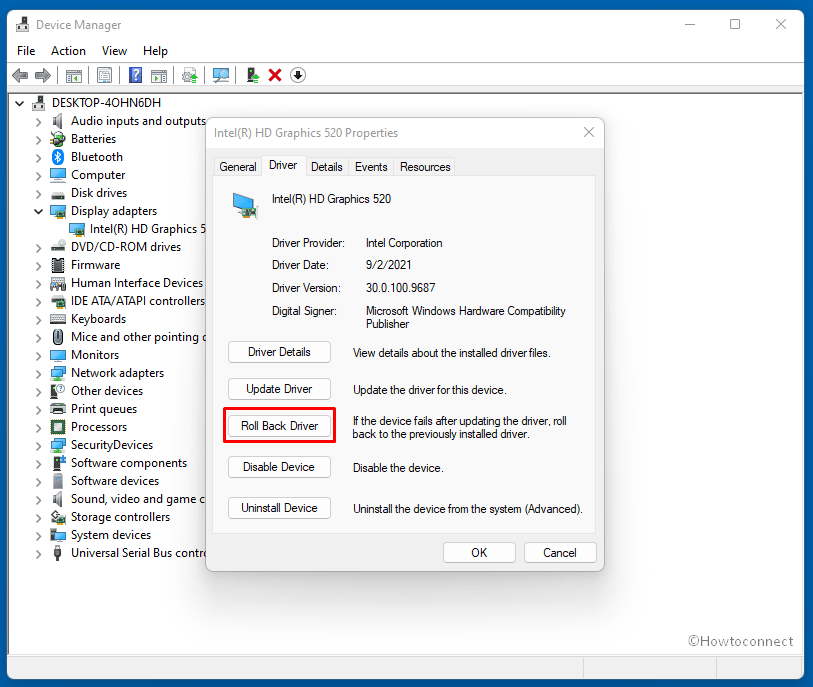
- You will come across a confirmation pop-up; check the reasonable option and click Yes.
- If the option is disabled, there are no previous driver updates to roll back.
- Reboot your PC and see if the issue is fixed or still persists.
In case the rollback is not available, it means that there is no one older app to retrieve. Therefore, you would be required to disable the device driver. It will stop the driver for that period of time allowing you to resolve the issue.
- Right click on the driver and select – Disable device.
- A prompt will be displayed.
- Click – Yes.
- Check once if the BSOD error is rectified.
If the Windows 11 black screen error still pertains, try uninstalling the device driver. It will delete the driver entirely, allowing the problem to be resolved at once.
- Select Uninstall Device from the right-click menu.
- Click ‘Uninstall’ on the prompt.
- Restart and check for the problem.
Way-6: Run Windows Memory Diagnostic
The system memory is responsible for storing data and providing the same when needed by the user. But a bad memory or, rather, a stuck RAM can cause an error while loading the system leading to Windows 11 black screen error. Additionally, if you have added a new RAM stick, it can be one of the reasons as well. In such circumstances, you would be required to run the memory test –
- Click Search icon from the taskbar.
- Type mdsched.exe.
- Select the option – “Restart now and check for problems (recommended)”.
- The computer will restart at once and run 2 tests successively.
- When completed, check if the problem is fixed.
- To view the log file, click the Start and type eventvwr.
- Select Event Viewer.
- Click on Windows Log.
- Double click on – System.
- Look for a recent – Memory Diagnostic file.
- Click on it to check the result.
Way-7: Run SFC scan
SFC is a powerful repairing tool that scans the entire system files to look for damaged or broken ones. When discovered, the utility replaces it with a functional version cache. In this way, the command line tool mends all the corrupted files in Windows helping to fix black screen error. Follow the guide below –
- Go to the Start Menu.
- Type – CMD.exe.
- Press – Control + Shift + Enter.
- Select Yes when UAC is prompted.
- This will launch command prompt as administrator.
- Type – SFC /scannow.
- Press – Enter.
- The System File Checker Tool will be activated now; wait for the scan to complete.
- After finished, restart the system.
- Check If the BSOD error is rectified.
Way-8: Use the DISM Command
Windows image, Windows Setup, and Windows Recovery Environment are all serviced and repaired using Deployment Image Servicing and Management aka DISM. Black Screen Error or BSOD in Windows 11 might occur due to malfunction in Windows image. Thankfully, the built-in DISM utility is capable of solving this system crash problem quite effectively. So, go along with the below steps –
- Open Command prompt as administrator using the steps in the previous method (Way-6)
- Type –
DISM /Online /Cleanup-Image /restorehealth. - Hit Enter and give some time for the process to complete.
- If the process fails, then copy-paste –
Repair-WindowsImage -Online –RestoreHealth. - Press Enter to activate the tool and let the execution of the command complete.
- At last, Restart the system and see if the BSOD error is solved.
Way-9: Check for Malware in System
Malware is a harmful tool in systems mostly originated by less trustworthy software downloaded from internet and external devices connected to the computer. When arrived the wicked codes mess up the entire registry, dll, and exe files to overpower the operating system. Consequently, any type of error including black screen of death may occur when malware enters your system. To fight the issue Windows 11 has a robust utility Microsoft Defender having so many modern functionalities so don’t worry but only run the tool.
- Press – Win+I.
- Click – Privacy & security.
- From the right pane, select Windows Security.
- Click on – Virus & threat protection.
- On prompt, click on Scan options.
- On the next page, check – “Full scan”.
- Click Scan now.
- The scanning will take a considerable amount of time (in hours) so sit back.
- The tool will notify you after the completion having the data that shows whether malware was was found or not.
- Follow the instructions to remove or quarantine the item.
Way-10: Run CHKDSK
The Windows 11 black screen error may also occur because of flaws in the disk. Any bad area in the disk doesn’t allow the system to perform normally and throws different types of errors. Fortunately, CHKDSK is the utility that checks volume for any problem and fixes them accordingly. Here are the guidelines –
- Click the windows search.
- Search for the CMD.
- Select – Run as administrator.
- Type – chkdsk /f /r.
- Click – enter
- Press Y to start the scan.
- Reboot the system once done
- It will resolve the error, and you will be able to use the system.
Way-11: Uninstall 3rd party antimalware or programs
When the built-in utilities are lacking you need to install third-party software to fulfill your need on Windows 11. But these programs engage in conflict with the Windows system elements if they are having low integrity. Suppose you have installed more than one antimalware then they will start conflicting with each other make your system super slow and originate some errors. Similar with the other programs; they may not be compatible with each other furthermore with the system files. So when you are undergoing black screen of death error you must uninstall them to check whether they are giving rise to the issue. Move with the steps here –
- Right-click on Start.
- Select – Settings.
- Click – Apps.
- Next, click on – Apps & features.
- From the list of all installed apps check the ones that are not displaying Microsoft Corporation below its name.
- Click on 3 vertical dots for that apps and select Uninstall.
- Confirm the pop up and follow the onscreen guidelines.

- Restart the PC and check if the black screen error no longer occurs.
Way-12: Install the most recent Windows update
If the black screen or bugcheck is officially confirmed Microsoft will certainly push a resolution via a small update whether it is LCU or other. So, this method is pretty useful when you are struggling with the issue because of bugs via a release. By the way, regular checking and installing Windows updates is also among the good habits of windows users.
- Click on the taskbar Search.
- Type updates.
- Press Enter.
- Next, click the – Check for updates.
Way-13: Run Disk cleanup
Disk cleanup is a classic tool in Windows 11 that will free up space by wiping out junk and unwanted and unnecessary data as well. This way, if the black screen has occurred because of no room in the disk drive then it will be resolved automatically. Move along with the instructions –
- Press Windows + R keys.
- Type – cleanmgr.exe.
- Hit – Enter.
- Select (C:) and click OK.
- On the Disk Cleanup for (C:) window, click – Cleanup system files.
- Again choose the ‘(C:)’ and “OK”.
- On the final window, select the options under File to delete.
- Click – ‘OK’.
- On the confirmation prompt, click – Delete.
Way-14: Update BIOS
Sometimes, BIOS (basic input/output system) causes the black screen error in Windows 11. Since System requirements of Windows 11 include several modern functionalities therefore manufacturers are updating the BIOS on higher priority to meet with them. Laptops and desktops of the company hung behind are the sufferer of various issues including black screen error. So you need to update BIOS using the below guidelines –
- Go to the official website of the manufacturer of the computer.
- Explore driver and software page.
- Find and download the BIOS update and manually install it on your PC.
Way-15: Use Bluescreenview to check the cause
BlueScreenView is a handy utility to scan the minidump files prepared during the occurrence of black screen of death (BSOD) crashes and shows the details of them in a table. The tool shows the minidump file name, important information about the crash, date and time, and the info of the driver or module that possibly caused it. To see the Windows 11 black screen error log you can get the tool from the link –
Way-16: Run The System Restore Option
The old tool System restore is proved pretty useful to fix Black screen of death error. This method works like wonder if a restore point has been created before the occurrence of Black screen. Sometimes, when updates are not properly installed, you have run a third-party program or made some changes in settings Windows 11 BSOD happens. In the current version, the restore point is not created itself, however, you can try using the procedures here for the same – How to Schedule System Restore Point to Create at Startup. In case of an install failure, data corruption, or any other anomaly you can restore a system and avoid reinstalling the operating system.
- Press Windows and S keys simultaneously.
- Type in rstrui.
- Hit the – Enter.
- A wizard for System Restore will prompt up.
- Check the option – Choose a different restore point and click – Next.
- Click on “Show more restore point”.
- Now select the one that is suitable for your computer and again click on Next
- Click on Finish.
- The restoration process will consume a big amount of time approx (2 hours or more in some cases) so don’t be upset.
Way-17: Boot In Safe Mode
When Windows 11 Black screen of death is rigid and not getting solved easily boot into safe mode may effectively help you. This method loads only basic drivers and apps so that there may not be interference of external devices or third-party software. This way, you become able to recognize the actual reason for the issue and remove it successfully. Follow the steps –
- Press – Win+R.
- Run box will open; type – MSConfig.
- Hit the enter key.
- The System Configuration window will open.
- Click on – Boot Tab.
- Check the – Safe Boot option.
- Select – Minimal (this may be automatically selected)
- Click on Apply then on OK.
- Select – Restart.
- Now your system should be working perfectly without encountering a crash. After coming back to normal mode you can check the real culprit.
Still, you are unable to fix the black screen of death, don’t be hopeless, follow this guide – How to Reinstall Windows 11 without losing data.
Methods list:
Way-1: Restart The computer
Way-2: Disconnect Unwanted Devices
Way-3: Uninstall Recent Updates
Way-4: Update Device Drivers
Way-5: Rollback, Disable, Or Uninstall Device Drivers
Way-6: Run Windows Memory Diagnostic
Way-7: Run SFC scan
Way-8: Use the DISM Command
Way-9: Check for Malware in System
Way-10: Run CHKDSK
Way-11: Uninstall 3rd party antimalware or programs
Way-12: Install the most recent Windows update
Way-13: Run Disk cleanup
Way-14: Update BIOS
Way-15: Use Bluescreenview to check the cause
Way-16: Run The System Restore Option
Way-17: Boot In Safe Mode
That’s All!!